

A beautiful expressive collar makes any cardigan, blouse or sweater elegant and unique. Knitting collars yourself is a very exciting activity, and this is not at all difficult if you follow the scheme and recommendations of experienced craftsmen.
Content
A knitted collar can be used as a decorative element, or can serve to maintain the throat and neck in the warmth. Consider both options in different interpretations.
How to tie a simple collar "bells"
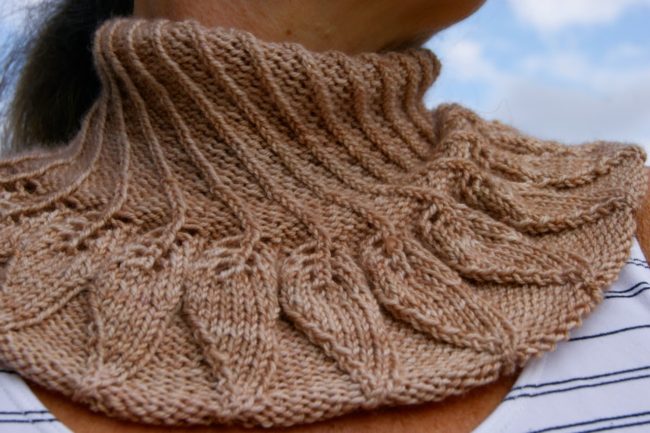
- We take 100 g of yarn and knitting needles No. 1.5. We collect 150 loops quite freely. We knit each even row with the wrong loops. In the 19th row, 1 loop is knitted along with a crum loop.
- In the number of number 37 in the last rapport, we knit 1 of the Locals of 2 loops. In the 47th row in the last rapport we knit from 3 loops 2 with an inclination to the right. We finish the product with a viscous crochet No. 2. To do this, we capture 4 loops together, including the hem, make 12 air loops, then capture the loops through the rapport: 4, 3, 4, 3, 4, 5, 4, 3, 4, 5, 4, 4, 4, 4 5.
- Between the indicated loops we knit 12 air loops. In order for the collar to look spectacular, you need to treat it with starch and dried, while straightening the patterns.
How to tie the collar "polo"
Knitted collars on sweaters, sweaters and cardigans, which are unbuttoned all the time, must be made flawlessly on both sides.
How to knit a “polo” collar, 1 option
- The edge of the fastener on shortened sides and the edges of the neck will be tied with hook (1 row of SBN). At the beginning and at the end of crochet in the rounding zones, the number of columns should be equal.
- We type loops on circular knitting needles, starting from the center of the left bar of the fastener. Of all the SBN, we knit 1 front loop. After each 3 and 4 loops, we make a cloak to dial the desired number of loops to create an elastic band.
- In the next row, we knit 1 front and 1 wrong loops alternately. The crochet necessary for the pattern is carried out by a crossed front or wrong loop. Then we move according to the scheme and at the end of the canvas we close the loops.
How to knit a “polo” collar, 2 option
- This collar is made similarly to 1 option. The hem of the fastener and the edge of the cut is tied with hook.
- On circular knitting needles, we type loops from the right bar to the left. Then we knit the elastic band. From 3 rows after 3 loops and in front of 3 loop from the end, add 1 crossed front loop. In the 7th row, we similarly add 1 wrong crossed loop. Then we add the loops in this way in every 4 row, and at the end of the knitting we close the loop.
How to tie a collar. Knitting schemes with knitting needles
Modern clothing design offers a great many forms of manufacturing products with a large and small collar. Almost every form can be tied with knitting needles and most of the beginner is not at all difficult to perform. Consider several variations.
How to tie the collar "Lucien"
- To create this product, we take 20 g of yarn and knitting needles No. 3. The collar width will be 8.5 cm, and the length will be 42 cm. We will start the mating from the edge, for which we collect 43 loops.
- Pay attention to the scheme again. It depicts all the loops from the front. But it should be borne in mind that we will knit the front loops of 4 rows from the inside, that is, the wrong loops.
- The 2nd row is indicated on the diagram by the facial pattern. But for the formation of the scar, we knit 1 row with the wrong loops. Having knitted 23 rows, 10 loops remain on the knitting needles. 24 row and the last 2 rows we knit 1x1 with an elastic band. To do this, select knitting needles with a smaller diameter.
How to knit a golf collar
- A similar collar and a box can be tied separately, and then attached to the neck. In circular knitting needles we type the right number of loops, a multiple of 4, and knit in a circle. We perform a 2x2 gum pattern.
- When the width of the canvas reaches the optimal level, we knit another 2 row with the front and cover the loops with a thread of a different color.
- We make seams on the shoulders. We lay the front part and the rear on the substrate in one layer, apply the collar to the edge of the neck and fasten it with pins. Rounded at the end of the needle we fit the part.
- Then we dissolve the first 2 hinges of the gate, with a needle from the lower edge to the upper, we pierce the edge of the neck, and pull it through the 2 loop of the collar into 1 loop, performing the capture of the neck of the neck from the lower part to the upper and leading through it.
- It turns out that the needle is passed through the previous loop and the edge of the cutout is captured. Thus we sew all the loops.
How to knit a “square” collar
We knit this collar, gaining the loops of the back, front and 2 sleeves. We knit 1x1 with an elastic band, while reducing 1 loop in each row. At your discretion, you can reduce the loops in every 2 row. When the height of the product reaches the optimal value, we close the loops.
How to knit a V-shaped collar
- When it is connected in front of the pulver, we perform a set of loops around the neck behind 3 knitting needles, starting on the left. We mark the loop in the middle of the cut. We knit in a circle of about 3 cm, we knit from 3 loops 1 on the left and symmetrically to the right of the center.
- We knit the bar of the optimal height and close the knitting.
How to tie a collar in "rhombes"
- For this product, 50 grams of yarn and several types of spokes are useful to us: 3.25, 3.5 and 4 mm. The width of the collar will be 14 cm. We decorate the finished thing with a flower, which we need to hook.
- We will start knitting from the neck. To do this, we type 114 loops on the knitting needles 3.25. We knit 12 rows with a patch pattern. Next, go to the knitting needles 3.5 mm. We knit several parts of the collar separately.
- On each side, we separate 7 loops and knit the finish with a plate pattern. We use the central group of loops to create rapports indicated in the diagram.
- There is one feature on the Asian schemes: they usually show all rows for knitting on the knitting needles. The central part of the collar consists of 25 rows. In the center of the rhombus there will be a small bump, which we will crocheted.
- In the next row of crochet along the edge of the rapport, we will perform crossed loops so that there are no holes. After that, we switch to knitting needles No. 4. We perform the lower box with a platoon pattern, connecting 16 rows.
- After that, we freely close the loops. For a fastener, we knit a crochet decoration in the form of a flower of 2 levels. The 1st level in the form of a circumference is performed with columns without crochet, leading behind the back. At the 2nd level, we tie the circle along the loops of the 1st level.
- On the wrong side, we fix the pin with which we will fasten the brooch, and in the center of the jewelry we place the bead.
How to tie a collar with a double stand
- Knitted collars with a persistent are often performed for sweaters and cardigans, and they are suitable for both male models and women. The stack holds the shape well and looks well -groomed, as its setting edge is hidden under the lapel.
- You need to perform a set of loops from the front side of the collar from the center of the clasp. In the place where the edge of the neck is rounded, from 2 sides the number of loops should be the same, and the total number of loops should correspond to the aligned neck without tightness.
- The number of loops for such a product should be a multiple of 4 plus 2 extreme loops. We knit 1 row with the wrong loops and 1 row with facial loops, then again 1 wrong row. After that, we cut off the thread and lay the loops. After each 19 loop, with the help of a bright thread, put Metochka.
- On circular knitting needles from the inside of the collar along the neck of the neck we collect the same number of loops using the transverse threads of the 1st row from the front of the rack. The number of new loops between the marks should be 10. We knit 3 rows with the front surface.
- In the next front row, we connect the loops of the external and wrong sides. We do this like this: 1 loop of the front knitting needle and 1 loop of the rear knitting needle we knit together with the front loop. In this case, first draw the knitting needle through the loop of the front knitting needle.
- We knit the next 2 loops of both knitting needles in the same way. 2 We knit the following loops together the wrong side, but first we throw the loop from the rear knit to the front. Thus, we knit further, 2 together the front and 2 together.
- Then we switch to larger knitting needles. We close the loops freely, according to the scheme.
- It is worth noting that knitted things with a rack collar go to almost everyone.
How to knit a shawl collar
- When we knit a sweater with a shawl collar, we will be guaranteed to look stylish and unusual. There is such a model of both men and women, and it is also popular among knitted collars for children.
- The width of the whitened collar is not the same in different parts of the product. He is wider from behind, and in front is more. To do this, you need to perform a reception that uses shortened rows.
- To make the cutout correctly, you need to determine the minimum height of the product at which 16 loops should be closed in the center. We knit the left and right parts separately from each other.
- To create oblique contours on both sides, we will reduce the loops. The number of loops that we will reduce depends on the appearance of the cutout. To perform a bevel on the left side, you need to knit 2 loops in front of the last loop together, drawing to the left, and for the right bevel we knit together 2 loops of the front immediately after the first loop.
- We perform the shoulder seams. On oblique cuts and on the back of the neck, we type an odd number of loops on the circular knitting needles, starting on the left. In the next wrong row, we knit in turn 1 front and 1 wrong loops in turn, and we finish the row at 2 seams of the shoulder.
- Then we turn the product and remove the first loop. We knit in the other direction to 1 shoulder seam, after which we turn the collar again and remove 1 loop. At the end of all the next rows, we create several additional loops.
- We knit in this way until we use all the loops. Then we perform knitting on all loops to the desired collar width. Close the loops and ends of the product to sew to the edge of the cutout.
How to crochet a collar
- Crochet collars look very open, elegant and elegant. With it, you can perfectly decorate a simple dress, as well as a strict school outfit of a girl on September 1.
- On the diagrams of products crochet, specific designations are always present:
- VP - air loop;
- SS - connecting column;
- SBN - a column without a crochet;
- SN - crochet column;
- NP - a roller loop.
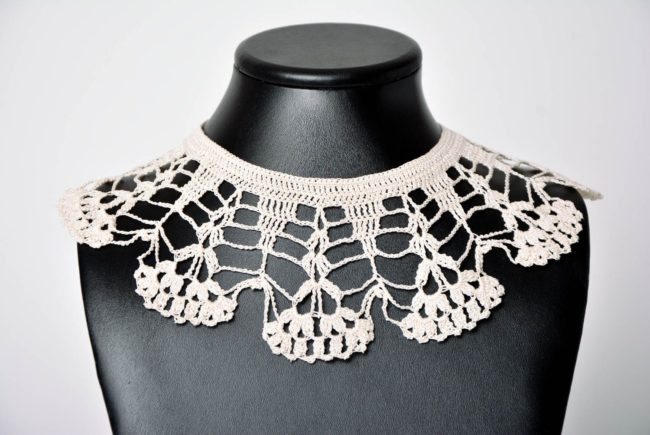
How to tie a lace collar on a dress
- For such a decoration, take 40 g of cotton white threads. First we knit a strip of cells according to the scheme:
- Nakid column, 2 VP, and then the main pattern. The rapport of the pattern consists of 4 cells, so we collect an even strip that is equal to the rapport and 1 cell for symmetry.
- Our collar consists of 53 loops, which allows him to sit quite tightly around his neck. In the rows, which are indicated in the figure in red, SNs are knitted under the arch, SBN - in 3 columns in a group of 4 SN. Then we do everything according to the scheme.
- At the end of the work, refill the tape no wider than 3 mm in 1 row and try on the finished collar.
How to knit a collar for school uniforms
- The collar in strict school uniform, manually crochet, makes the young student very elegant and original. Included with a collar, you can connect openwork white cuffs.
- Beginner craftswomen can start with a simple knitting scheme for a collar for a schoolgirl.
- Create 5 VP and make a ring from them. We knit 3 NP, then 11 SN. We turn the knitting and knit another 12 row according to the scheme. We perform 4 NP, we knit in the first VP. We take such steps 10 more times.
- We perform 1 CH in the upper row from the VP. We turn the collar again. We knit another 6 NP, then SN in the base 10 times. We make 1 CH in the third of the 5 VP. We move on to knitting the border - 1 SBN, after that 3 SN.
How to connect a collar with elements of Irish lace
- Irish lace is a technique that requires certain skills and dexterity. Take 100 g of cotton yarn, hook No. 2 and several white beads.
- For this collar, we will connect all the elements separately, and then connect them together using the pattern.
- To tie 5 large flowers, we will move according to the scheme:
- 1 row: we knit 6 VP, we connect the first and last loops into a circle;
- 2 row: in the center of the circle we knit 21 SSN;
- 3 row: we perform a “raring step”, that is, we knit the SBN, starting on the left;
- 4 row: 7 VP + 1ss, perform 6 times to create 7 petals;
- 5 row: in all arches we get 12 c.
- Further, according to the scheme, we perform 4 branches of 3 sheets, 6 twigs of 6 leaves and mugs.
- We put all parts on the pattern with the wrong side up and sew the parts together. We tie the inner edge of the collar, collecting it a little so that the collar length is 35 - 38 cm. Then we make a 4 cm rack. From one edge we make a loop for a button, and from the other edge we sew a button.
- We decorate the collar with beads.
How to tie a simple lace collar
We knit a circuit of air loops of the desired size. Then we are guided by the scheme:
- 1 row: Perform SBN.
- 2 row: Perform a column, 2 crochets and a fork in turn, then we knit 2 columns with 2 crochet, between which we knit 2 VP. For a rounded shape, we knit the part through 1 loop 1 row.
- 3 row: we do everything, as for 2 rows, except for a fork, which consists of 4 columns.
- 4 row: Add 2 columns.
- 5 row: we knit 8 columns under the VP and 1 column in the loop of the previous row.
Knitted collars with diagrams and a detailed description on the shoulder of any needlewoman. This, as a rule, is the final part of the creation of a thing and image, plays a very important role for comfort and the appearance of a stylish person.


Comments
a couple of years ago, there was no side of metrogils from the same problem, there were no side effects ...
I’m not a fan of peeling at all, it saves from acne of metrogil, it also smoothes it ...
Great article! ...
I take the second course of the Capsules Climafite 911. The tides went very quickly. It became calmer, irritability went away and I sleep well ...
i also noticed - it is worth nervous, everything immediately affects the face. Therefore, I try to avoid conflicts and unpleasant people. Of the creams, I like Miaflow from wrinkles - smoothes not only small wrinkles ...