You can make a bright accent in the interior or simply decorate the apartment for some significant event by spending a minimum of effort and financial costs. Surely, everyone remembers how, in childhood, the faners made of paper. Such a craft can be an excellent element of decor, if you make it from beautiful paper, choose an unusual combination of colors and textures. In this article, we will consider detailed instructions for the manufacture of paper fans.
Content
A little from the history of fans
The fan is a special fan, which is designed to create a stream of air on the face, neck, shoulders in hot and stuffy weather. The first mention of the Vera belong to antiquity. At different times, they were made from poultry feathers, paper, from fabric, etc.
- In ancient India, the fan was an attribute of royal power, and in ancient Japan - a symbol of military force.
- In Japan, the manufacture of fans was a real art. They were made round, folding, in a frame, with a mirror, from leather, paper, from lotus and reed. Fans were decorated with drawings, calligraphy. The fan is the main attribute of one of the national Japanese dances.
- In the Baroque fan was available only to the royal nobility and aristocracy. In France, there were very strict requirements for the manufacture of fans, they were allowed to apply drawings only on certain topics. Italian masters showed more fantasy in the manufacture of “manual dough”. They were decorated with drawings from mythology, floral ornaments, drawings on the topic of court life, etc. The fan during the reign of Louis XIV became an incredibly important object involved in the ceremonies of the palace. For example, women could reveal their fans only in the presence of the queen. And a young girl, first appearing in society, was supposed to master the art of handling a fan.
- In the era of Rococo, the faners became a real instrument of flirting and coquetry. Women of the lower classes gained access to this subject, but only aristocrats still owned the real skill of handling a fan. With the help of a fan, women could even “talk”. The language of the fan helped to express sympathy without words or make it clear to the man that the woman is not interested in him.
- In the 19th century, fan of ostrich feathers gained popularity. It was at this time that their number was significantly reduced. The production of fans were engaged in masters from France, Italy, Holland.
- The tradition of using the fan for decor of the room came to us from the East. There, fans replace the paintings on the walls.
Fan from paper for decor. Options for application
If you think that the paper fan will not fit into your apartment, then you are mistaken. There are several options for its application, one of which is necessarily suitable for you.
- Wall decor. A fan of paper on the wall can often be found in apartments with an interior in the oriental style. If any of the walls in your apartment seems empty to you, then a spectacular composition of paper fans will be able to correct this position. Usually, photo frames, paintings, watches, murals, etc. are used for wall decor. Beautiful color faners of different diameters will look unusual, bring a little eastern energy to the house. The advantage of such an element of decor is that it can be made any color that will perfectly combine with the color of your walls.

- Decor for the children's holiday. On the eve of an important holiday for a child, many parents begin to look for ideas for decorating an apartment. Most often, traditional garlands and posters are chosen. But believe me, that the child will like the bright and unusual fans from the paper to decorate the holiday. If you make a fan yourself, you can decorate them with images of your favorite heroes from cartoons or fairy tales.
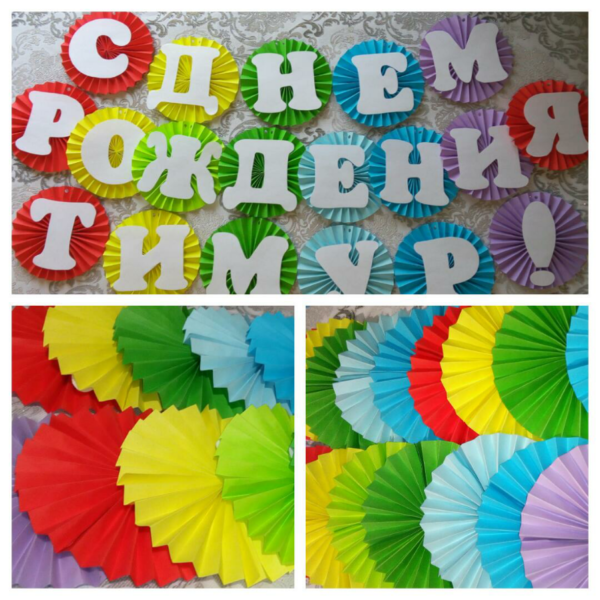
- Window or space decor over the bed. If paper faners are hung on a thread, then they can be used as a garland. Fans can decorate the window or just hang them under the ceiling above the bed or in the center of the room.

- Decor of the wedding celebration. If you do not want to spend money on ready -made jewelry for a wedding, then you can make it yourself. Choose a paper of delicate flowers combined with each other, and make a fan out of them. With their help, you can decorate the area for photos, an arch for newlyweds, decorate with their help a ceiling at the place of celebration, etc.

- Decor photo zones. The composition of bright and juicy fans will be a great background for a photo shoot. You can make such an original decor in the oriental style quickly and not expensive.

How to make a fan of paper. What do you need
A fan can become both a temporary decoration in your apartment on the occasion of a holiday, and a constant element of decor. The faners will look incredibly spectacular against the background of plain walls in apartments that are not overloaded with furniture. You can make a whole composition of round fans, correctly selecting a combination of colors. If you are going to make a fan with your own hands, then you need to prepare for this in advance. Decide on the type of fan that you will do, buy in advance the required amount of paper, think over the decor elements that you will use. Thus, for the manufacture of a decorative fan from paper at home you will need:
- color, corrugated paper or scrap paper;
- ruler;
- ordinary scissors or curly scissors;
- glue;
- long wooden skewers;
- ribbons, beads, lace and other decorative elements.
DIY
Japanese fan of paper
Consider a very simple master class on the manufacture of a paper fan in the Japanese style. To give the fan the eastern appearance, you can purchase paper with Japanese motives or draw a suitable pattern on paper yourself.
- In order to make a Japanese fan you will need double-sided pale blue paper, double-sided tape, ordinary tape, colored pencils or paints, wooden sticks with ice cream, decorative elastic band to fix the fan, scissors.
- To begin with, we proceed to the design of the paper. Sakura branches are a typical oriental print that you can portray with pencils or paints on paper. For one fan you will need one sheet of A4 format.
- If the paper is ready, now you need to cut it into 2 long rectangles.
- Each of the rectangles must be folded into an accordion.
- With the help of bilateral tape, we fasten two accordions in one large accordion.
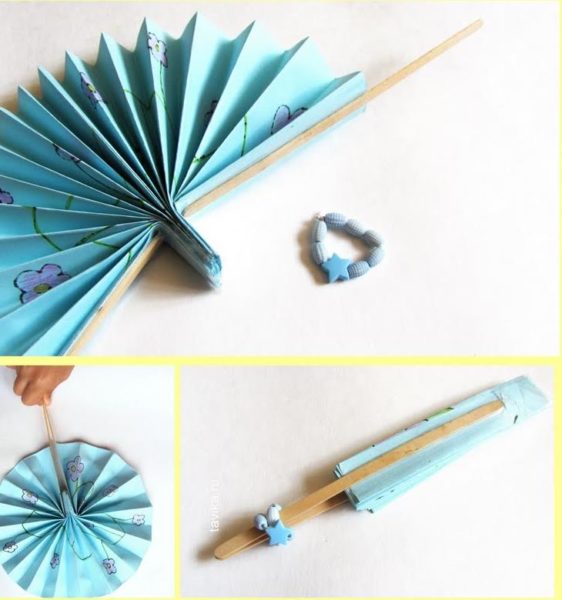
- Next, using conventional tape, we wrap the lower part of the fan (about 3 cm).
- Now on the side sides of the accordion you need to attach wooden sticks. This can be done using double -sided tape. For greater strength, glue the sticks on top with ordinary one -sided tape.
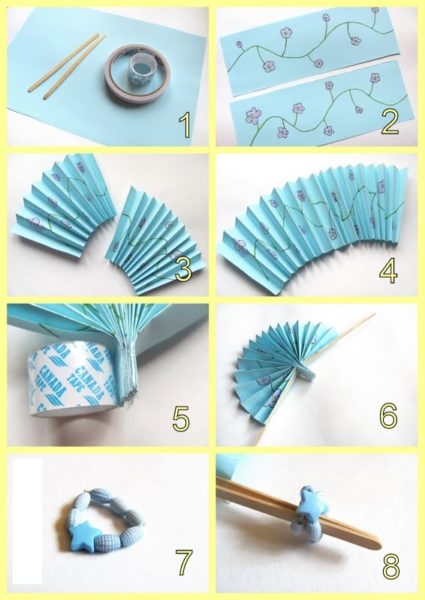
- Our fan in the Japanese style is almost ready. It remains to put a small decorative rubber band on the sticks so that it holds the fan in an open or closed position. The craft is very simple and it can be recommended for joint implementation with the child.
Round fan of paper
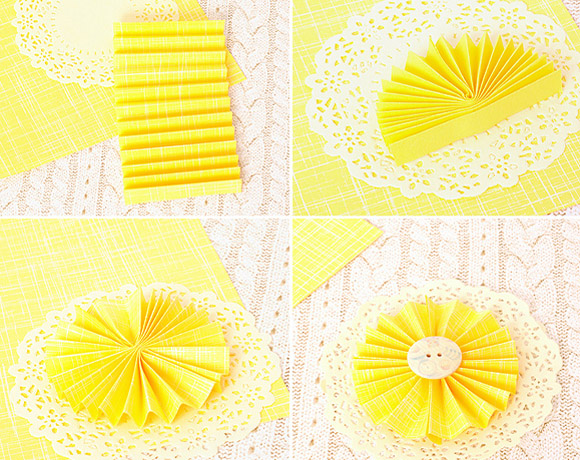
A round fan is most often needed to create a whole composition of fans for decor. In order to make a juicy yellow fan, follow the instructions:
- first you need to prepare everything you need. You will need double -sided colored paper of high density of yellow or any other color, scissors, double -sided tape, various decorative elements;
- the paper needs to be cut into strips of the desired size. The larger the strip of paper, the more the fan will be;
- a prepared strip of paper must be folded into an accordion. In order for the bends to be even and clear, you can use a line for “invitation”;
- the finished accordion must be folded half, glue the inner edges with double -sided tape, and dissolve the outer edges. As a result, you should get a semicircle;
- the second half of the round fan is made in a similar way;
- we glue the halves of the fan with flat sides using double -sided tape;
- the round fan is ready. In order for the decoration to be brighter, you can decorate it with tape, beads, pebbles, etc.
Corrugated paper
Corrugated paper is an excellent material for the manufacture of various crafts at home. For example, from such paper and from a minimum set of other materials, you can make a decorative fan, which can be a great gift for friends. Consider a detailed master class on making a fan of paper:
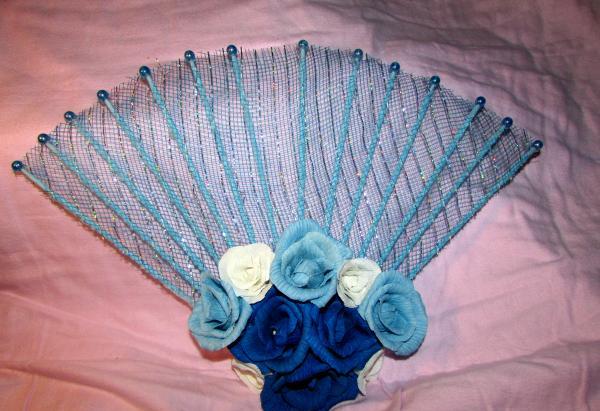
- prepare all the necessary materials and tools for the manufacture of a decorative fan - corrugated paper, a floristic mesh, long wooden skewers, an adhesive gun, threads, beads for decor, scissors;
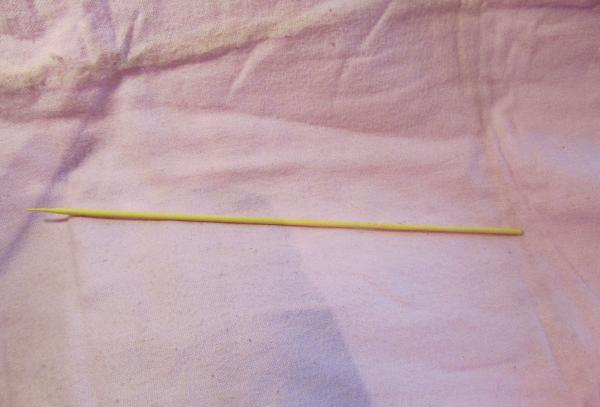
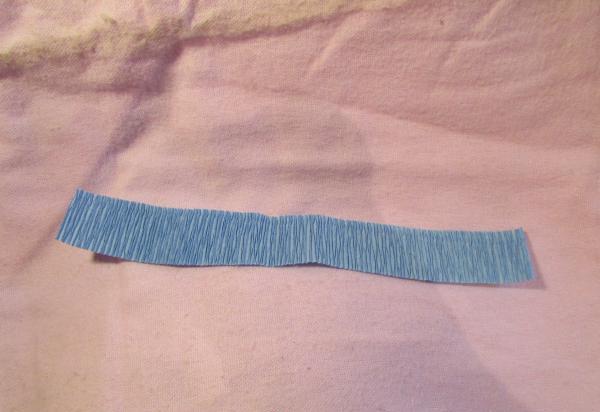
- from corrugated paper you need to cut the strips across the fibers 15 cm long and 1 cm wide;
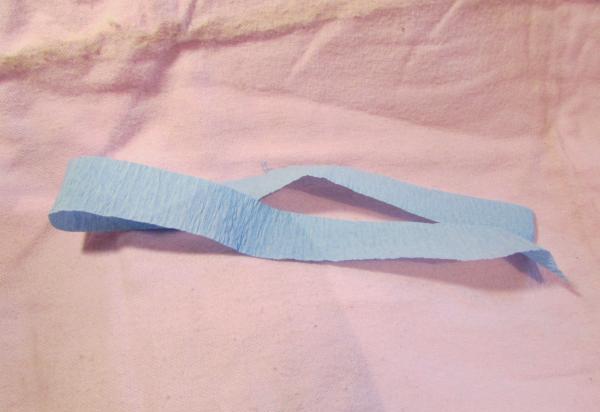
- a strip of paper needs to be straightened. Next, take a wooden skewer and wrap a strip of paper around it, fixing it with a glue gun. You should get a wand tightly covered with colored corrugated paper;
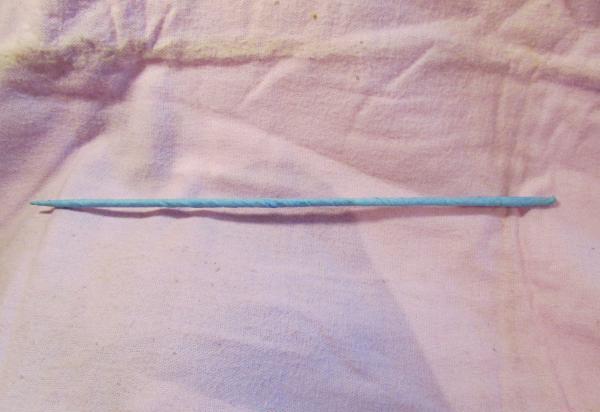
- similarly, prepare 14 wooden sprayers;
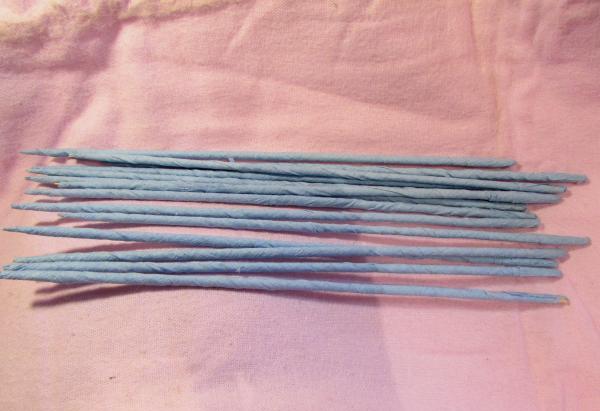
- the following is a very important stage - gluing sticks among themselves. This must be done at an angle of 45 degrees using an adhesive gun;
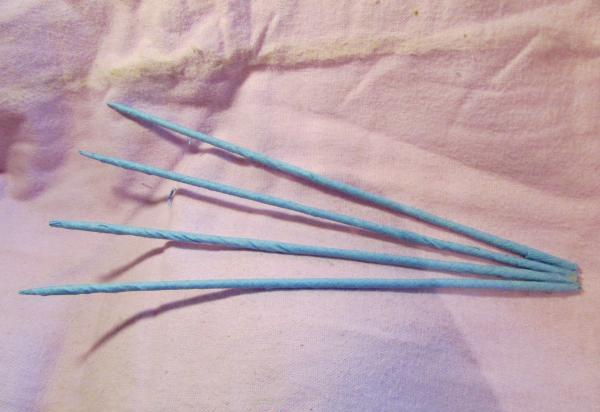
- when you glue all 14 skewers among you, you will get a prototype of the fan;
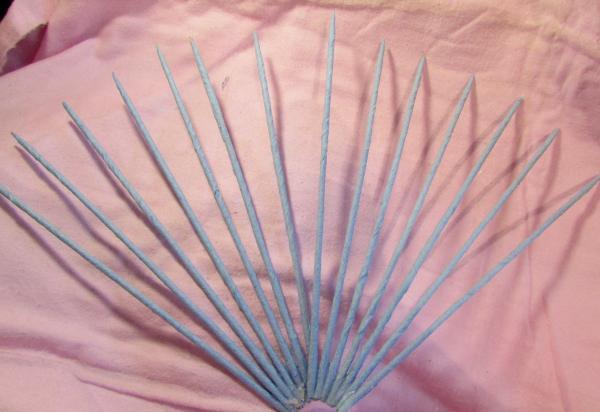
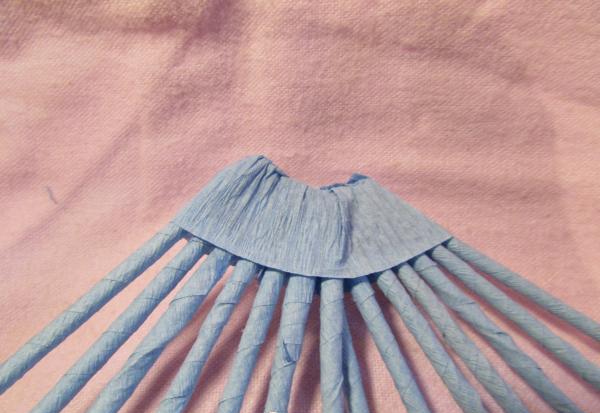
- in order to mask the place of attachment of the sticks, you need to cut a strip of 2 cm and a length of 5 cm out of corrugated paper. Stretch the paper and pushing the lower part of the fan in a circle;
- prepare 14 beads that will be combined with the color of corrugated paper in color. They are needed in order to decorate the upper part of the wooden skewers. For fixation, also use an adhesive gun;
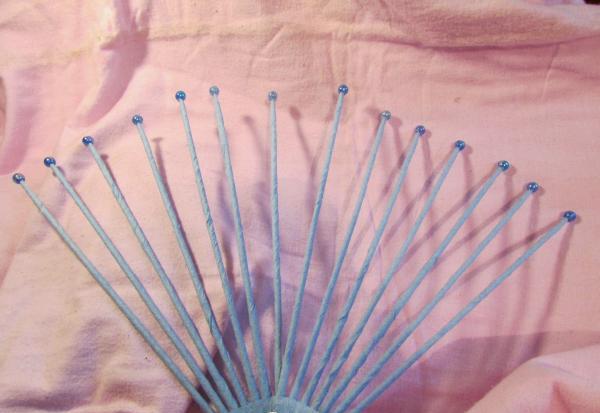
- now we proceed to the manufacture of the basis for the fan. We will use for these purposes a floral grid of the same color as corrugated paper that we used. Cut a piece of mesh with approximate dimensions of 30*30 cm. It is not necessary to cut a piece that will perfectly repeat the shape of the fan. Excess pieces will perfectly part after the glue dries. Attach the grid to the fan and with the help of an adhesive pistol firmly glue it to each skewer;
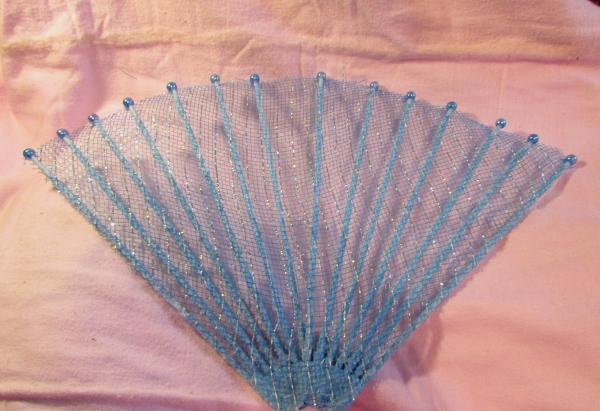
- a decorative fan using corrugated paper is almost ready. It remains to make some decor elements for him. From corrugated paper combined in color, we will make flowers of different diameters. Cut about 7 petals for each flower. In order to make it more realistic, make 3 larger petals, and 4 - a little smaller;
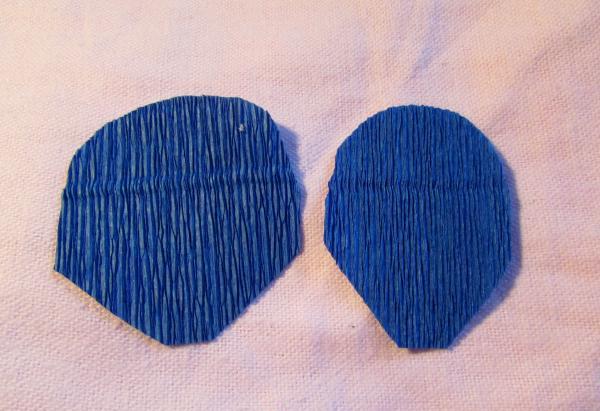
- each petal give a curved shape with your fingers or toothpick. Now proceed to the manufacture of the middle of the bud. To do this, cut a piece of foil with approximate dimensions of 10*10 cm, rinse it into the ball, wrap it with a small piece of corrugated paper and fix it with a thread;
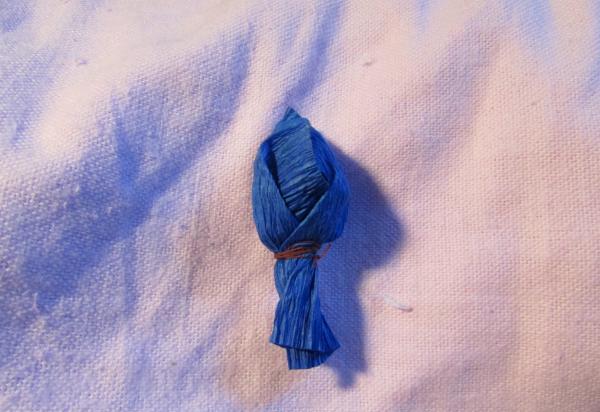
- next, we begin to glue the petals alternately, giving them the desired shape. You should get a beautiful and realistic flower;
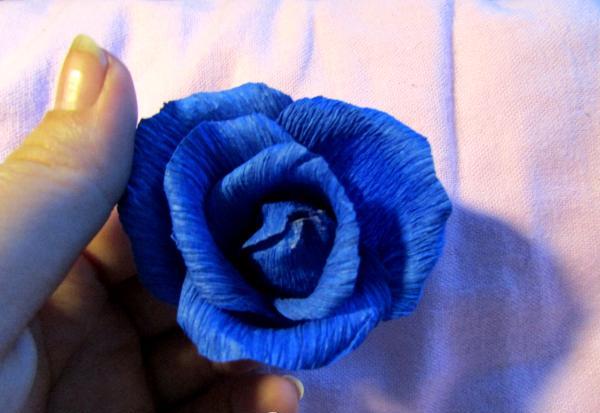
- after the right amount of paper flowers is ready, we proceed to their fixation on the fan. Place them in a checkerboard pattern, alternating large and small flowers. As a result, you will get an original fan, which can be used for a gift or for the decor of your apartment.
Color paper
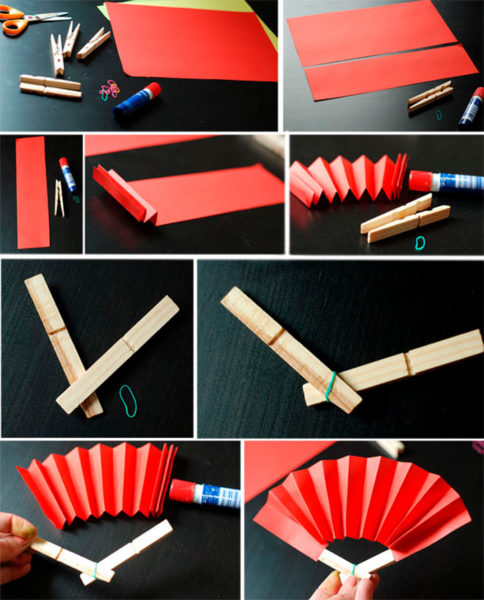
A simple fan of colored paper can be made using unusual material - wooden linen clothespin. Consider step -by -step instructions:
- to begin with, prepare all the necessary materials and tools-sheets of bilateral colored paper of the desired shades, several wooden linen clothespins, PVA glue or adhesive pencil, scissors, elastic bands of clerical;
- for the manufacture of one fan, you will not need a whole sheet of A4 paper format. Cut the strip, the width of which should approximately equal to the length of the side of the clothespin;
- from the prepared strip of colored paper we begin to fold the accordion;
- now we will be engaged in the preparation of the clothespin. It needs to be disassembled. To do this, simply remove the metal part and free two wooden clothing elements;
- fold the wooden parts of the clothespin as shown in the photo, and fix them with a clerical elastic band;
- now you need to attach the paper part of the fan to wooden sticks. To do this, you can use any improvised material - glue or double -sided tape. Mini-leader made of colored paper is ready. Such a craft will especially appeal to young children who can also be attracted to the creation of such a simple fan.
Fan of paper for children
The form of a paper fan allows us to attract even children to the manufacturing process. Older children can perform all steps on their own, and younger children can make such a craft with the help of adults. Consider an example of creating a simple, but very bright work of paper - a fan.
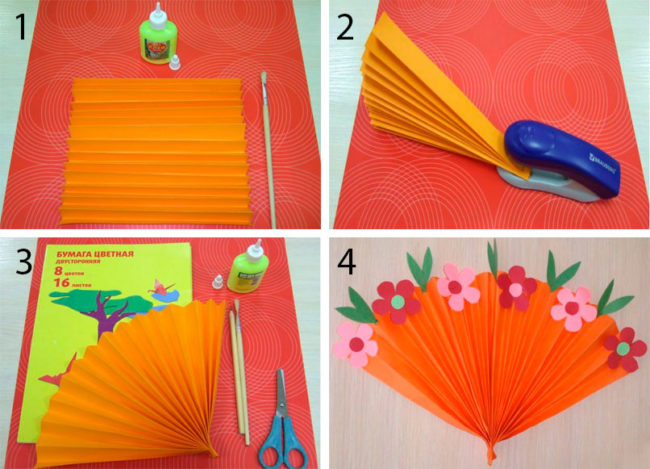
- To begin with, place in front of you all the necessary materials and tools that will be useful to you. If children will take part in creating the fan, then conduct a conversation with them about the rules for working with scissors and glue. Several sheets of double -sided colored paper, PVA glue, a stapler, an adhesive brush and scissors will come in handy.
- First, decide what color the fan will be. Fold a sheet of A4 format with an accordion.
- Gather a fan and fix its end with a stapler.
- A simple fan of colored paper is almost ready. Now proceed to its decoration. From colored paper, cut out simple -shaped flowers and green leaves from color paper. Glue the blanks to the upper part of the fan. Children will be delighted with such a spring fan that resembles a bouquet.
Fan-flower of paper
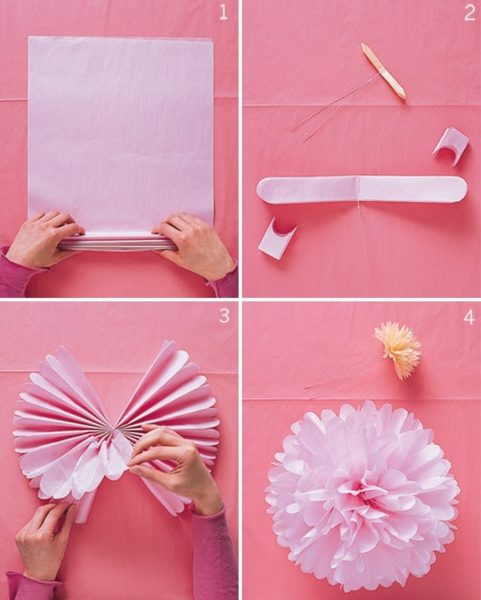
From a paper fan you can make an incredibly spectacular voluminous flower. To do this, you will need a minimum set of materials, tools, as well as very little time. Such volumetric flowers can be both small diameter or simply giant. They can be used for wedding decor, to decorate the apartment for birthday or to any other significant event. Consider detailed instructions for creating a fan-set.
- To create a fan-flower, corrugated paper is best suited. You will also need scissors, a small piece of soft wire or thread, elastic bands.
- Spin corrugated paper from the roll, cut into rectangles of the same size and put them in a pile.
- Next, all sheets together begin to put in an accordion.
- With scissors, give the shape of the edges of the accordion. They can be rounded or pointed.
- With a wire, elastic band or thread, fasten the accordion in the middle. If the fan-flower is designed to be suspended, then make a loop.
- The fan-flower is almost ready. Spread the sheets of paper, giving the volume of the craft. Of course, the more sheets of paper you use, the more magnificent the fan-flower will turn out.
Origami from paper - fan
Origami technique allows you to make a fan without the use of glue, stapler or other similar materials. You will need only a sheet of A4 paper and the dexterity of your hands. Consider detailed instructions for the manufacture of a fan in the technique of origami:
- in order to make a simple fan in the technique of origami, you will need a sheet of ordinary white paper A4. You can also take a leaf of colored paper;
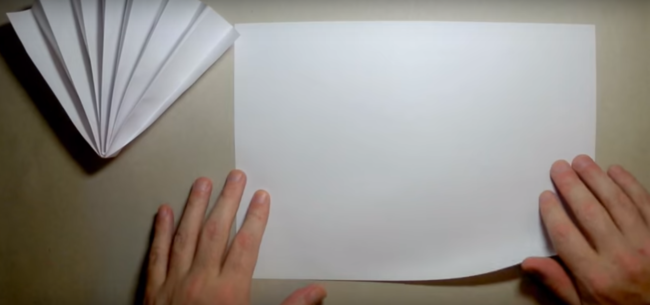
- the sheet must be folded half as shown in the figure;
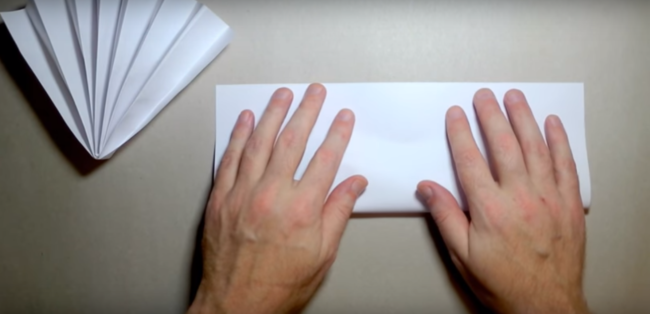
- now expand the sheet. In the middle should be a clear fold line;
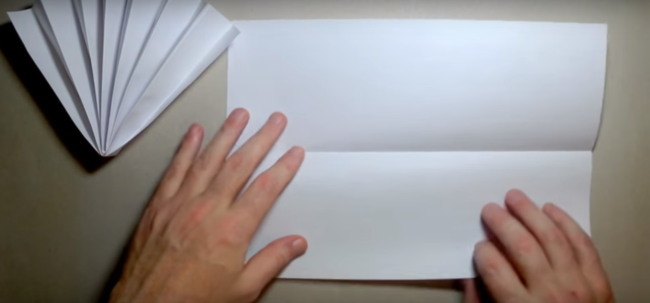
- now bend the lower side of the sheet towards the fold line in the middle;
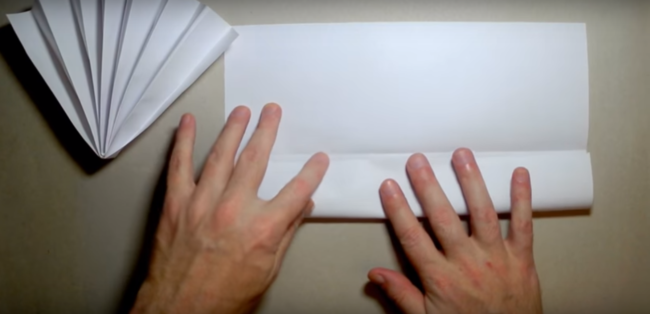
- now the upper part of the sheet is also bend towards the fold line in the middle;
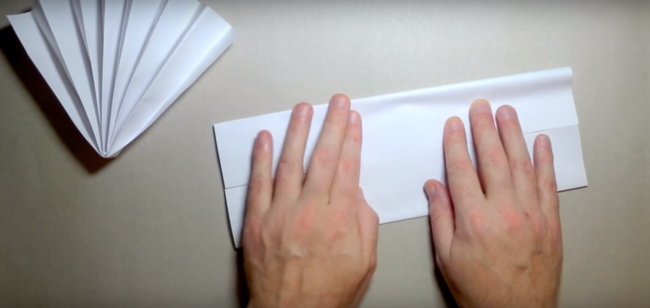
- now bent the free paradise of the leaf in the direction down;
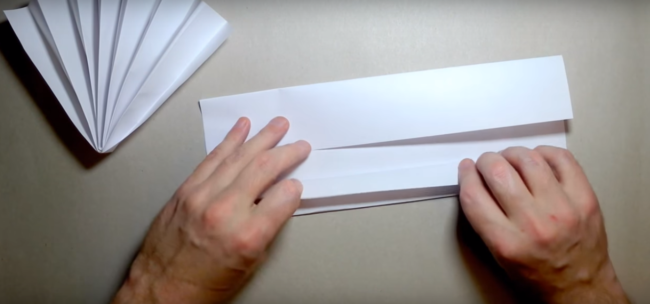
- turn the workpiece and continue to fold a sheet of paper with an accordion;
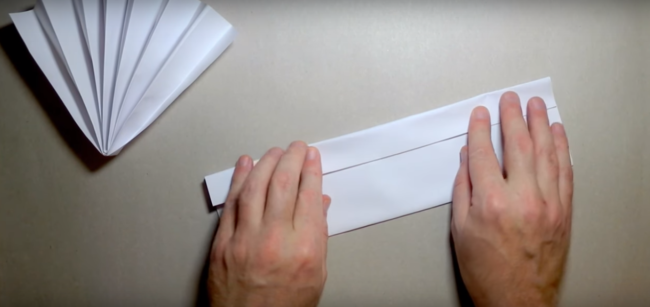
- expand a sheet of paper. You should get such an accordion as in the photo;
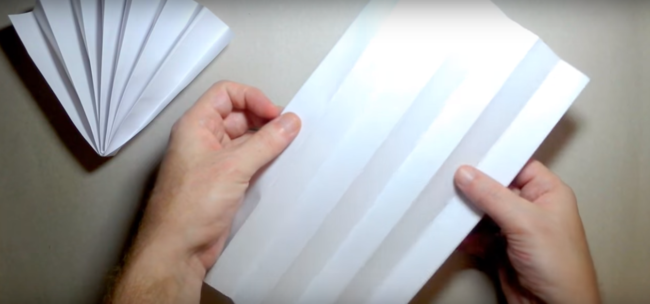
- fold the sheet in the accordion again and bend one free edge;
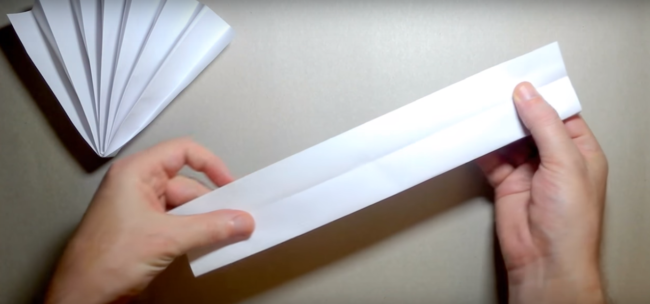
- fold the workpiece half, without wrapping the free edge inward;
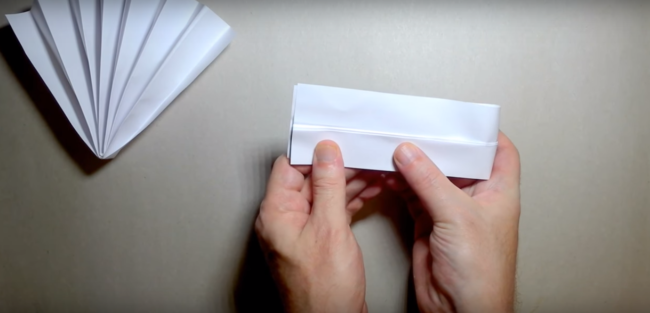
- now bend the corners of the protruding edge towards the center of the workpiece;
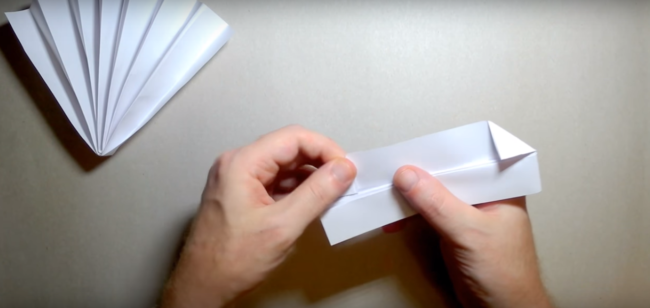
- now expand the fan and put the protruding land in the middle of the fan so that it is firmly fixed and does not break up;
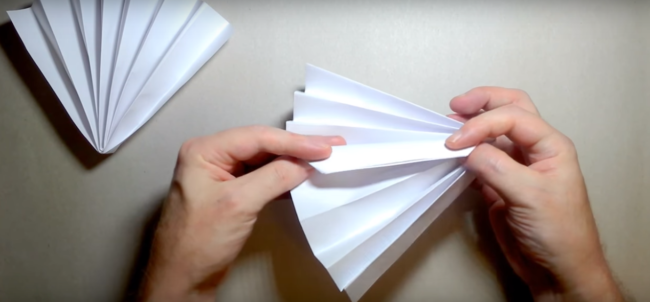
- as a result, you should get such a simple fan, made in the technique of origami. The fan can be done even on the road when you have no materials and tools. It is convenient for them to create an air flow in hot weather.
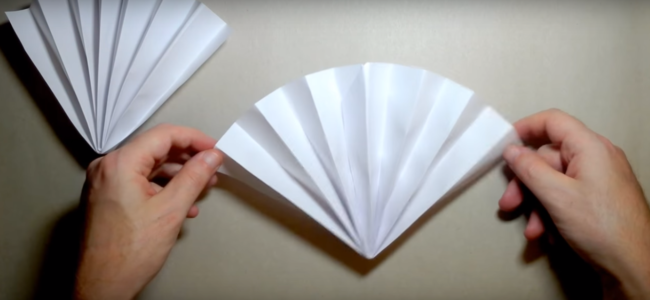
A doer of paper made by yourself can be used for various purposes. You can make a very simple option in order to turn your face in the heat. You can also make a fan of beautiful paper, create a whole composition of fans and use them for an apartment decor, as a jewelry for the holiday, as a souvenir, etc.


Comments
a couple of years ago, there was no side of metrogils from the same problem, there were no side effects ...
I’m not a fan of peeling at all, it saves from acne of metrogil, it also smoothes it ...
Great article! ...
I take the second course of the Capsules Climafite 911. The tides went very quickly. It became calmer, irritability went away and I sleep well ...
i also noticed - it is worth nervous, everything immediately affects the face. Therefore, I try to avoid conflicts and unpleasant people. Of the creams, I like Miaflow from wrinkles - smoothes not only small wrinkles ...