

The problem of storing things in a house or apartment is always very acute in front of every mistress who seeks to create comfort and order at home. Of course, daily cleaning are able to put in order for a while and put all things into the right place, but this is not for a long time. After a couple of days, various things, the little things again become scattered throughout all rooms. Today in stores you can buy ready -made beautiful organizers for storing a variety of things that can help find their own permanent place for each. You can buy such an organizer at any time and for every taste, but it is much more pleasant and more economical to make such a device with your own hands. This will not only decompose all objects in the house, but also create a unique designer interior.
Content
- Do -it -yourself organizer is a great idea to restore order in the house
- How to make an organizer out of the boxes with your own hands - interesting solutions
- How to make an organizer for cosmetics - option 1
- How to make an organizer out of a box for cosmetics - option 2
- How to make an organizer for the office
- How to make an organizer for storing handles and pencils
- How to make an organizer for the table - step -by -step instructions
- How to make an organizer out of the table for a table - option 2
- How to make an organizer from cardboard with your own hands
- How to make an organizer from paper-master class
- How to make an organizer from fabric
- How to make original organizers with your own hands - options
In this article, we will consider the most diverse options for organizers for storing things in the house. Here are detailed master classes on the creation of organizers for small things, office and other household items.
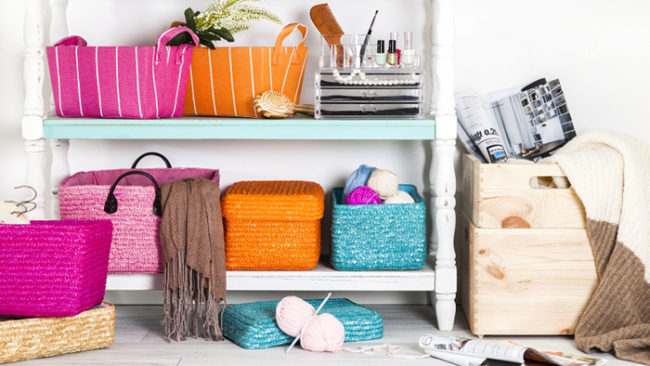
Do -it -yourself organizer is a great idea to restore order in the house
Every year of joint family life in the house, just a huge number of different things accumulate in the house that simply cllate all the free space. It turns out that we simply shift all things from place to place, subsequently finding up finding the desired item at a particular time. At the same time, the house can be found in the most inappropriate places umbrellas, pets leashes, children's toys, cosmetics, clothes and shoes.
That is why organizers are an excellent solution for all housewives who are tired of constant chaos in things. Imagine how spacious and comfortable it will become in the house when each thing finds its permanent residence and will not constantly shift from place to place. In addition, each family member can easily find the accessory he needs or an object, without spending a lot of time on meaningless searches. Probably, every woman or girlfriend has a desire to purchase such convenient organizers, but only the idea stops that they will cost a penny.
Do not despair, organizers can be done with your own hands, which in the future will turn not only into the ordinary process of cleaning things, but into an exciting occupation of the creation of a unique interior.
How to make an organizer with your own hands - basic rules and options
To make an organizer yourself, there is no need to spend a lot of money, it is enough to pay attention to things accumulated in the house that did not find application.
- First of all, for the manufacture of organizers, ordinary empty boxes can be used. This item is found in every house, since all new purchases are most often placed in cardboard boxes. It can be boxes of shoes, household appliances, electronics, food, cereals and other things.
- With your own hands, organizers can be made of ordinary cardboard or paper.
- If an unnecessary fabric was lying in the shelves on the shelves, it can also be launched to create beautiful interior organizers for a wide variety of little things.
- Many needlewomen launch old frames, banks, tin boxes, bags, hangers and other unnecessary things in your house.
- To give boxes for storing things a more beautiful and interesting look, it is enough to use colored and wrapping paper, ribbons and tapes, original buttons and twine.
- An important rule for making organizers with your own hands is its own fantasy, which, first of all, should be supported by the interior in the apartment and the purpose of this device.
How to make an organizer out of the boxes with your own hands - interesting solutions
Boxes are the most universal and suitable thing for the manufacture of organizers that is found in every house. Of these, you can easily and simply make a variety of options for storing things in the house: for cosmetics, for the office, for the table and so on. Consider the features of the manufacture of organizers from boxes.
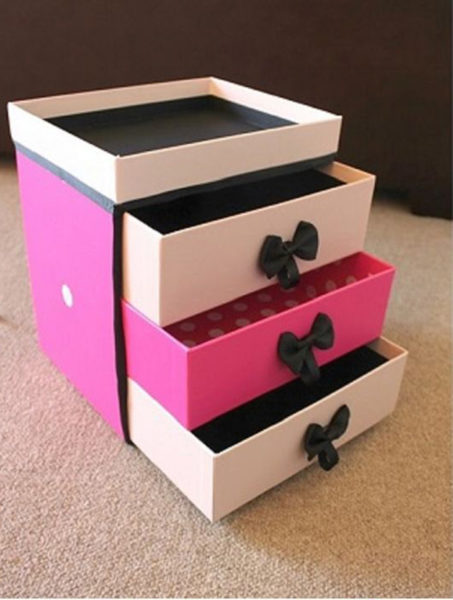
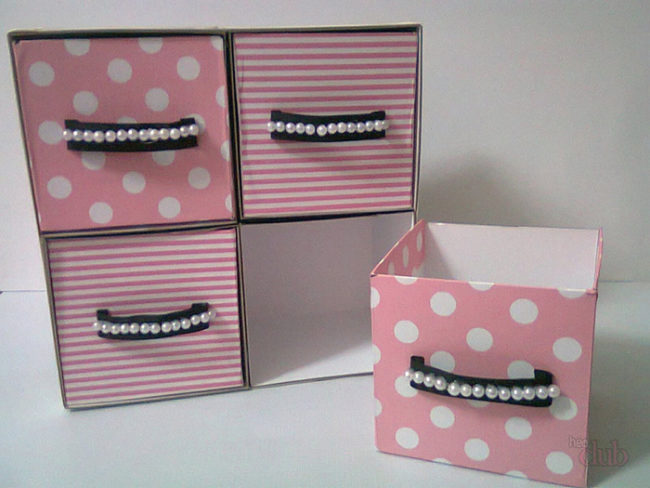
How to make an organizer for cosmetics - option 1
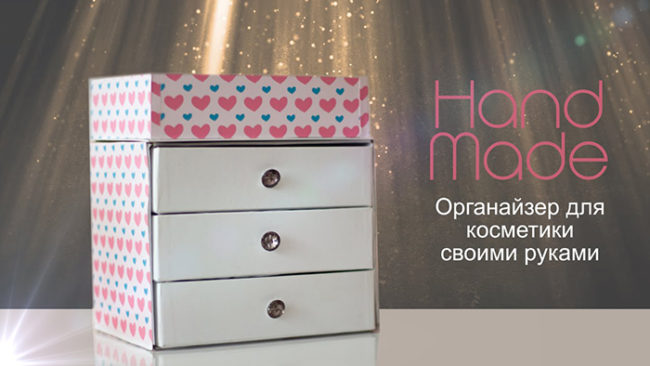
Necessary materials:
- 5 boxes, of which 1 high and 4 low;
- ribbons and paper for design;
- glue, scissors, pencil and ruler;
- decorative elements.
Production process:
- Take the largest box and glue all the outer sides with dense cardboard to strengthen the base.
- Next, glue all the outer parts of the dressing room of the chest of drawers with beautiful decorative paper or a crap paper. In this case, you can use ordinary wallpaper. You can fix paper or wallpaper with double -sided tape or glue.
- After that, you can deal with internal drawers, in which cosmetics can be stored in the future.
- Find three identical boxes that would perfectly fit in size for our chest of drawers in width and height in total.
- Take the covers from these boxes and cut one of the narrow sidewalls from each.
- Next, measure the location of the shelves and with the help of double -sided tape glue the lids from the boxes, which can also be pasted with colored paper. Such shelves can not be done, just find suitable boxes and insert them into the prepared basis.
- After that, we glue three boxes with beautiful decorative paper and make a hole in the center of the facade part for attaching a ribbon or an unusual button that will be used as a pen.
- Glue the box or cover from the box for another shelf at the top.
- Such an organizer can be decorated at your discretion.
How to make an organizer out of a box for cosmetics - option 2
The organizer for cosmetics can be made in another way - using boxes of different sizes and heights.
Necessary materials:
- various boxes:
- cardboard;
- decorative paper, krap-paper;
- glue, ruler, scissors;
- decorative elements.
Production process:
- First of all, take a spacious shoe box in which a large number of smaller boxes and cups can fit.
- We will need only the lower part of the box, which needs to be glued with beautiful decorative paper, wallpaper, a crap paper or decoupage paper.
- Next, take small boxes of various sizes and put inside a large box to accurately determine their placement. As an option, such boxes or cups can be made independently from cardboard. To fill the interior of the box, you can use bushings from toilet paper of different heights.
- All boxes and cups need to be glued with the same paper as the main box.

- After that, arrange all the boxes inside a large box. It is best to do this in increasing, i.e. Put the highest cups away from yourself.
- The upper edge of each box can be decorated with scourge or braid.
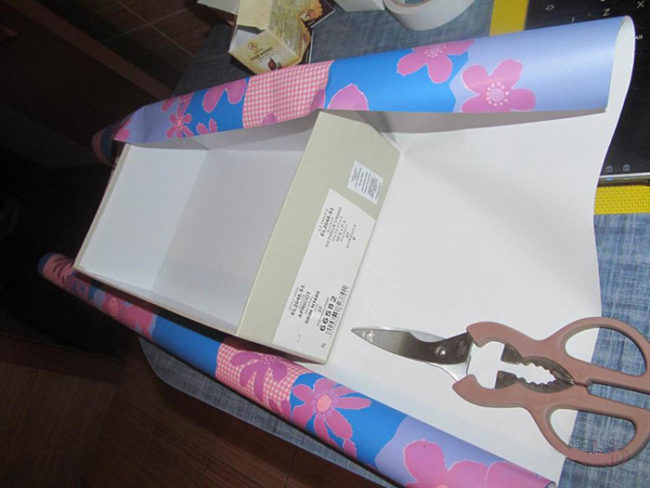
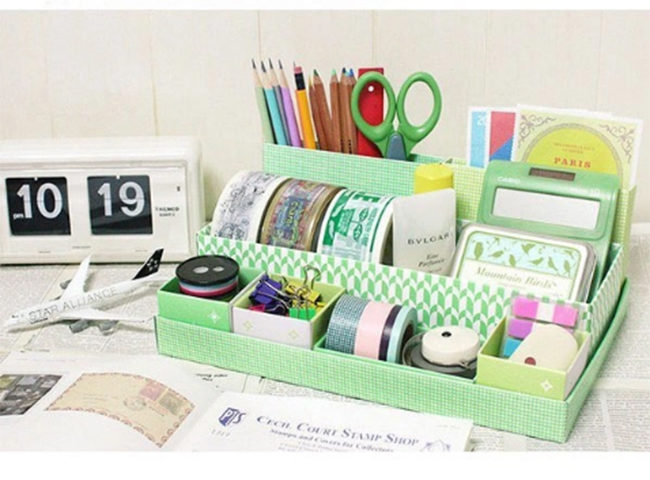
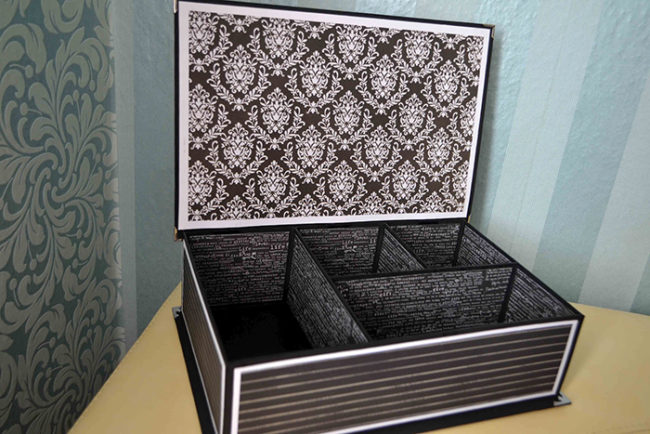
How to make an organizer for the office
In each house, a huge number of stationery periodically accumulate: pens, pencils, felt -tip pens, notebooks and other items.
Necessary materials:
- shoe box;
- decorative paper;
- scissors, glue, ruler;
- cardboard and cylindrical bushings.
Production process:
- Take a box of shoes and apply markings on it, as shown in the figure.
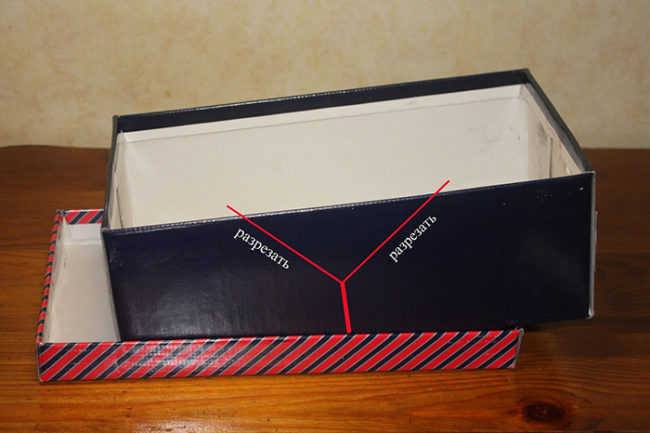
- After that, make cuts on the specified lines with scissors. Next, carefully bend the box exactly in the center and fix it with glue.
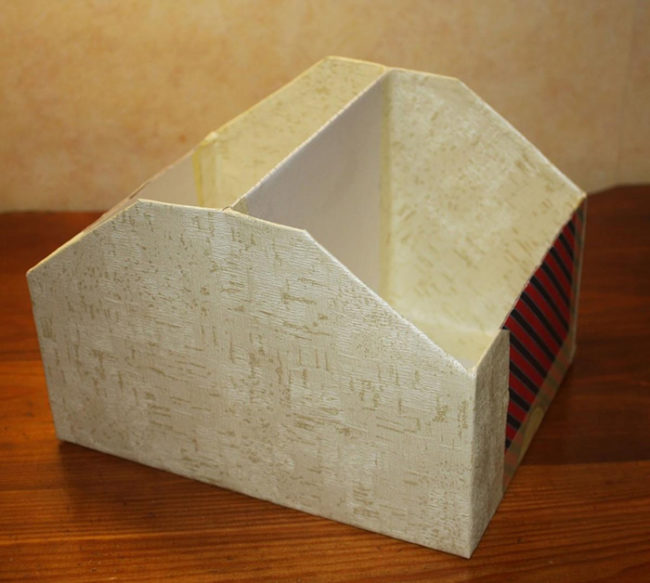
- Next, take decorative paper and glue the resulting organizer from the outer and inside. You can use a variety of decoration options.
- The organizer can be left in this form for storing notebooks, notebooks and papers. And, as an option, you can make small compartments for storing handles, pencils and other office. To do this, make partitions from dense cardboard inside the large departments, which is previously glued with paper. On the other hand, you can glue cardboard bushings for storing handles and pencils in a large compartment.
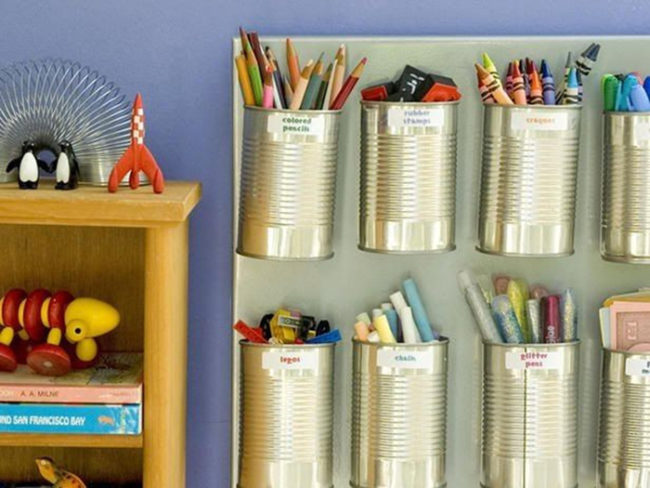
How to make an organizer for storing handles and pencils
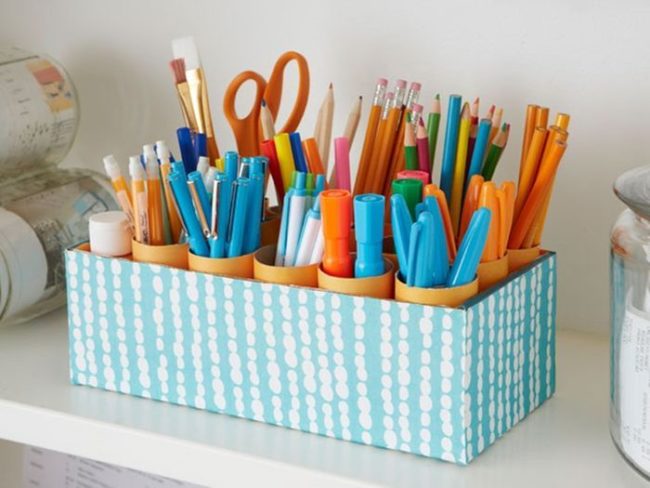
Necessary materials:
- a spacious box, you can use a shoe box;
- beautiful decorative paper;
- glue;
- scissors and ruler.
Production process:
- Take a box of shoes, we need only the lower part. Measure the desired paper length and decorate the resulting box with it. You can use glue or stapler.
- Next, cut the desired amount of cardboard bushings. In this case, decide on the height of the bushings. You can make one height with a box, or you can cut the bushings slightly above the main box.
- Select the bushings of the desired diameter so that the internal volume of the box is completely filled. As an option, you can take bushings of different diameters, for example, from toilet paper, from foil, from baking paper.
- The resulting blanks can be glued with decorative paper, or you can leave it in the usual form if they are not visible in the box.
- Gently insert the bushings into the box and fix them with double -sided tape or glue so that the structure does not shake.
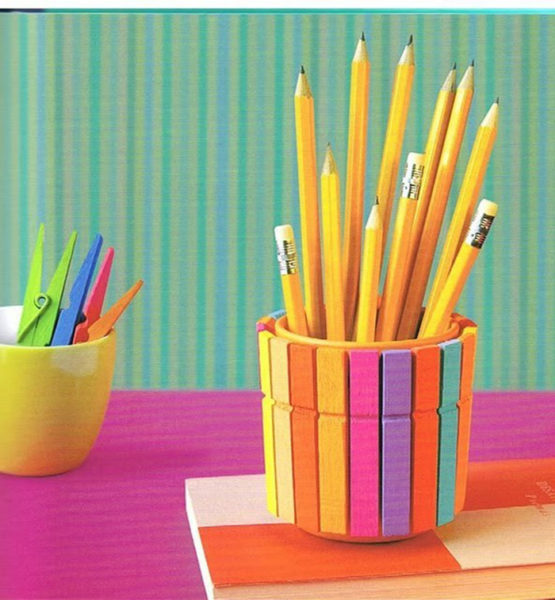
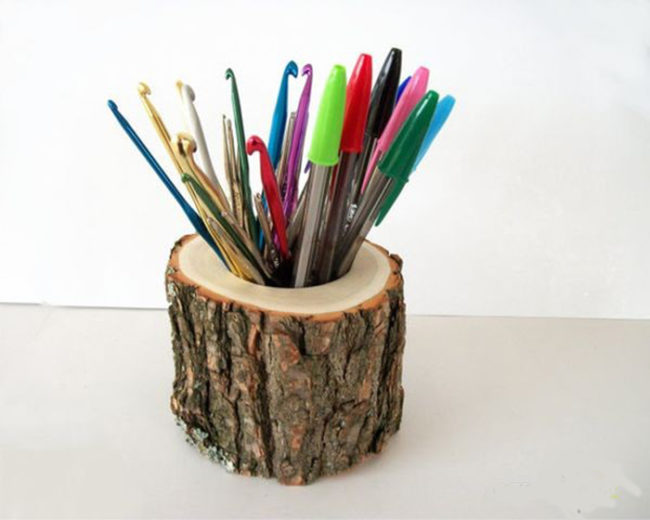
You can make an organizer for pencils in a variety of ways:
- With the help of tin cans.
- Organizers made of wooden and colored clothespins.
- Organizer for wood pencils.
How to make an organizer for the table - step -by -step instructions
A working or desk is an integral part of the interior of any apartment or house. Usually it is in this place that a huge number of things accumulate, especially in the drawer of the table. With the help of an organizer, you can easily and quickly put the order in the table and put each thing in its place. For this, various boxes will be needed.

Necessary materials:
- boxes of different sizes;
- color decorative paper or fabric;
- glue;
- varnish;
- scissors and ruler.
Production process:
- Pull the drawer out of the table and place the boxes you found in it. They need to be placed in such a way that there is no free space, so that they do not move during operation.
- Next, cut the upper part of all boxes of the same length.
- After that, you can immediately connect all the boxes with whether the glue areas and place in the box, or you can first glue each box separately using paper.
- Apply varnish to the inside of each box so that in the future the glue does not appear on fabric or paper. Next, glue your chosen fabric or paper with glue. To make the organizer look more elegant, you can use fabric of different colors.
How to make an organizer out of the table for a table - option 2
A light organizer for the table can be made with only a few boxes. Thanks to this, you can get a beautiful and convenient organizer for storing all the necessary office, papers and other small items necessary for work.
Necessary materials:
- Prepare a few boxes of different sizes. For the foundation of such an organizer, you can use a lid from a large box. When choosing boxes, take into account their location, as well as the fact that high boxes must be placed on the long line.
- Small or high boxes can be made of thick cardboard to perfectly fill the free space in the box.
- Take a beautiful decorative paper or a crap paper and use it to glue all the prepared boxes. You can use paper of the same color, or you can take several options to obtain a more elegant organizer.
- To fix paper, use glue or stapler.
- After that, place the boxes in the base cover in a convenient manner for you.
- Fill in the boxes with all the necessary items. Everything, a beautiful and stylish organizer for the table is ready.
How to make an organizer from cardboard with your own hands
Cardboard is another simple and affordable material for the manufacture of stylish and convenient organizers for storing things. With the help of this unique material, you can create the most unusual objects. Consider the options for making organizers from cardboard with your own hands.
How to make an organizer for small things from cardboard - step -by -step instructions
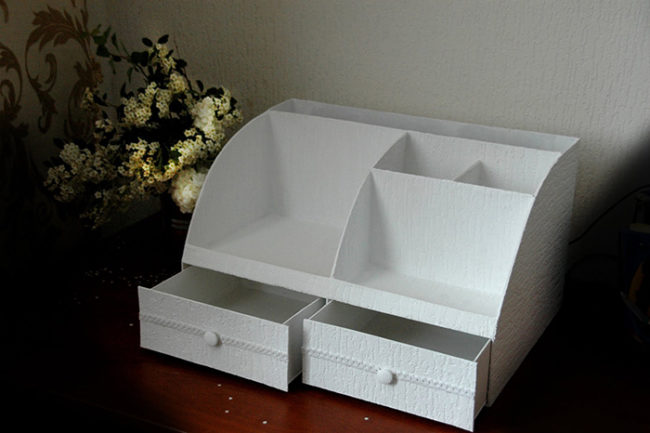
Necessary materials:
- Thick multi -layer cardboard.
- Decorative paper, crap paper or wrapping paper.
- Glue, scissors, stationery knife, ruler.
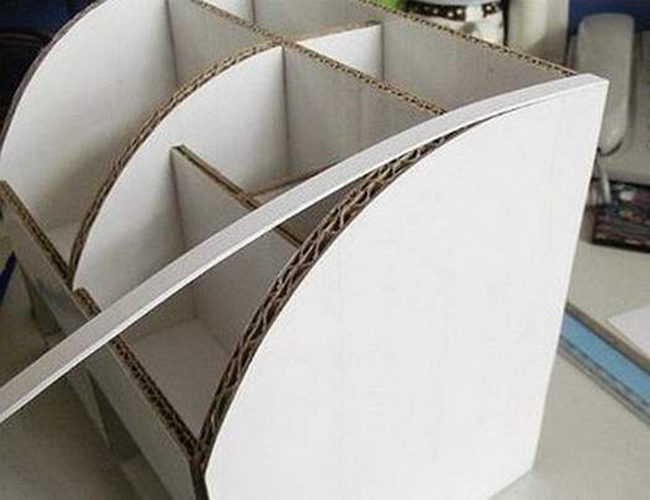
Production process:
- First of all, it is necessary to decide on the specific sizes of the future organizer. Next, the patterns of all parts with holes and protrusions for fastening are drawn. Thus, you will get a strong and stable device for storing little things.
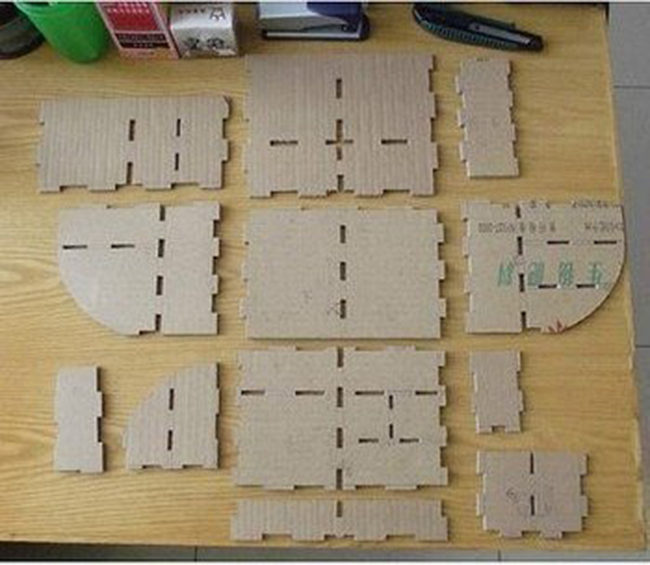
- Next, you need to connect all the details to see the entire structure as a whole. Then the details are versed, if necessary, the protrusions are adjusted.
- At the next stage, each part needs to be glued with decorative paper or a crap-paper.
- Do not forget about the edges of the details that also need to be decorated. To do this, you can use adhesive tape and strip in the tone of the details. You can also use a scourge or a thick cord.
- Next, proceed to the manufacture of small drawers. To do this, you can use cardboard or, as an option, you can find suitable boxes.
- Two boxes need to be glued with decorative paper in tone, after which be sure to attach the handles. To do this, you can use a variety of elements.
- Insert the boxes into the organizer and you can start using a very convenient and useful thing.
In addition to this option for making an organizer, you can take a closer look at others:
How to make an organizer from paper-master class
If you want to make an unusual and simple organizer with your own hands, you can use the most affordable material - ordinary paper. With its help, you can get a small box for storing little things or office. Often such organizers are made in the technique of origami.
Video: how to make an organizer from paper
How to make an organizer from fabric
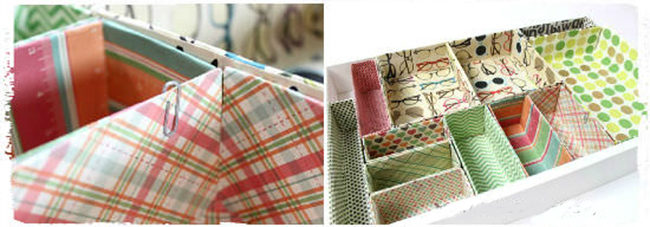
With your own hands, an unusual and beautiful organizer can be made using a cut of fabric. This is especially true for storing women's linen and socks. For such the right product, you will need a piece of any fabric, cardboard, threads, a needle or sewing machine, as well as a ruler.
How to make an organizer for linen - step -by -step instructions
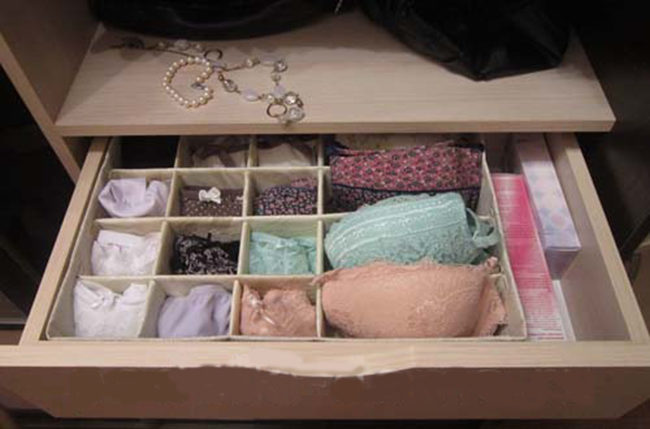
- First of all, it is necessary to find a suitable box, which will be the basis for the future organizer for underwear. You need to look for a box that will perfectly fit the size of the drawer, where you are going to store linen.
- Cut the box just below the level of the box. It is good when the selected box is about 1-2 cm less in width than the box itself.
- Next, prepare partitions from dense cardboard, their number is calculated based on the number of cells. It should be borne in mind that the cells can be of different sizes, depending on the type of linen.
- After that, measure the fabric for each part, making a small allowance. Cart boards are neatly upholstered. To do this, you can use a sewing machine or a regular needle with threads.
- When all the details are ready, they need to be connected together in one design.
- The box is also sheathed with fabric, after which the partitions are inserted into it and they are fixed.
- A convenient and practical organizer for storing linen is ready.
- In exactly the same way, you can make an organizer for socks, it only turns out with smaller cells.
How to make original organizers with your own hands - options
A do -it -yourself organizer can become a unique and rather unusual gift for its close relatives and friends, especially if it takes into account their preferences and hobbies. Consider step -by -step instructions for the manufacture of original organizers.
How to make an organizer for threads
Such a practical organizer can be made to your beloved mother or grandmother, who are fond of sewing. Usually, such needlewomen at hand can have a large number of threads of threads, so the organizer for their storage will be a great gift.
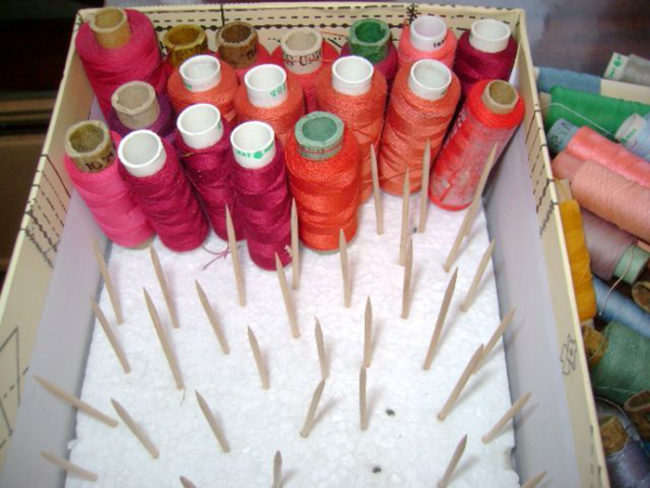
- You will need an ordinary shoe box. To give her a more festive and elegant look, glue it with beautiful decorative paper.
- Next, take a foam layer and cut a piece from it that suits the size of the box.
- Place it inside the box and gently stick the toothpicks at a short distance from each other. Many use ordinary pencils and even nails.
- After that, you can fill all the holders with the coils of the threads and give such an organizer to your loved one.
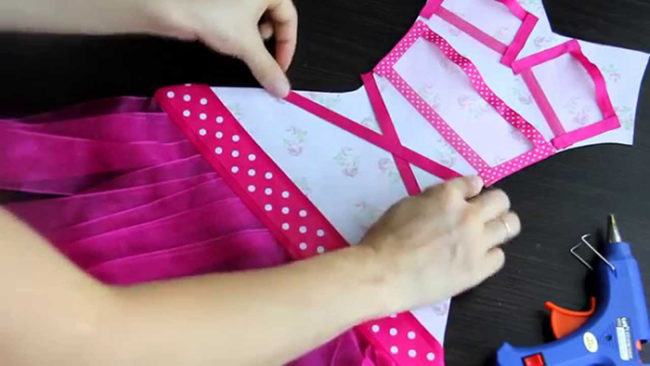
How to make an organizer for girls
Girls are little fashionistas, who from childhood begin to be interested in hair clips, elastic bands, bracelets and other trinkets that need to be stored somewhere. In this case, you can also make a convenient and original organizer, which will be a great surprise for the child.
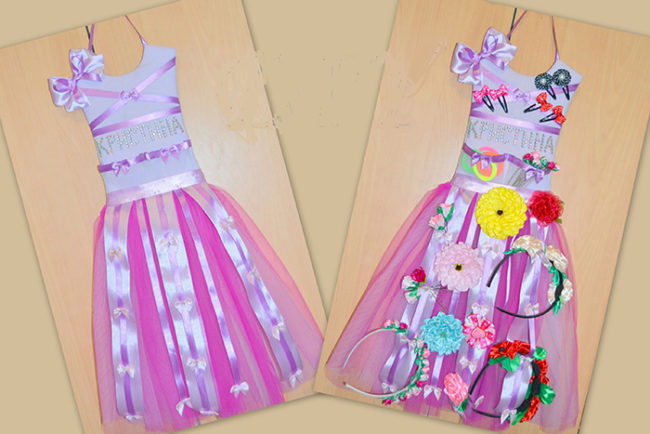
- To make such a charming organizer, you will need cardboard, fabric, various tapes and braid.
- The figure of the princess itself can be made of white cardboard, or you can additionally sheathe it with a cloth.
- On a typewriter or manually, sew a skirt from air fabric with folds, after which, using a braid, fix it on the figure.
- Next, you can experiment: sheathe the upper part of the figure with ribbons on which hairpins will be fixed in the future; You can also let the ribbons for hairpins along the hem of the dress.
- To fix hoops and rims, small folds or holes can be made in the ribbons.
- To make a holder for elastic bands, attach a braid in the upper part of the figure, which will be fixed with a button. If desired and necessary, the button is unfastened and the elastic band is removed.
How to make an organizer for headphones
Constantly confusing headphones is the problem of many modern people. Therefore, a convenient and practical headphone organizer will become a real salvation.
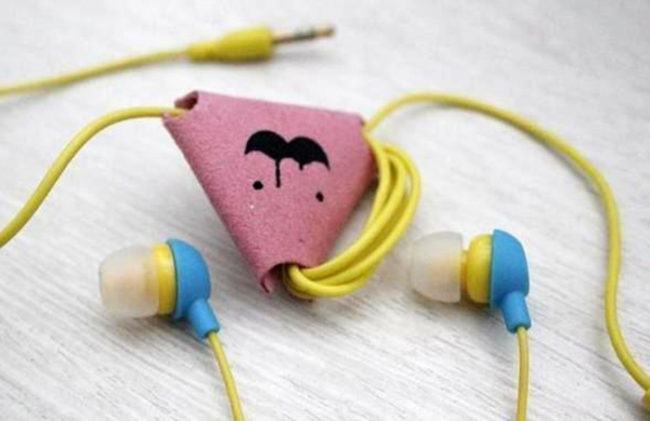
- For such an organizer, you will need a small piece of felt or skin, as well as buttons or button.
- First of all, you need to cut a piece of felt in the shape of a triangle, then three corners of this figure are bent to the center along the red lines that are marked in the figure.
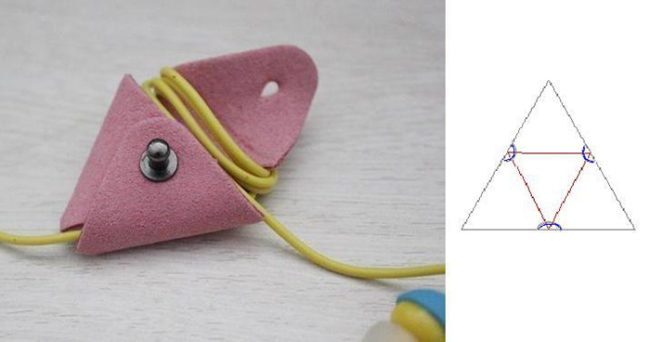
- Next, you need to make small cutouts along the marked blue lines. Through these holes, headphone wires will be extended. At this stage, you can round the tops of the triangle so that the organizer looks more neat.
- After that, fold two corners together and sew a button or one part of the button on them. Sew the second part of the button to the third corner or make a hole for the button.
- The last stage of manufacture is the decoration of your organizer.
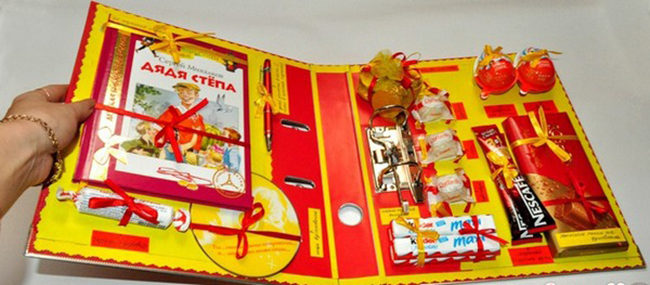
How to make an organizer of mood
To make an amazing and very non -standard gift, you can make a good mood organizer with your own hands. This is a special folder for a particular person who is filled with all kinds of pleasant things, sweets, photographs and funny inscriptions. Such an organizer can be done for a girlfriend, mother, for a husband or brother, given the habits and hobbies of everyone.
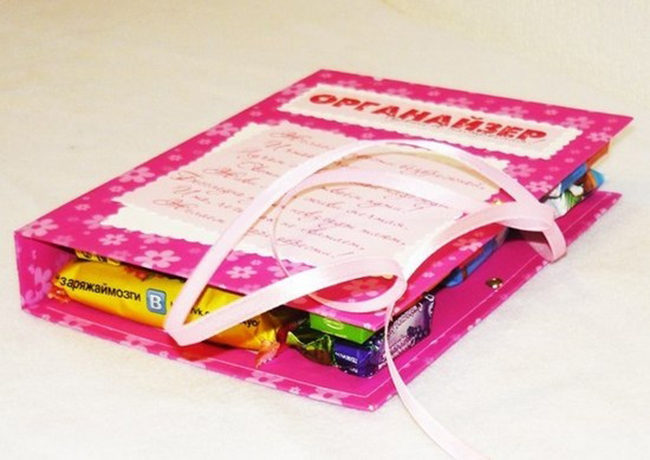
- First of all, it is necessary to take care of the acquisition of a folder folder of any color. If desired, the folder can be glued with decorative paper and make it more thematic depending on the hero of the occasion.
- A sheet of paper is glued to the front side of the folder, on which you can print or write by hand "Organizer of good mood."
- Next, the two inside of the folder must also be sealed with colored or white paper, after which you can do design.
- If this organizer is intended for the girl, it is filled with jewelry, cosmetics and various sweets. On the occasion of a large celebration, you can raise money.
- Male organizers of this type are decorated with cars, the theme of football or fishing.
How to make an organizer for the trunk of a car
Often the trunk of the machine is cluttered with all kinds of tools, sets of cosmetics for the machine and other things, in which you can put things in order with the help of an organizer. It can be made of strong detergent fabric, or you can apply gross power and build an organizer made of wood.
Video: How to make an organizer for a trunk from fabric:
Do-it-yourself organizer is a convenient and practical thing, the manufacture of which can turn into a real hobby and entertainment. In addition, with the help of this small thing in your house or apartment there will always be order and comfort, and each item will certainly lie in its place.


Comments
a couple of years ago, there was no side of metrogils from the same problem, there were no side effects ...
I’m not a fan of peeling at all, it saves from acne of metrogil, it also smoothes it ...
Great article! ...
I take the second course of the Capsules Climafite 911. The tides went very quickly. It became calmer, irritability went away and I sleep well ...
i also noticed - it is worth nervous, everything immediately affects the face. Therefore, I try to avoid conflicts and unpleasant people. Of the creams, I like Miaflow from wrinkles - smoothes not only small wrinkles ...