

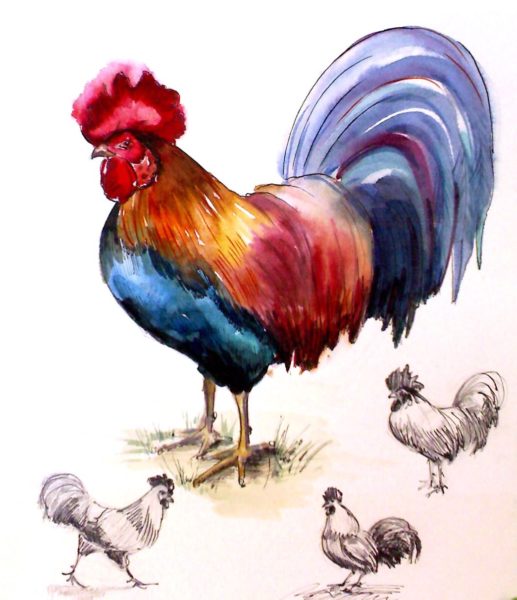
Drawing is a great way to relieve stress, have a good time and gain new skills. From this article you will learn how to draw a rooster - a symbol of the coming year. With the help of step -by -step instructions, drawing not only simple, but also quite complex images with many details, it became available even to those who have never tried to draw. In addition, drawing is a great way to occupy children, teach them something new, develop imagination and have a good time together.
Content
How to draw a rooster. Several general tips for beginners
- For drawing, buy a pencil of medium stiffness so that it does not require strong pressure, but does not stain the paper with fat lines. Do not press the pencil strongly, especially if you draw auxiliary lines, which then you will have to wash.
- Try to make your lines smooth. To do this, it is advisable not to tear off the hands from the paper while drawing one figure.
- If, having outlined the contours, you want to give the drawing a more complete look, you can shake it with a simple pencil or color it. If you stroke, make sure that the lines are neat and repeated the shape of the depicted part. In the case of working with a simple pencil, tone transitions from light to dark are also important - this will depend on the force of pressing during hatching.
- If you color the rooster with pastel, colored pencils, handles or markers, accuracy and direction of strokes also matter.
- If you performed a drawing on the album sheet, do not paint it with watercolors - from a large amount of water that will have to dilute the paint, the paper can soften and wrinkle.
- When working with children, start from a simple one and gradually move to a more complex one. Encourage their successes and try to always leave a place for imagination and creativity, even if you perform exercises from a step -by -step lesson.
How to draw a cock with a pencil for children
If you teach children to draw, these simple step -by -step schemes will be useful to you. Such drawings of the rooster are available even to preschool children. It is better to perform drawings with a pencil, so you can easily erase unnecessary lines or fix errors. However, if you want something brighter, you can use gel handles, markers and felt-tip pens.
How to draw a rooster from geometric shapes
This is the easiest option for beginners - in this figure the rooster is almost entirely made of simple geometric shapes. It is only necessary to combine them correctly.
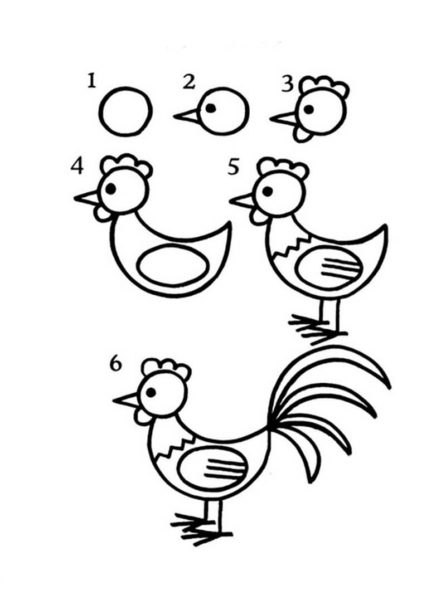
Step -by -step instruction:
- First, draw a small circle. Place it in the middle of the sheet, with a shift to the left, so that the torso of the rooster will fit in the future.
- Continue to draw your head. Make a rooster a triangular nose and put a bold point in place of the eye.
- Now make a crest and beard as shown in the figure. They are several open semicircles interconnected.
- The body of the rooster will be based on an inverted crescent. Make it almost horizontal, only slightly tilted right down. In the middle of the crescent, draw an oval stretched to the sides - this will be the basis for the wing of the rooster.
- Finish the wing by making several horizontal lines from right to left in the oval. They will imitate the plumage. Designate the neck of the rooster with zigzags. Schematically draw his paws.
- The tail will be several thin crescents placed by a fan. Draw them, and a cock with a pencil for children from geometric shapes is ready.
How to draw a rooster felt
This instructions will allow you to draw a rooster with a black felt -tip pen with a minimum number of lines with the children. If desired, then you can paint the rooster together with colored felt -tip pens or handles. In the picture you see how the rooster contour should turn out.
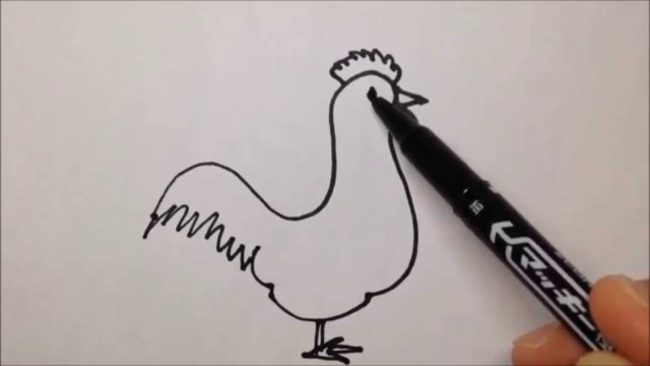
Start with the body of the bird. It is worth putting an end to the base of the tail, draw the chest, neck, head, back and feathers themselves on the tail. It is advisable to do all this without tearing his hands from the paper - only in this case the lines will be as smooth as possible. If you cannot do everything together in one movement, you can interrupt the line in the beak area or in the area of \u200b\u200bthe tail of the tail - there the point will be minimally noticeable. Then finish the details: paws, eyes, beak and crest.
This simple rooster does not look too realistic, but the process of drawing it is an excellent exercise for children to learn how to display the lines with a pencil and compare the proportions.
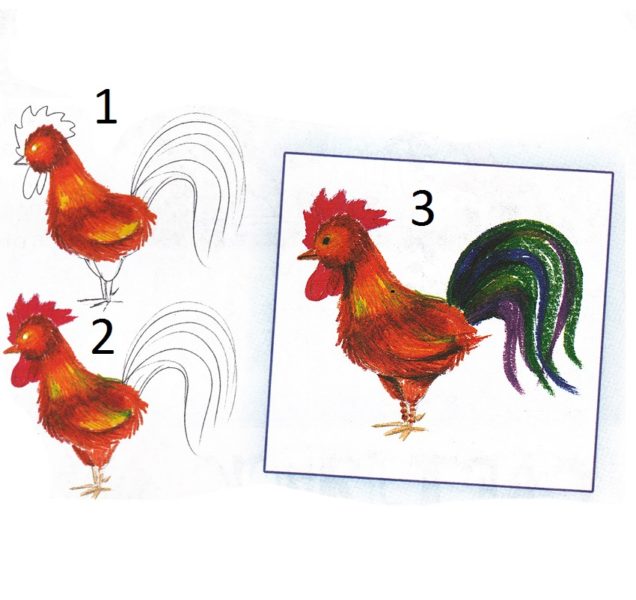
More complex drawings of a cock with a pencil in stages
Now consider more complex options. They are suitable for older children and fit perfectly into creative projects, which are often set for schoolchildren. Also, such a rooster can be used to decorate the children's room.
These drawings are built on ovals and intermediate lines that are necessary in order to evaluate the proportions of the body of the rooster and to portray them beautifully. In the future, it will be necessary to wash the intermediate lines so as not to clutter up the drawing. Therefore, it is better not to press the pencil too much. It is also worth buying a pencil of medium stiffness - too soft the neck will not give a clear line, and it may not be easy to erase it, so the pattern will turn out to be dirty.
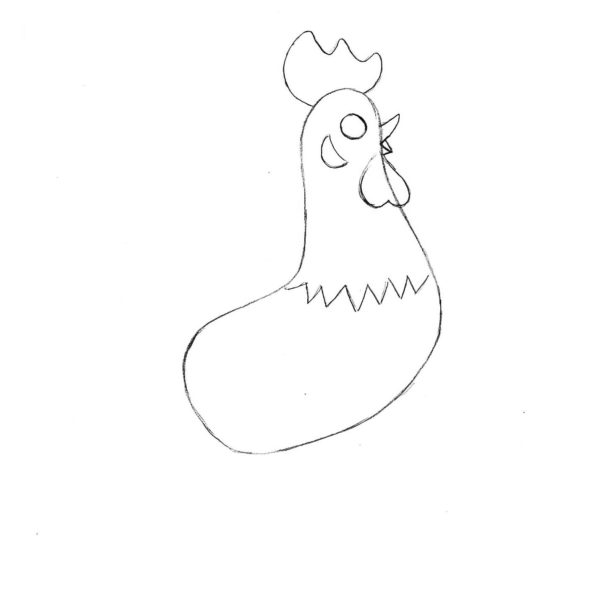
Rooster drawing in 4 stages
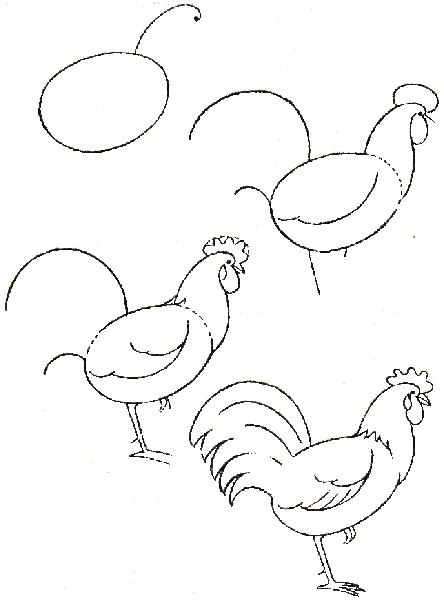
Step -by -step instruction:
- Draw an oval in the middle of the sheet, not too much pressing a pencil. Make sure that there is enough space left on all sides to draw a rooster tail and neck. Designate the neck and head with a soft curved line as shown in the first figure.
- In the same way, turn a curved line just below, denoting the lower border of the neck. Draw a rooster eye and a beard. Sove a crest in the form of a small oval above your head. Designate the beak - for starters, with one thin line. Think about the location of the tail and designate its upper and lower boundaries. Sweep your legs with two thin lines and a wing with a wavy line.
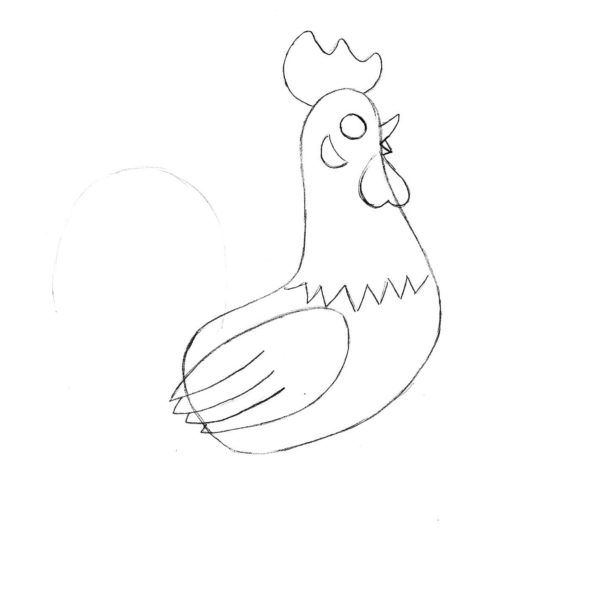
- Gradually begin to add more details to your drawing. Make the rooster a full -fledged crest with a continuous wavy line. On the neck, beard and wing, depict the plumage as it is shown in the figure. Start drawing your legs in more detail.
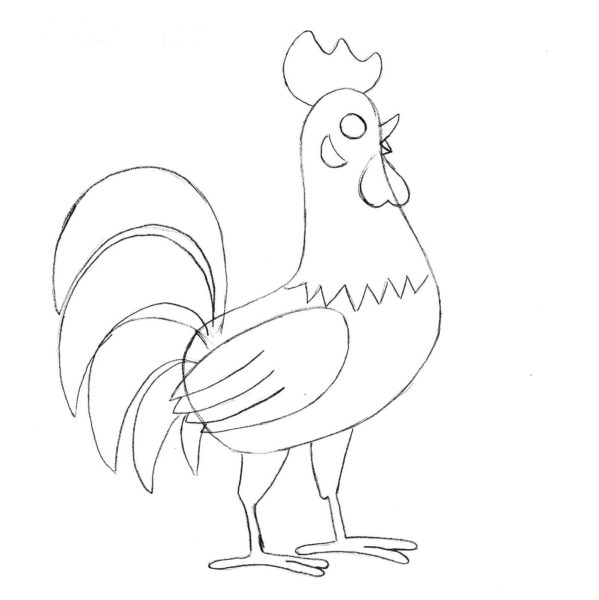
- Wash all the extra lines. Add the last strokes to the drawing. Using frequent parallel strips, make a lush tail a cock. Make the beak more clear, complete the plumage on the neck and wings. Look if you depicted all important details and whether there were unnecessary auxiliary lines.
Rooster drawing in 6 stages
Now you are already familiar with the principle of working with auxiliary lines and ovals. Here is another way to draw a rooster in 6 stages.
Step -by -step instruction:
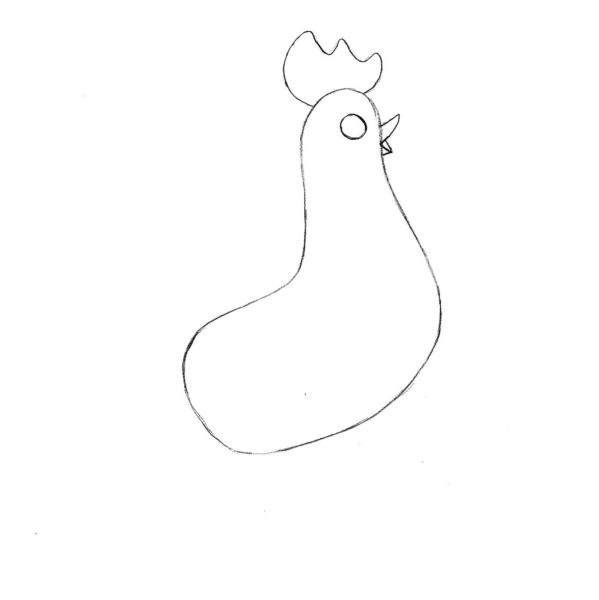
- Start with the body and neck. You can designate them in the form of one curved oval. Keep the proportions - there should be a small deflection in the back, the chest should protrude forward, and the neck will be thinner at the base of the head. A rooster will come from this figure in the future.

- Start drawing your head. Make a rooster open beak, mark your eyes with a small circle, draw a magnificent crest with a smooth curved line.
- Continue the study of small details. Draw the plumage on the cheek and beard. Designate the plumage on the neck with zigzags.
- Now draw a wing. It has the shape of a small oval, only with a few oblique parallel strokes that show the plumage. Subminate the end of the tail with a thin line.
- Draw the tail - it will consist of crescents collected by the fan - so you will best show the plumage. Then draw a rooster to the rooster with membranes.
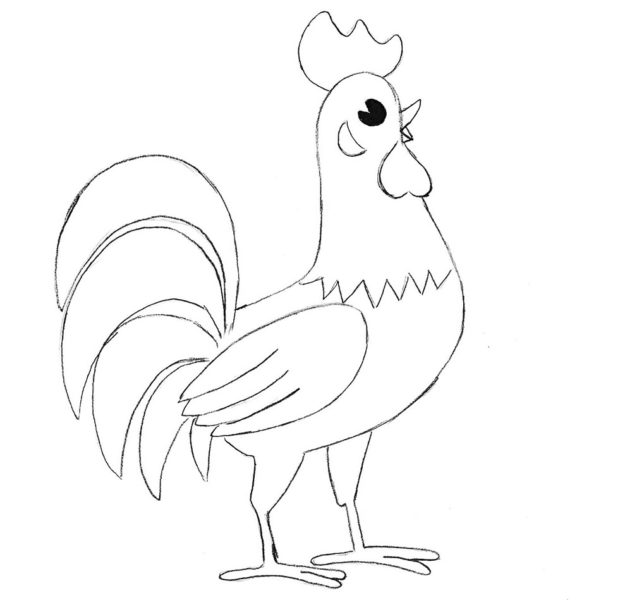
- When you wipe the auxiliary lines you see possible errors - check the proportions again and make your drawing look like a real rooster. Add the last strokes, work with details if there are not enough lines somewhere. Design the eye with a dark dot.
How to paint a rooster in stages for beginners
You can paint the rooster in different ways. If you use a pattern for children's crafts or decorating a room, you need special acrylic paints for wood and ceramics, stained glass paints for glass or paints for fabric. If you draw on paper, the simplest ways to paint the image with colored pencils or children's watercolors. However, instead of pencils, you can use colored gel handles or pastel crayons, and watercolor can be replaced with gouache.
How to paint a rooster with pencils
To paint a rooster with pencils, first, you need to choose all the colors that will come in handy. Usually it is yellow, orange, red, blue and brown. You can use different shades of these colors to make the drawing even more lively and realistic. Make sure the pencils are sharpened.
Step -by -step instruction:
- It is worth starting to paint a rooster from large forms - for example, a body, neck. Try to shake them with the desired color, not too much pressing a pencil. In the future, you can add additional strokes and make the color more saturated. Please note that the strokes should repeat the shape of the figure. For example, horizontal strokes are best suited for the body, and vertical for the neck.
- After you have applied the main pale colors, such as yellow, you can proceed to more intense - orange and red. Apply them in the same way, not too much pressing the pencil.
- When you painted most of the image, you can draw the brightest details of the picture. You can press the pencil more so that the color is more saturated.
- Designate the eyes, beak and other smallest details.
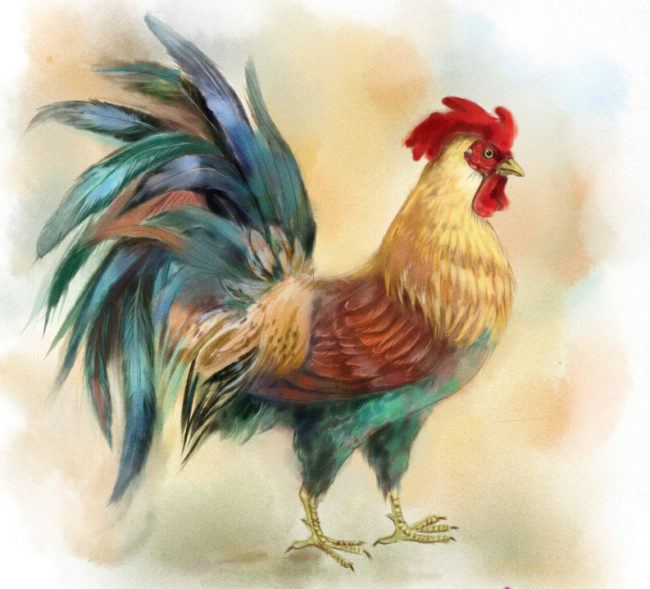
How to paint a rooster watercolor
It is more difficult to paint with watercolors, but more interesting. If you paint your drawing with paints, it is desirable that it be on watercolor paper or cardboard, otherwise a thin sheet may be won from the water.
Step -by -step instruction:
- Start with the main color, strongly diluted with water. Apply yellow to the whole body, head and tail of the rooster. You can make the picture more diverse and bright, adding several more primary colors: green, blue, brown. Start slightly denoting feathers, play with light and shadow as done in the picture.
- If you like how the colors spread and mix, you can try to draw darker orange and red parts directly on raw paper. Then you can adjust the blurry lines. You can also just wait until the yellow paint on the rooster dries, and apply other colors on top, as on ordinary paper. At this stage, it is worth clearly identifying the tail in a dark color, starting to paint a crest and a beard of a rooster, add more vertical and horizontal strokes along the neck and body to demonstrate plumage.
- In the end, draw the brightest spots and small details. If you want to give a special completeness with a watercolor pattern, you can draw off offices with a thin black gel pen.


Comments
a couple of years ago, there was no side of metrogils from the same problem, there were no side effects ...
I’m not a fan of peeling at all, it saves from acne of metrogil, it also smoothes it ...
Great article! ...
I take the second course of the Capsules Climafite 911. The tides went very quickly. It became calmer, irritability went away and I sleep well ...
i also noticed - it is worth nervous, everything immediately affects the face. Therefore, I try to avoid conflicts and unpleasant people. Of the creams, I like Miaflow from wrinkles - smoothes not only small wrinkles ...