

Valentine's Day is the most romantic holiday in the year, which has taken root in many countries. This day gives a great reason to remember his beloved and close people, admit love to each other and just lead the time with his second half. The most important attribute of the day of all lovers is Valentine. Valentine is a small postcard, which is customary to give a loved one. The first valentines appeared already in the 15th century, and then they became even more popular. The traditional flowers of the design of Valentines are red and pink colors - the colors of love and passion. Such cute cards in a huge assortment can be found on store shelves on the eve of all lovers. But your loved one will be doubly pleased if you do Valentine with your own hands. In this article, we will consider several creative ways to create romantic valentines at home.
Content
- How to make a valentine out of paper
- How to make a valentine Origami
- How to make a simple Valentine
- How to make an original valentine
- How to make a valentine for mom
- How to make a valentine with children
- How to make a beautiful valentine
- How to make a valentine postcard
- How easy it is to make a valentine from threads
How to make a valentine out of paper
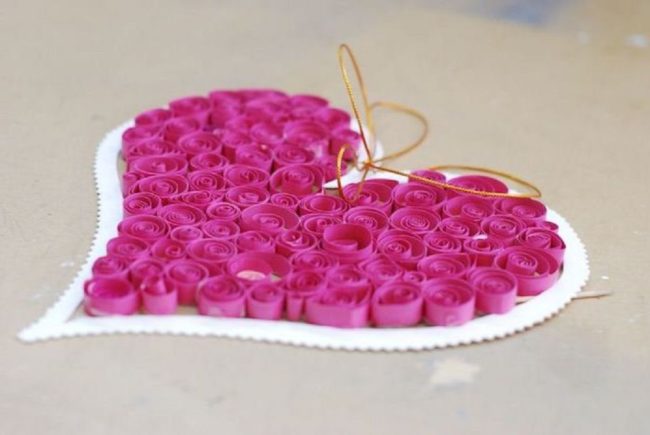
Method number 1. Valentine with paper flowers
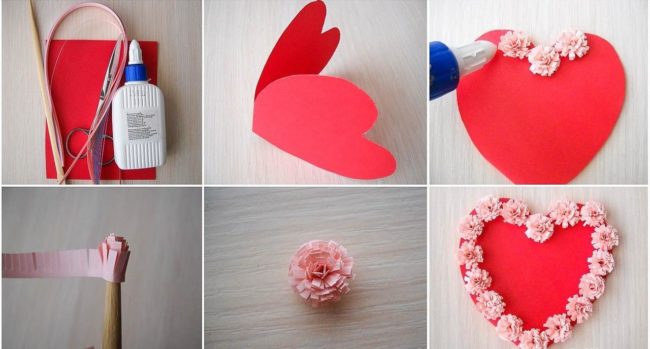
- In order to make a valentine with spectacular flowers of paper you need a dense red cardboard, scissors, PVA glue, a brush to spread glue, thin strips of bilateral colored paper of pink color.
- If you have prepared everything you need, we can start creating a romantic postcard. A red -sided dense cardboard of red color must be folded half to get a “book”.
- Next, you need to draw a heart on cardboard. If it’s hard for you to do this, then use any template with which you transfer the image of the heart to the card. The heart should be drawn in such a way that its lower line coincides with the place of fold of the postcard. After you cut your heart along the contour, you should get a postcard that can open and close.
- Cut the drawn heart along the contour.
- The basis for our romantic gift is ready. Now you can start creating a decor. To do this, you need a brush, strips of pink paper with a width of 0.3-0.5 mm. Take a strip of paper and make the cuts along its entire length in such a way as to get a “fringe”.
- At the reverse end of the brush, begin to wrap the resulting strip with the “fringe”, adding a drop of glue to the whole edge on each turnover. This is necessary so that the finished flower does not fall apart after you remove it from the brush.
- After you wrap the whole strip on the brush, press it slightly with your fingers at the gluing site, and then remove it from the brush. Spread the fringe so that the flower looks voluminous. In such a technique, you need to make so many colors that they are enough to glue the contour of Valentine. The larger the size of the valentine you chose, the more such paper colors will need to be done.
- After the required amount of paper flowers is ready, you can start gluing them on Valentine. Apply a drop of glue to the base of the flower and glue the workpiece to the edge of your heartboard heart. Thus glue all paper flowers. The postcard will turn out to be beautiful and voluminous. Inside Valentine, write a romantic message for your loved one.
Method number 2. Valentine using Quilling technique
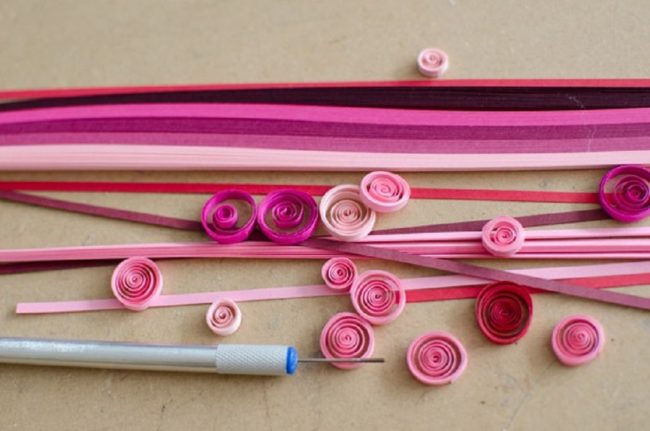
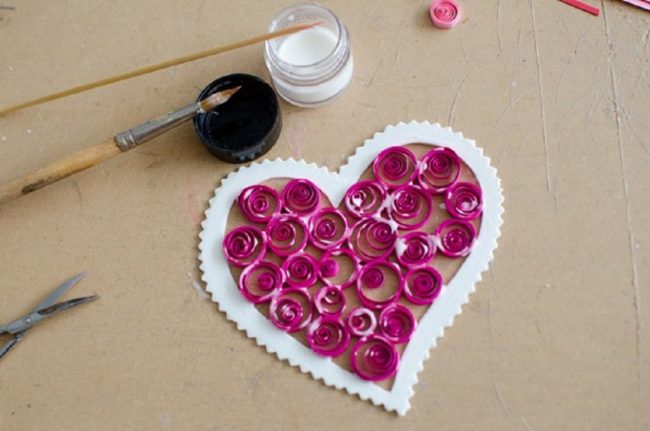
- For the manufacture of valentines using the quilling technique you will need a dense white cardboard, stripes of double -sided colored paper of pink, raspberry, red color, stationery knife, curly scissors, brush for glue, thin brush (toothpick, needle) to create “curls” in the quilling technique, ribbon or beautiful thread. Place all the necessary items in front of you.
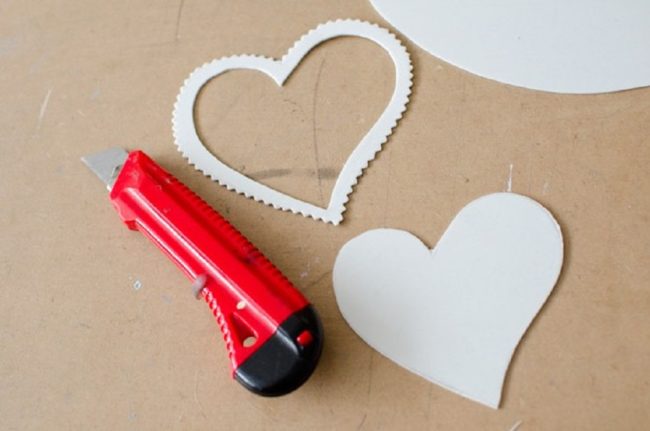
- In order for Valentine to be strong, select a very dense cardboard. Draw your heart yourself or with the help of a template and cut it with curly scissors.

- On the resulting workpiece, draw another heart contour at a distance of 0.5-0.7 mm from the edge to cut the middle. It is most convenient to do this with a clerical knife.
- The frame for our Valentine is ready. Now we can start creating "curls" from strips of colored paper. On a toothpick or needle tightly wind a strip of colored paper. After you remove it from a toothpick, the strip will remain in the form of a beautiful “curl”. Use the paper of several shades of pink and red. Place the "curls" inside the heart from cardboard.
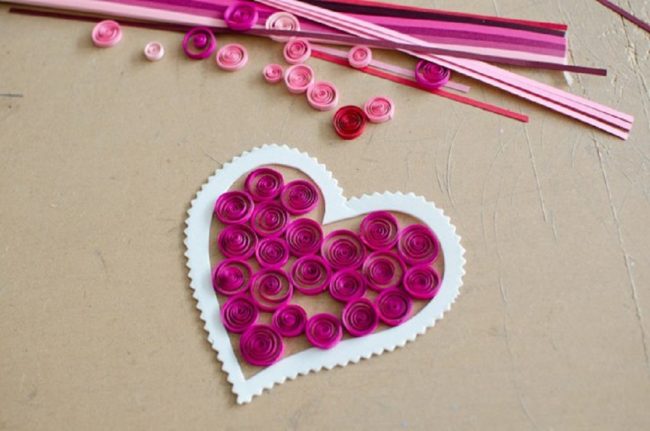
- Now it is necessary to firmly fix all the “curls” inside the heart. With the help of the brush and PVA glue, fasten all the elements. Remove excess glue in a timely manner with a napkin. Let the workpiece dry.
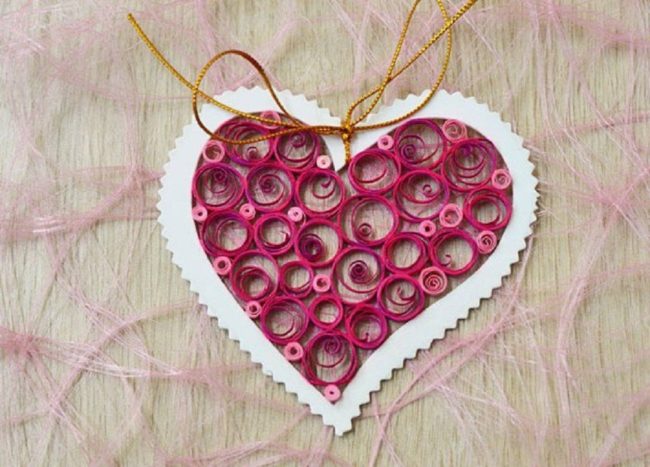
- After the glue dries, inspect Valentine again. If somewhere the elements glued poorly, glue them again. Attach a ribbon or a decorative thread to the finished valentine.
- The elegant and delicate Valentine in the quilling technique is ready.
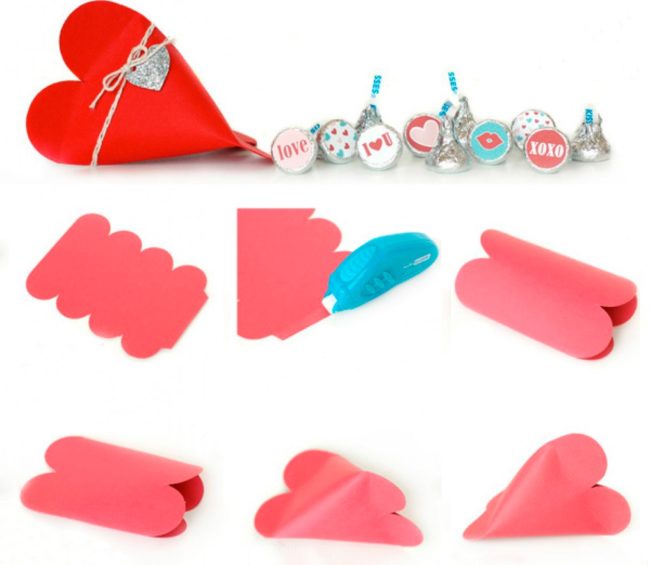
Method number 3. Valentine in the form of a box
If you want to congratulate your soul mate not only with a postcard, but also give a small gift, you can make an elegant gift box in the form of a heart with your own hands. Consider step -by -step instructions for the manufacture of such an unusual valentine.
- Before starting to make a ceremony box, decide on the color of the paper. The traditional colors of St. Valentine's Day are considered red and pink. But you can choose absolutely any color. The paper should be quite dense if you want to place a small gift inside the future box.
- Draw and cut the template that you can see in the photo below. The resulting workpiece is represented by 4 rectangles with rounded edges interconnected. On the one hand, the workpiece must be left a small strip for gluing. The larger a sheet of paper you take, the greater the size of the box.
- Using a pencil glue or any other glue, combine the edges of the workpiece.
- Next, glue the wavy edges of the workpiece so that the box is obtained. If you were going to put a small souvenir inside, then do it now. Lovers usually give each other bracelets, pendants, rings with romantic symbols.
- To additionally decorate the box, use a decorative thread with a romantic pendant or a bright ribbon that can be tied around the box.
How to make a valentine Origami
If the person you want to congratulate on Valentine's Day is fond of reading books, then you can make a cute valentine-posting using origami technique. Consider step -by -step instructions:
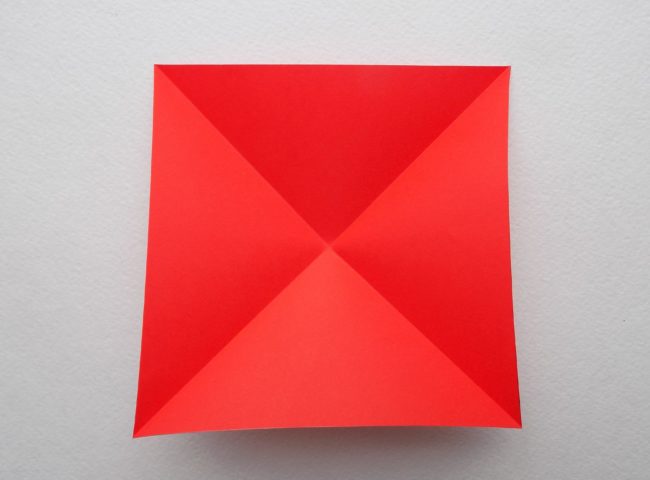
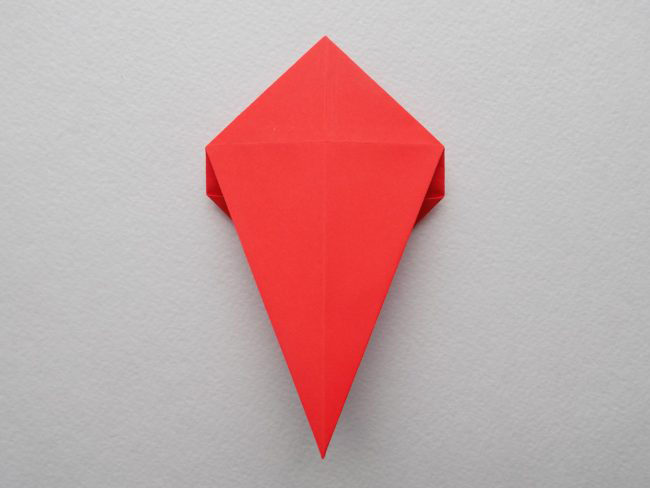
- prepare a sheet of double -colored red paper and cut a square out of it;

- fold the square one diagonal, turn it back. Then fold the square according to the second diagonal and turn it again;
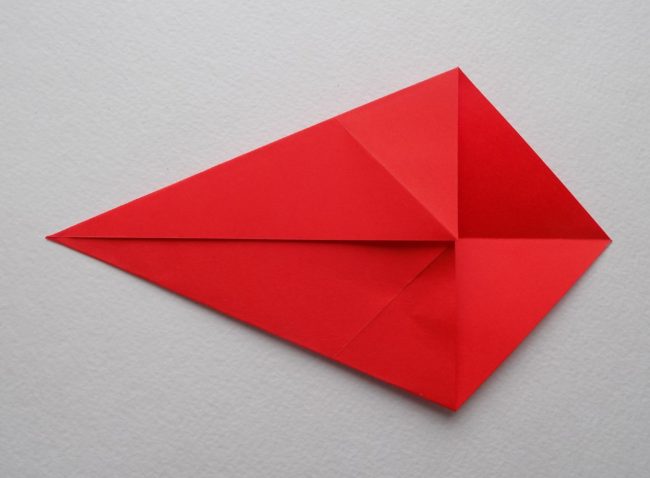
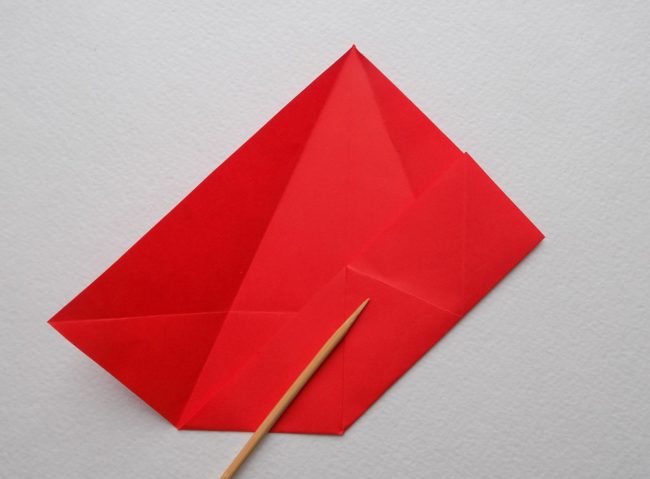
- next, it is necessary to turn one of the sides of the square along one of the diagonal lines;

- now make a similar bend of the side of the square on the other side;
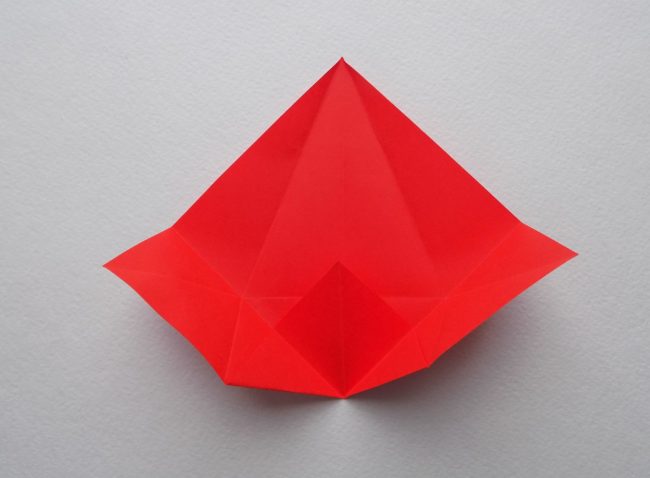
- turn the workpiece to you so that its most sharp corner looks up. Bend up the lower side of the workpiece upward to the sharp corner;
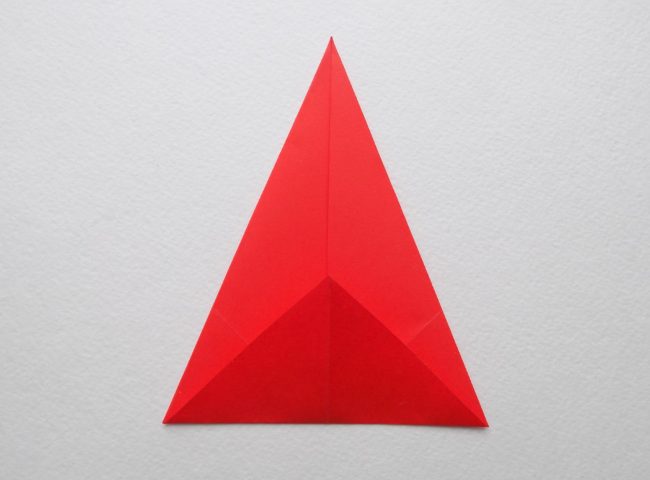
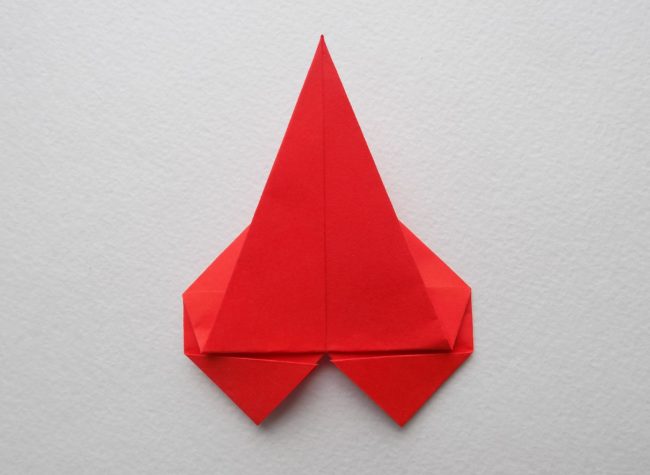
- now it is necessary to deploy our square to start folding it in another way;

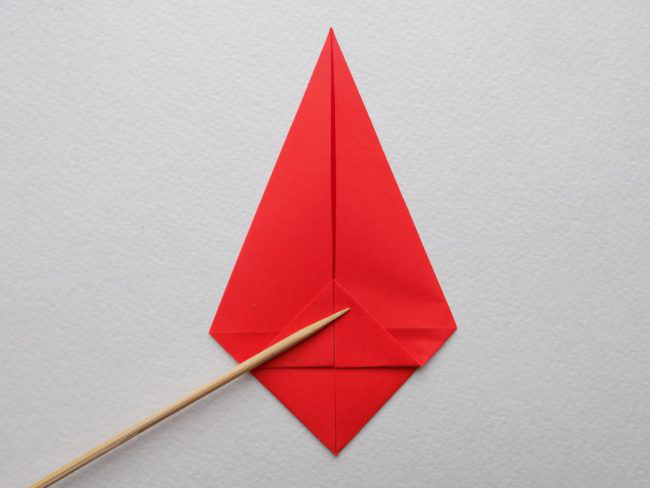
- without turning the workpiece, bent the lower edge of the square up;
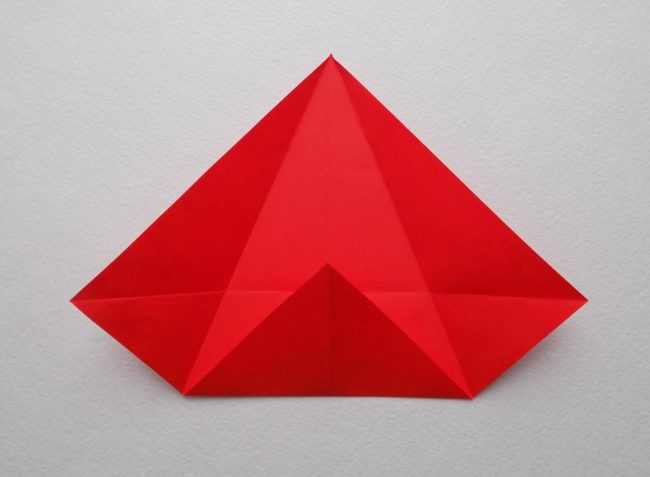
- next, you need to fold the right edge of the square as follows;
- similarly, fold the left edge of the square. We remind you that all the bends should be shitty and without creases;

- now expand the right and left edge of the workpiece that you folded in the last 2 steps;
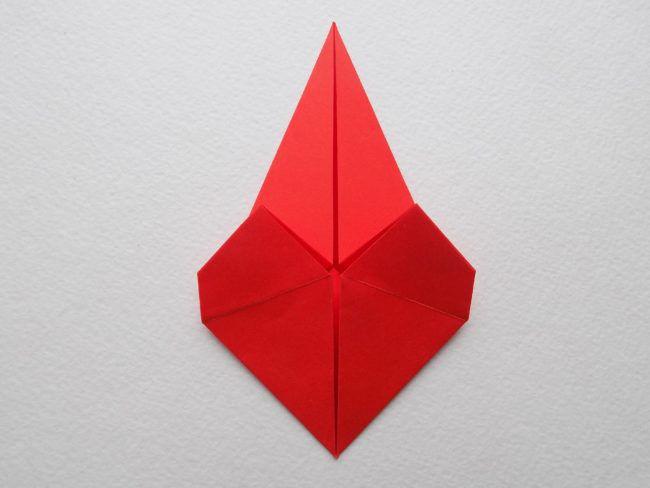
- bend the left side of the workpiece along its middle;

- similarly, bend the right side of the workpiece. You should get the following;

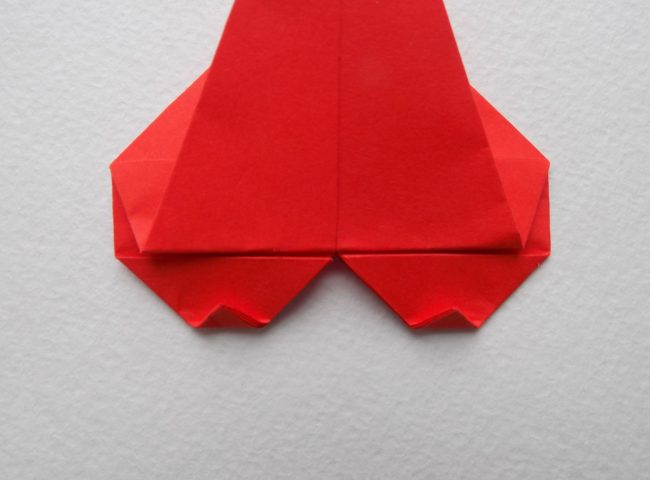
- bend the lower edge of the workpiece as follows;

- in the same way, bend the lower edge of the workpiece on the other side;
- if you turn the workpiece at this stage, then it should look as follows;
- turn the blank back so that the long sharp corner looks down;
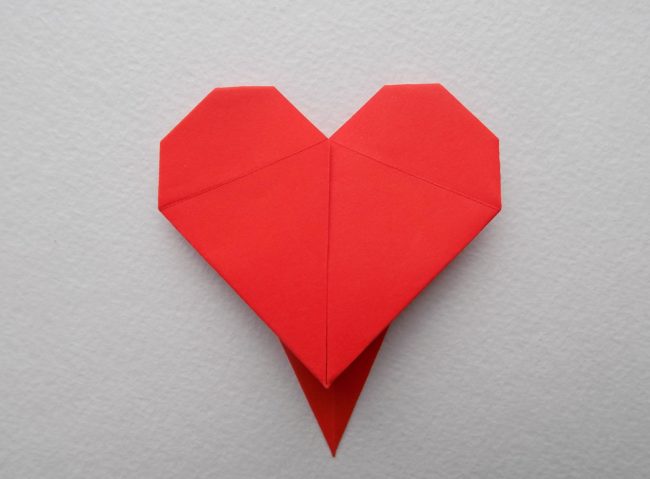
- now the long and sharp angle must bend up;
- at this stage, if you turn the workpiece, you can already see the outlines of the heart-stiring;

- in order to remove too sharp and graphic heart outlines, it is necessary to make small folds in certain places. Now the heart will acquire more smooth outlines;
- valentine-stroke in the technique of origami is completely ready. You can place it in a book that your loved one is currently reading to make him a pleasant surprise.

How to make a simple Valentine
If you want to surprise your loved one with a valentine made by your own hands, but do not really like to mess with glue and scissors, then look at the next method of manufacturing a simple, but spectacular valentine.
- In order to make a simple valentine, you need dense cardboard, colored paper, sharp scissors and glue.
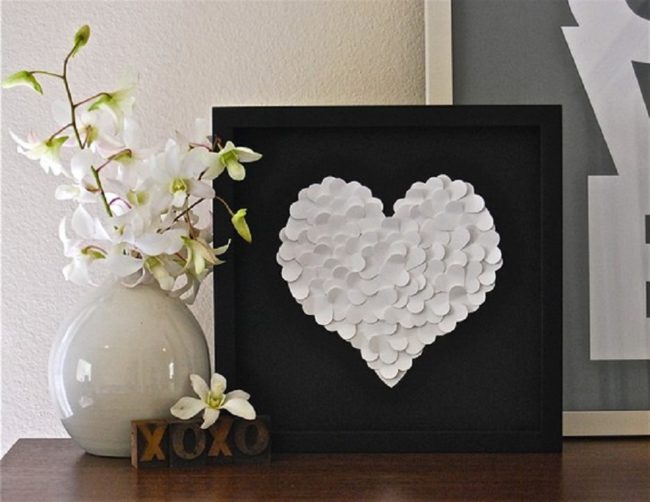
- One of the most important points in the manufacture of this valentine is the choice of colors. In the version we propose, the color of Valentine is not quite traditional for the Valentine Day - black and white. You can opt for another combination of colors, but they must be contrasting.
- Cut the square of the desired size from cardboard.
- Draw a silhouette of the heart strictly in the center of the square with a simple pencil.
- Now it is necessary to prepare many small hearts from colored paper, which will fill the entire space inside the drawn heart.
- Stick the little hearts so that they fit tightly to each other, but so that their widest parts are not overlapped.
- After the entire space inside the heart is filled, slightly lift the edges of the hearts to give the volume of the postcard. A simple valentine from a minimum of materials is ready. On the back you can write a romantic message for your loved one.
How to make an original valentine
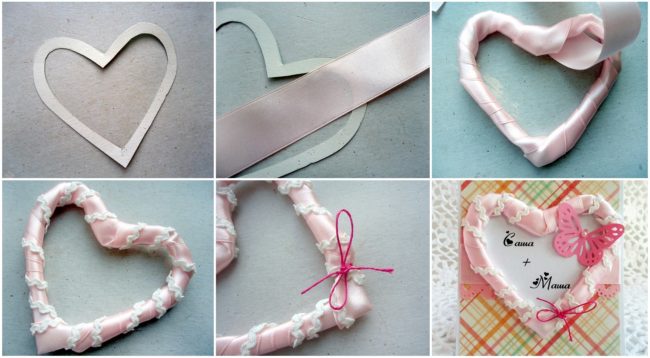
Valentine, which was done with his own hands, already attracts attention. If you use a variety of materials in your work, then the effect will be even more attractive. Consider the option of making a valentine using ordinary cardboard and a delicate -colored satin tape.
- You will need the following materials: dense cardboard, satin ribbon, decorative thread or cord, lace, scissors, stationery knife.
- Take a sheet of dense cardboard and draw a silhouette of the heart. With the help of scissors, cut the workpiece. Then, inside this heart, you need to draw another heart of smaller size. Using an office knife, cut the middle of the workpiece along the second contour.
- Now take a thin satin ribbon and begin to wrap your heart. Try to tightly, but not too pushing the cardboard. Fix the end of the tape with glue or a needle with a thread.
- Now you can start decorating a satin heart. You can wrap it with a decorative thread, a cord, a thiner ribbon of a different color.
Such a heart can be presented to a loved one in different ways. You can attach a sheet of decorative paper and a small piece of magnet on the back of the heart. In this case, Valentine will act as an original magnet. You can also place a memorable photo inside the heart.
How to make a valentine for mom
There are a large number of ways to make Valentine easily. Such methods can even the child who want to congratulate the most dear and loved one - his mother. Since children are very fond of drawing, we will consider the method of drawing valentines.
- Prepare a white sheet of paper and red paint.
- Adjust the palm with a hand with a brush and make a fingerprint on a sheet of paper.
- Clean the second palm with paint and make the second imprint so that the thumbs close, forming the silhouette of the heart.
- The original Valentine is ready. If the child knows how to write, then inside the heart you can write a wish.

How to make a valentine with children
The joint work of the parent and the child brings great benefits to both. Valentine's Day gives a wonderful reason to make Valentine with the child. Consider the step-by-step instructions for creating a cheerful valentine snail, with which the child will then play with pleasure.
- For the manufacture of valentines in the form of a snail, you will need bilateral colored paper, glue, pencil, felt -tip pens.
- To begin with, we will deal with the manufacture of the "body" of the snail. Cut a strip of colored paper. On the one hand, cut 2 “antennas”, which will be the eyes of the snails.
- Bend thin strips and draw eyes on them with a felt -tip pen. The "body" of the snail itself also bend so that the snail "looks" forward. Do not forget to draw a sweet smile of our snail.
- Now you can start creating a snail shell, which will be presented in the form of a heart. Cut a strip of color paper of a different color. On each side, make small incisions so that the sides of the strip easily connect to each other.
- Connect the strip with the incisions made. To get the shape of a heart, you need to glue a small section of the strip right in the middle.
- Attach the resulting heart to the "body" of the snail. A charming craft for Valentine's Day, which can be made with the child, is ready. Older children can perform such a snail on their own, and younger children can make it under the guidance of the parent.

How to make a beautiful valentine
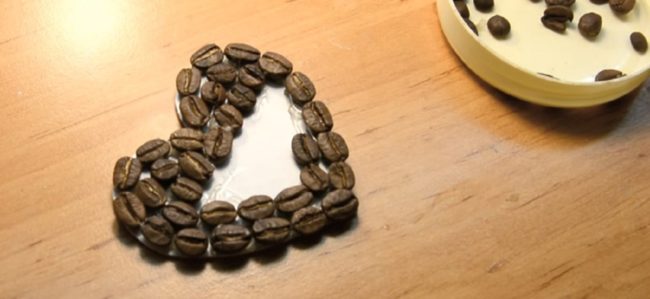
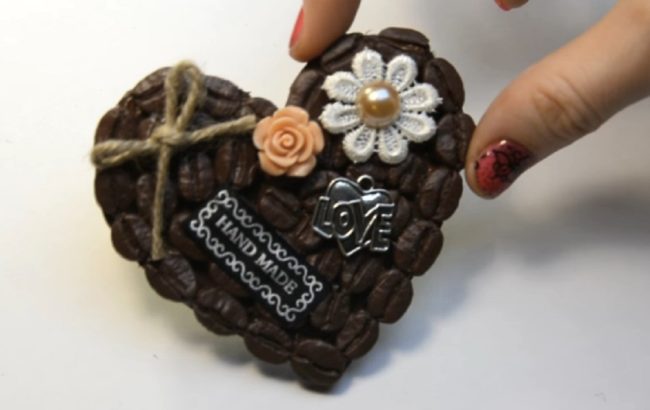
A romantic Valentine can be made from a rather unusual material - grain of the Club. Such a miniature postcard, along with touching words, will give your loved one and an invigorating aroma of coffee, which causes pleasant associations in most people. In order to prepare such a valentine, you need a white dense cardboard, scissors, coffee grains, acrylic paint in the color of grains of coffee, adhesive gun, various decorative elements for decorating Valentine (beads, stones, rhinestones, bow, ribbon, etc.). Consider step -by -step instructions for the preparation of the "coffee" Valentine.
- Draw your heart on cardboard. If you are not distinguished by artistic abilities, you can draw a heart with any template. Cut the valentine and prepare a small amount of grain of the coffee.

- Now you just need to fill the entire space inside the paper heart with coffee beans. It is most convenient to do this with a glue gun. Start fix the grain along the contour of the cardboard workpiece.

- Place the granny as close as possible to each other so that there are no gaps between them. It is better to use grains of different sizes.
- After you completely fill the space inside the paper heart with coffee beans, you can cover with valentine with acrylic paint to the color of grains. If the aroma of Valentine is very important, then you may not do it.
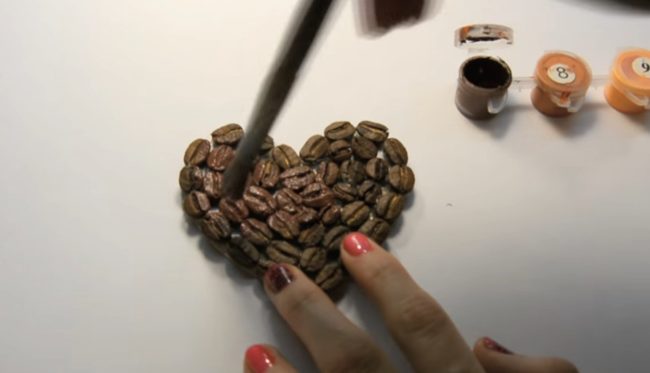
- Now you can allow a real flight for your imagination. Decorate the surface of the "coffee" valentine with any decorative elements. It can be beautiful beads, pebbles, unusual buttons, miniature flowers, tapes, etc. Try not to overload Valentine with decor, because She itself looks quite attractive.
How to make a valentine postcard
On Valentine's Day, Valentines can be presented to your beloved people, made in various techniques and styles. Valentines in the form of cards are very popular. Consider the option of execution quite simple, but very spectacular valentine-postcard:
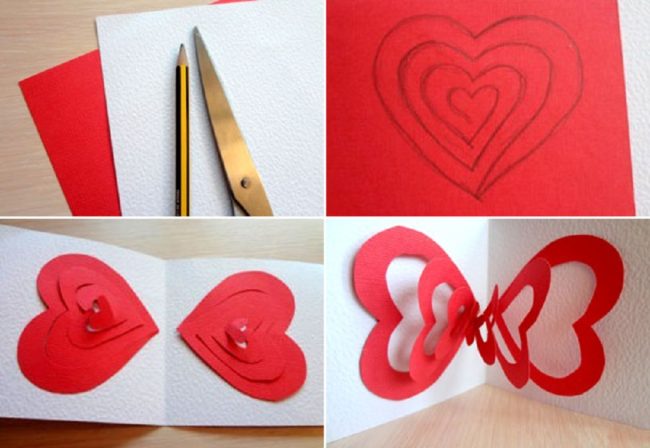
- for Valentine, we will need sharp scissors, colored double -sided paper, thick white cardboard, simple pencil, eraser, glue;
- first, prepare the basis for the postcard. To do this, you just need to bend half a sheet of white cardboard. You can choose the size of the postcard you need. The postcard can be both rectangular and square;
- The “highlight” of this festive postcard will be its internal content - two voluminous hearts connected to each other. On a sheet of red paper, draw a heart. You can do this by hand, or you can use any template;
- inside the drawn heart, you need to draw several more contours of hearts in the form of a spiral;
- prepare exactly such a second heart;
- now you need to use scissors to make cuts inside the heart along the drawn spiral contours inside;
- light glue the outer edge of the heart and glue it on one side of the postcard. Strictly symmetrically from the other side, glue the second heart in the same way;
- now you need to connect the hearts with glue. At the time of opening, the heart cards will be turned into such a voluminous and spectacular composition.
How easy it is to make a valentine from threads
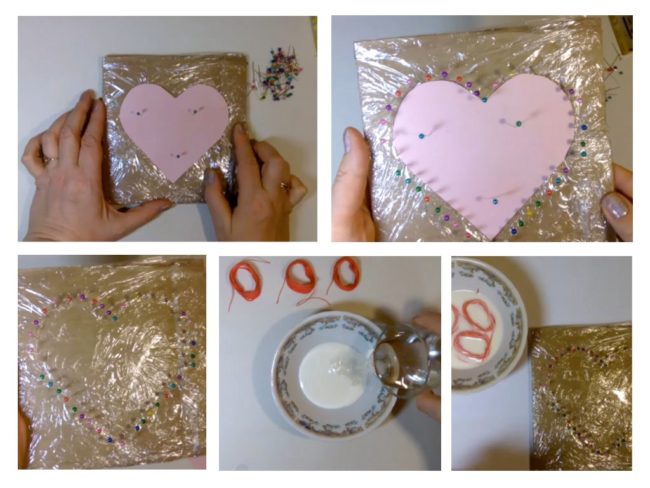
Valentines from threads look unusually elegant and fragile. In order to prepare such a gift to your loved one for Valentine's Day, you will need scissors, PVA glue, red thread, plate, clerical needles, glue, cardboard, piece of film.
- The first thing to do is prepare a heart template. You can draw it yourself or cut your heart out of the newspaper, magazine.
- Take a small square of dense cardboard, which should be large in size than the heart. This will be the basis for gluing our Valentine. Wrap the cardboard with a food film. This is necessary so that the threads after gluing easily separate from the base.

- Attach your heart to the cardboard in the film and fix it with the help of stationery needles. Using the same needles, indicate the contour of the heart on a cardboard basis. The distance between the needles should be 1 cm.
- Now you can remove the heart template from the paper.
- Drink red threads with small glomeruli and soak them in a plate with PVA glue. Threads should be well soaked in glue.
- Slightly squeeze the thread from the excess glue and begin to form the shape of the heart, clinging to the needles. Thus, you must completely fill the entire space inside the needles.
- With the help of a brush with glue, smear the threads again. Carefully smear the places where the threads cling to the needles.
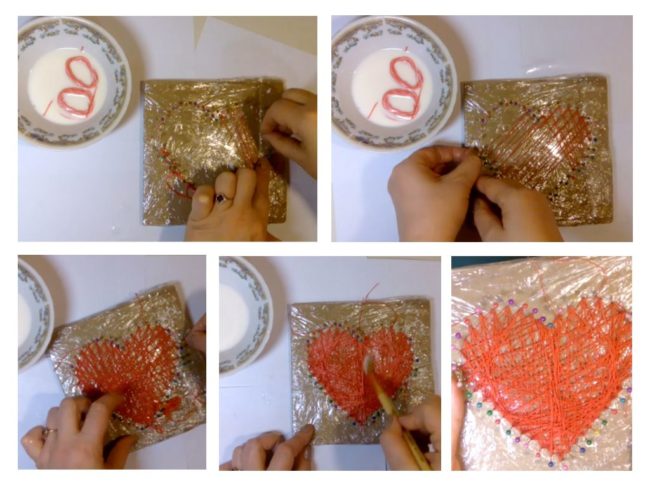
- Put your workpiece until completely dry.
- Now you can remove the needles and easily separate your heart from a cardboard base. Using various decorative elements, you can additionally decorate Valentine.

Valentine is one of the many ways to please her beloved and loved one. If you do it with your own hands, then, together with attention, give a person a piece of your soul. Now you know many ways to make Valentine with your own hands. Love and be loved!


Comments
a couple of years ago, there was no side of metrogils from the same problem, there were no side effects ...
I’m not a fan of peeling at all, it saves from acne of metrogil, it also smoothes it ...
Great article! ...
I take the second course of the Capsules Climafite 911. The tides went very quickly. It became calmer, irritability went away and I sleep well ...
i also noticed - it is worth nervous, everything immediately affects the face. Therefore, I try to avoid conflicts and unpleasant people. Of the creams, I like Miaflow from wrinkles - smoothes not only small wrinkles ...