

A hobby or creativity is a unique and unique opportunity to distract from everyday routine and problems at work and completely dissolve in your favorite pastime, resting morally and physically. To date, there is simply a huge number of different hobbies for girls and women, as well as for young mothers who simultaneously want to engage in the development of their baby. Quite often, the preference is given to the modeling of various figures, panels and paintings, for which plasticine, clay, polymer clay are used. However, the most popular material for creativity is a salty dough that can not only be bought, but also do it yourself at home. Simple salty dough is much cheaper than the same plasticine or plastic, it does not smell and does not cause allergies, which is an undoubted plus when working with children.
Content
- Features of the preparation and use of salt dough
- How to make salted dough: recipes
- How to dry crafts from salt dough at home
- What can be done from salt dough - making crafts step by step
- How to make a toy from salt dough on a Christmas tree
- How to make a smoke toy from salty dough
- How to make a salted doll doll
- How to make flowers from salt dough
- How to make food from salt dough
- How to make a cat from salt dough
- How to make a salted dough house
- How to make a picture of salt dough - video
In this article, we will consider all the features and subtleties of how to make salted sculpting dough, describe several options for proven recipes. We give detailed step -by -step instructions for preparing a variety of crafts from salt dough, which can be made by yourself or with children.
Features of the preparation and use of salt dough
Testoplasty, mukosolka or biocamics - these are all synonyms of modeling from salty dough. This type of hobby appeared a long time ago and immediately gained popularity among women and girls, as well as small children who could create the most incredible and funny figures using this material. It is not known for certain who came up with the use of the usual culinary dough for the manufacture of crafts. However, there is an opinion that for the first time the salty dough for modeling figures are used, who wanted to diversify the cakes.
Salt dough is a great alternative to plasticine or clay, so many needlewomen and young mothers choose this material for creativity. Today in stores you can purchase ready -made salty dough of various brands, but the cost of such material is quite high. For this reason, many beginner needlewomen are thinking about how to make salted dough at home. In this process, there is nothing complicated, and as a result you can get high -quality, safe and suppressed material for classes with children and your own creativity.
Why do many women prefer the salt dough? Everything is very simple, the use of salty dough for your hobby has a number of advantages, which are fundamental in this choice. Consider the main features of the use of salted dough for modeling crafts at home.
- First of all, this is one of the most economical materials for creativity, which will cost real pennies. Most often, it is this factor that bribes needlewomen, since every housewife in the kitchen has all the ingredients for making salty dough.
- When working with salty tests, you cannot stain your clothes. It is also enough to simply remove your workplace - shake off or wipe it first with a dry rag, and then walk wet.
- Salt dough has a very good consistency, thanks to which it is easy and pleasant to work with such material. The dough is quite thick, so it does not stick to the hands and thereby does not spoil the entire process of creating crafts.
- Salt dough can perfectly keep in shape. The figures made of it do not fall and do not deform even without finish drying in the oven. Salt dough crafts can dry out even in the air.
- This material is more natural in comparison with the same plasticine or plastic, which is an important factor for its use when working with children. Salt dough does not have an unpleasant odor and does not cause any allergic reactions. Even when a piece of dough in the mouth gets in the child, it does not harm any harm, especially since it is salty and the child will immediately try to spit it out
- You can make salty dough for children using various dyes. In this case, you can use natural paints, for example, beet or carrot juice.
- If you make a salt dough correctly and cover the finished craft with colorless varnish on top, then such a work of art of your own manufacture will serve you for many years.
Necessary ingredients for preparing salt dough at home
It is very simple to make salt dough with your own hands, since the necessary ingredients are always at hand. To get high -quality and correct salty dough, you need only three most important components. The most basic components of the classic salty dough are flour and salt. Some needlewomen prefer to mix various varieties and types of flour, for example, wheat and rye, thereby achieving more supple material and better crafts. In addition, water is necessary that the previous ingredients are stirred. In addition to the main components, different needlewomen can add auxiliary ingredients to salt dough, which make the material more plastic and durable.
- Sometimes in recipes there is such a component as dry wallpaper glue. Its needlewomen are used for greater strength of the final product.
- In order for the process of modeling from salt dough to be more pleasant, and the material itself is elastic, you can add a little vegetable oil or hand cream when preparing it.
- Some women use glycerin in the salt dough, which also makes the material more pleasant to the touch and facilitates the work with it.
- You can use jelly on starch instead of water. This ingredient will help make salty dough more plastic and soft.
- To make colored salty dough, you can use food dyes or natural, if we are talking about working with a child.
Necessary tools for preparing salt dough and working with it
In order to correctly make salted dough at home, you must first prepare all the necessary tools and materials that may be needed during operation.
- First of all, you need to arm a large bowl for a kneading salt dough. It can be made of any material: glass, metal, plastic.
- You will definitely need an oven for drying. There are alternative methods, for example, drying on a battery or in the air.
- In addition, it should always be disgusting at hand or a board for laying out figures from salt dough.
- Prepare any measured containers. It can be glasses or spoons. Without them, it is difficult to prepare a really right salty dough.
- To store the dough, plastic bags are necessarily needed, since from a long stay in the air, the salty dough is covered with a crust and then it is difficult to work with it.
- Prepare a variety of molds, a rolling pin, shoulder blades and sculpting stacks. They are needed to form various figures.
- Paints and brushes are useful to create ready -made crafts from salt dough.
- To decorate crafts, various cereals, coffee beans, buttons and beads, ribbons and sticks, tubes and screws, as well as all unnecessary little things that can be found at home, can also be needed.

How to make salted dough: recipes
Properly prepared salty dough is the key to obtaining beautiful figures that will remain for a long time. That is why it is important to responsibly approach the process of kneading. Each needlewoman and a lover of working with salty tests knows his secrets of its preparation, adds some additional ingredients that can give the test more elasticity and suppleness. Today, there are a large number of salt dough recipes that differ in the dosages of ingredients and various additives. However, there are common nuances in them: the flour should be purely wheat without additives, salt is better to use small, and it is ideal that ice water is ideally suited.
Consider the most popular recipes for salty dough that can be prepared at home.
How to make salted crafts for crafts - a classic recipe
This recipe is the basic basis for the preparation of salt dough.
Necessary ingredients:
- Wheat flour - 200 grams.
- Small salt of Extra varieties is 200 grams.
- Ice water - 125 ml.
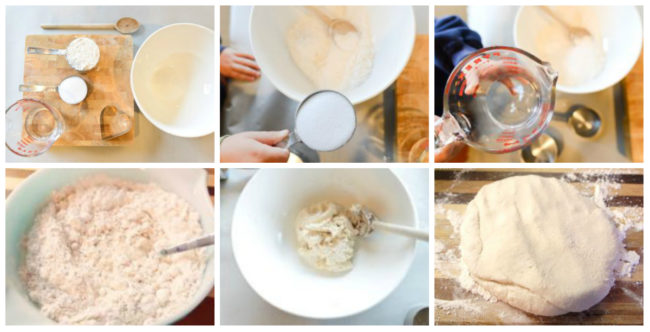
Preparation:
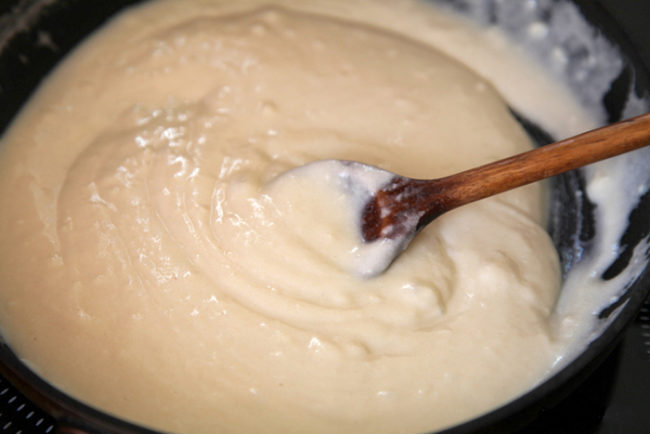
- Take a wide bowl and pour 200 grams of salt into it, then add part of the water. It is best not to pour all the water at once, since the flour is different and therefore a little different amount may be needed. However, if you first knead the salt dough for the first time, it is better to strictly adhere to the recipe.
- Next, stir the salt thoroughly until it is completely dissolved in water.
- See the flour and add it to a salt solution. At this stage, you can add water if it is not enough.
- First stir the flour with a fork, and then put the dough on the board or on the table and knead it well with your hands.
- Then put the finished dough in a plastic bag, which must be placed in the refrigerator for a couple of hours. After about 2-3 hours, salted dough is ready for work.
How to make salted dough in a microwave
A good salty model for modeling can be prepared in a microwave. This process takes literally a few minutes.
Necessary ingredients:
- Two parts of water.
- Two parts of rough white or rye flour.
- One part of the small salt of the Extra class.
- 1 tbsp.
- 1 tbsp of vegetable oil.
- If necessary, food dye.
Preparation:
- Take a large bowl and pour salt into it, then pour in the water and stir everything thoroughly until completely dissolved.
- Next, add sifted flour and all other components.
- First you need to knead the dough well with a spoon or fork, and then pour into a special container for the microwave.
- You need to keep the dough at medium power for 5 minutes.
- Remove the container with the dough and let it cool, after which the salty dough needs to be kneaded well with your hands.
- That's it, you can begin to make a figure out of salt dough.

How to make custard salt dough
Unlike a classic recipe, custard salty dough is softer and more viscous. Children love to work with such material, as it does not stick to their hands. In addition, you can immediately make a large amount of dough and engage in creativity with the whole family.
Necessary ingredients:
- Two glasses of water.
- 1 tablespoon of vegetable oil.
- Two glasses of white wheat flour.
- One glass of small salt of the Extra class.
- 1 tablespoon of citric acid or baking soda.
- Owing dyes are added if desired.
Preparation:
- Take a small pan and pour the right amount of water into it, put on the fire and heat, without bringing to a boil.
- Add vegetable oil to the water and mix everything.
- In a separate container, mix all other ingredients and pour them with hot water. Start kneading the dough with a fork or you can try to mix with a mixer.
- At first, the mixture will be liquid. Do not be scared, gradually flour is brewed in water and swells. As a result, the dough should turn out to be viscous and elastic.
- While the salty dough has not cooled, you can add dyes or sparkles to it.
How to make salted dough from PVA glue
Necessary ingredients:
- 2 cups of white flour.
- 1 cup of small salt "Extra".
- 125 ml of warm water.
- 50 ml of PVA glue.
Preparation:
- Take a suitable capacity and mix in it the required amount of flour and salt.
- Next, add warm water and mix the mass well with a mixer.
- After that, add 50 ml of glue and knead the salty dough with your hands.
- Roll the dough in the ball and place it in a plastic bag, which is placed in the refrigerator for a while.
How to make color salt dough
Very often, when working with children and in independent creative activity, color dough is used. Consider how you can prepare a color dough for your hobby or for the development of children. In one case, you can add food liquid or loose dyes. And for children, you can paint salted dough with gouache or acrylic paints.
- Prepare the salty dough for any recipe you like.
- Next, decide how many colors you need in your work. It is such a number of parts that divide the salty dough.
- Take one piece of dough and with your finger in the center make a small recess, after which pour water into it on the tip of a teaspoon.
- Next, add a couple of drops of liquid dye or powder -shaped to the water, wait until it dissolves.
- Knead the dough until a uniform color is obtained.
- Fold the dough in the bag and place it in the refrigerator.

How to make salted dough - video
How to dry crafts from salt dough at home
In order for figures or toys from salty dough that you or your children to serve for a long time, it is necessary to dry them correctly. There are several options for drying products from salt dough.
- Drying in natural conditions. This will indicate drying in the open air, but not under direct sunlight. This process takes more time, but it is the most effective. It is necessary to place the figures on a wooden or plastic tray and leave them in this position for 3-4 days, after which the figures are turned so that they dry from all sides.
- Drying in the oven. You can dry in the oven with a ajar door at a temperature of 55-70 degrees, or you can put the figures in a cold oven and gradually heat it to 150 degrees. You can’t immediately place the figures in a hot oven, as they can crack.
What can be done from salt dough - making crafts step by step
From the finished salt dough, you can make a wide variety of crafts, the complexity and appearance of which will depend on your imagination and skill. Experienced needlewomen from such material are able to create beautiful unique earrings or pendants, intricate paintings and panels. There are more options, from salty dough you can make simple toys in the form of figures of animals, New Year's toys or crafts for holidays for your children. Children will especially like thematic crafts. For example, you can make a tank from salt dough for a boy or a doll for a girl. To decorate their crafts, a variety of materials are used: paints, sparkles, beads, beads, buttons and much more. Consider detailed step -by -step instructions for creating various crafts from salt dough.
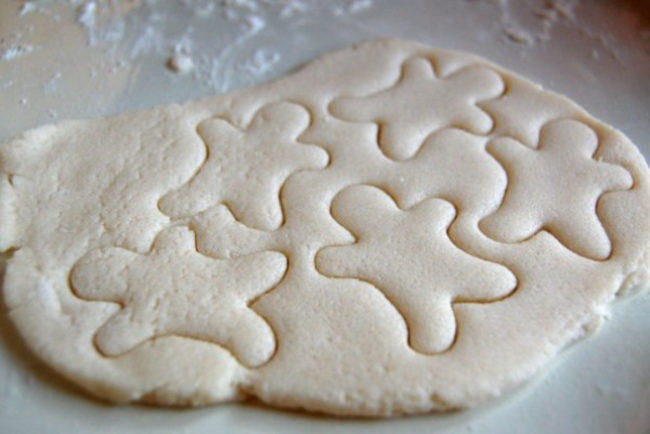
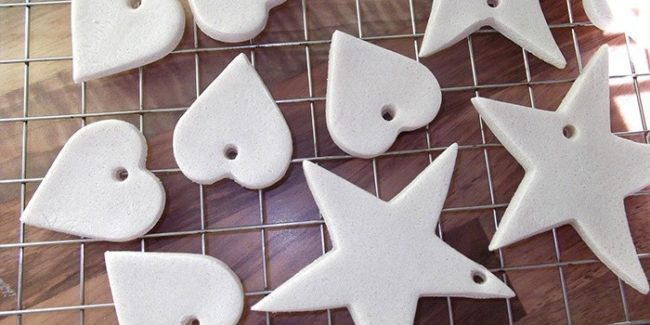
How to make a toy from salt dough on a Christmas tree
From salt dough, you can quite simply make bright and unusual Christmas toys that will become the main decoration of the New Year tree. You can make such crafts yourself using a more diverse forms and figures, or you can have fun with your child, preparing for the holiday.

Production process:
- Prepare the salty dough according to one of the above recipes. If you need a multi -colored dough, add the necessary dyes.
- Put a piece of dough the color you need on the table and roll it into a thin layer with a rolling pin.
- Next, you can use conventional cookies for cookies in the form of stars, bells, snowflakes, Christmas trees and snowmen. And you can apply stencils to create more complex drawings.
- Using improvised molds, cut the right amount of Christmas toys.
- Next, take a cocktail tube and make a hole for a thread or tape in the upper part of each toy.
- At the next stage, you need to turn on your imagination and decorate the toy. This can be done from pieces of multi -colored salty dough, gluing parts with water. You can apply paints or use beads.
- Very often, needlewomen make drawings on such Christmas toys using a print, which can also be made independently.
- Dry the finished Christmas toys in a convenient way for you, after which they can be covered with varnish.
- Pass the tapes in the holes and hang jewelry on the Christmas tree.

How to make a smoke toy from salty dough
Dymkovo toy is a part of our story that is always used in creativity. It is quite simple to make this type of toys from salty dough, the main thing is to adhere to the basic rules of the shapes and figures of these toys, and you must also remember the coloring of the Dymkovo toy. It is characterized by the use of simple lines and figures, as well as a combination of various colors.
Consider the process of creating a Dymkovo toy "Horse":
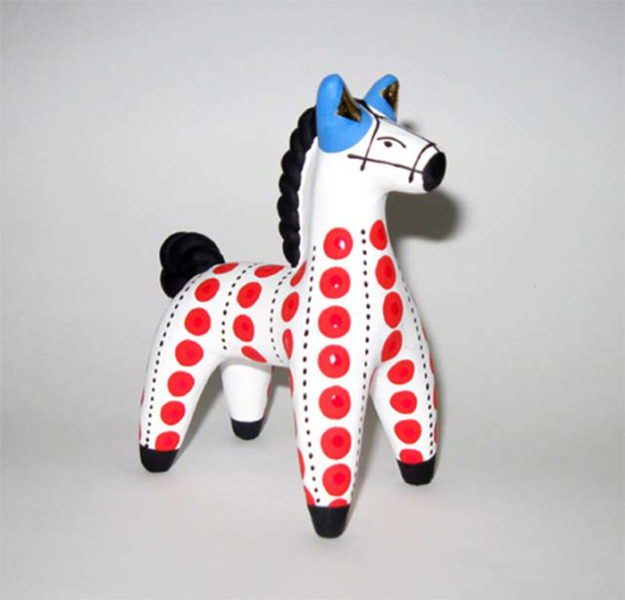
- Prepare the salty dough according to the classic recipe without using dyes. In the future, our Dymkovo toy will need to be painted according to all the rules.
- Next, it is necessary to prepare the main parts of our horse. Such a toy can be made in different ways. For example, a separate body and a separate leg separately, but you can make a torso and legs one thing to make it easier for a child.


- Roll up a sausage from the dough, which in the future cut half in two sides. It will be our torso and legs.
- Next, roll another smaller sausage for the horse's neck. Bend the body and highlight your legs a little so that it looks like a horse, then attach the neck with water, which must be bent to get the muzzle.
- From two thin and long pieces of dough, weave a braid, which must be attached instead of a horse mane. In the same way, only smaller, make a pigtail pigtail.
- Attach triangular ears.
- The product must be dried, and then painted in a variety of colors using bright colors.

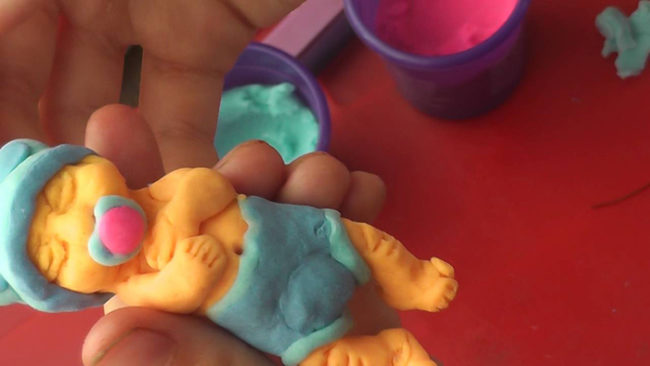
How to make a salted doll doll
From salt dough, you can easily make your child or even for sale a beautiful and original doll. For beginners, you can try to make a reflex from salty dough, i.e. Cool-Golish from our childhood. However, in this matter you need to be very reinforcing and attentive to the little things.

- Prepare the salty dough according to any recipe, you can use PVA glue or starch so that the dough turns out to be more elastic and flexible, since a lot of small details need to be made in the doll.
- Divide the dough into the desired number of details: part more on the body, a smaller piece for the head of the doll, two identical pieces for arms and legs. Some needlewomen make Reborn from a continuous piece of dough, which is later formed in the gas doll.
- Take the dough and start forming your head out of it. This is quite complicated, since it is necessary to select the line of eyebrows, eyes and mouth using stack, make the shape of the head.
- Next, form a slightly oval oblong shape from another piece.
- Reborn's arms and legs should be slightly bent at the elbows and knees, so roll up a peculiar sausages from the pieces and simulate the legs and handles of the doll.

- To highlight the fingers, use stacks to work with plasticine.
- Next, using water, combine all the details of our Reborn and gently burn all the irregularities, forming a beautiful figure of the baby. Do not be discouraged if the first time you can’t do beautifully.
- Dry the figure in any way, after which you can start painting the doll. It can simply be covered with beige color. And you can sew additional clothes for Reborn or make, for example, a diaper from the dough.
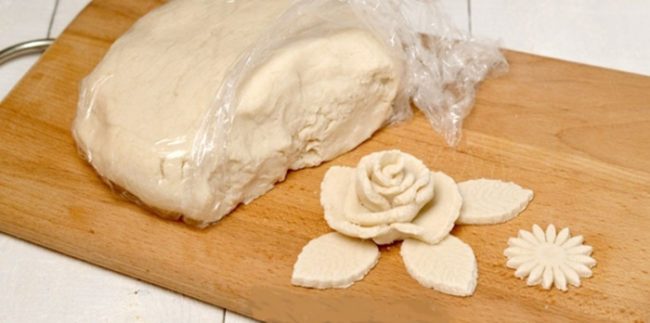
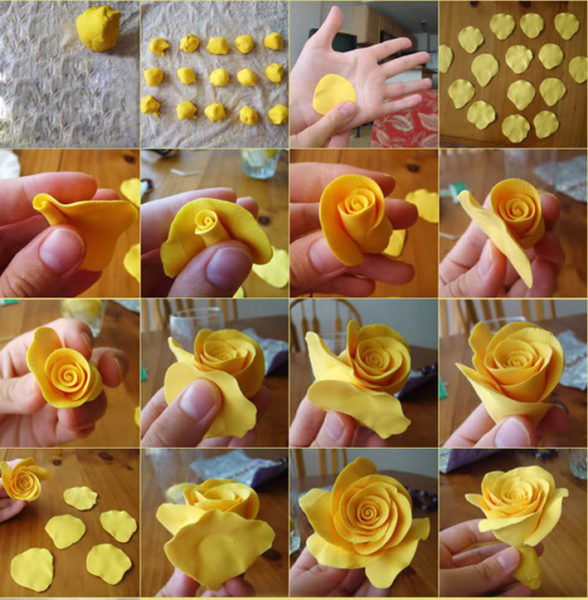
How to make flowers from salt dough
From the self -cooked salt dough, you can make a variety of flowers that can further be used as brooches or to decorate panels and paintings.
Consider the step -by -step instructions of the process on how to make a rose from salt dough.
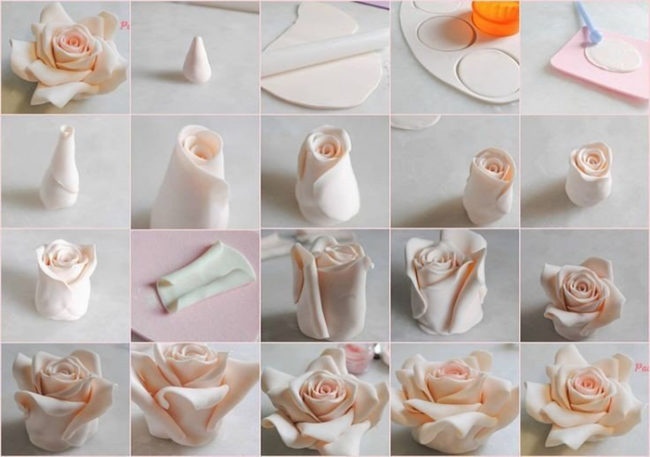
- Prepare the salty dough according to the recipe you have chosen, let it lie down a little in the refrigerator. At the stage of kneading the dough, you can immediately give the material the desired color. To do this, add the dye of red, pink, yellow.
- From a small piece of dough, form a figure in the form of a drop whose base will be the bottom of our flower.
- Next, using a rolling pin, very subtly roll out the salty dough and cut the circles from it with a glass or mold. To give the rose a more natural look, the edges of the swing circles need to be slightly added with a suitable stack. So we get uneven edges.
- Take one petal and glue it around the base. On the other hand, glue another petal. So it is necessary to repeat several times as shown in the figure to get a rose bud.
- Next, we form a more uneven edge in the petals and glue it to the rose.
- To make beautiful extreme flowers, you need to gently bend each petal back: the upper part or sides.
- At the end, you need to cut several beautiful leaves and glue them to the base of our flower.
- Dry the rose in a convenient way, after which it can also be painted or simply covered with varnish.
How to make food from salt dough
To conduct various games with a child, you can make the most diverse food out of salt dough. Consider several options.
"Cheese" from salt dough
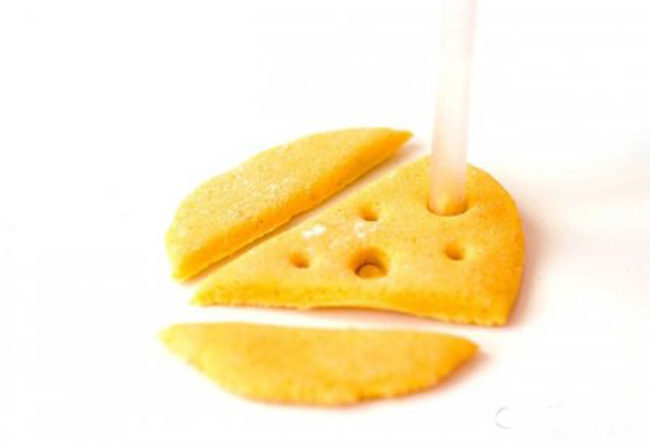
- Roll out a thin layer in the shape of a circle from the salted dough prepared in advance in advance.
- Next, cut the triangle with a knife, separate two parts of the dough on the sides.
- We will get a chopped piece of cheese, which needs to be given realism. To do this, you can make holes to him.
- To make holes, you need to take a tube for a cocktail of different diameters and put on the surface of the hole.
- Dry the cheese and paint it yellow. Cover with varnish on top.
"Egg" from salt dough

- To prepare a real breakfast from eggs and sausages, you need to prepare 4 pieces of dough. They can be painted immediately in white, yellow and pink, or you can leave painting for later.
- From one piece of salt dough, form an irregular circle with uneven edges with a rolling pin. It will be a protein at the egg.
- Next, using a glass or shape, cut a circle of yellow, which will be yellow. Using water, combine two parts of fried egg.
- Next, from two pieces of dough, roll sausages like sausages.
- Dry your crafts and cover them with varnish.
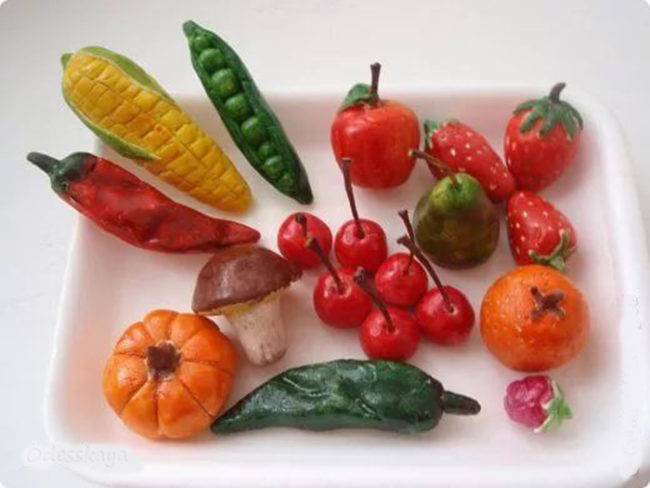
"Fruits" from salt dough

- Prepare the salty dough according to the recipe you like. At this stage, you can pre -paint individual parts of the dough in different colors.
- In order to make a pear out of the dough, you need to take a piece of dough and form a shape from it, narrow from above and more voluminous from below. Gryn all sides so that you get a pear shape. Next from a small piece of dough, make a pear petiole and use it with water.
- To make a banana, you need to take a piece of dough and roll a sausage from it, and then slightly bend the resulting shape. On the one hand, slightly stretch the edges for the base.
- To make cherries, take two pieces of dough and roll balls out of it. Next, you need to make two petioles, for which very thinly, roll out the two parts of the dough with your hands. Assume the petioles to the cherries.
- After you make fruits, they must be dried and painted. In order for everything to turn out more naturally, you need to paint with the help of various shades and tones.
- If you collect all the fruits in one basket, then you can make a panel of salt dough, holding all the parts with water, and only then drying.
How to make a cat from salt dough
Consider how to make a amulet in the form of a funny cat.

- First of all, prepare the salty dough. It is not necessary to paint it with food dyes; in the future, you can distinguish some parts of the cat’s body with the help of paint.
- In order to get a cat’s body, you can use a stencil or cut the figure by hand. Roll out the dough with a rolling pin and attach a stencil to it, then carefully circle with a knife.
- Pay holes immediately in the ears for attaching ropes or ribbons. Exactly the same holes can be made below, we will attach paws to them in the future.
- From pieces of dough, form paws with three fingers. At the same time, make holes for a rope on the hind legs.
- Between the upper legs, glue a rectangle with any inscription that can be made with stack.
- For the eyes, form two circles, and for the nose you can make a heart from the dough.
- Take the stack and give it to the craft of the volume: draw lines of the mouth, mustache, ears.
- Dry the craft, then paint the cat at your discretion. Combine the paws with a rope.
A flat or voluminous shape can be made by a dog from salty dough, the manufacturing options can be seen in the video.
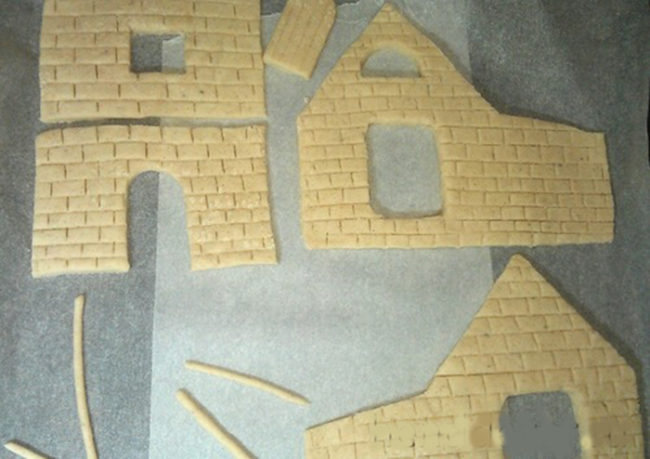
How to make a salted dough house

- Prepare the salty dough and cut off the harvesters in advance for all the details of your house.
- Applying stencils to a rolled dough, cut a blanket from salted dough with a knife. If you want to make a brick house, draw bricks with a stack, then send your forms to dry.
- When your blanks are dry, you can start glue them with glue.
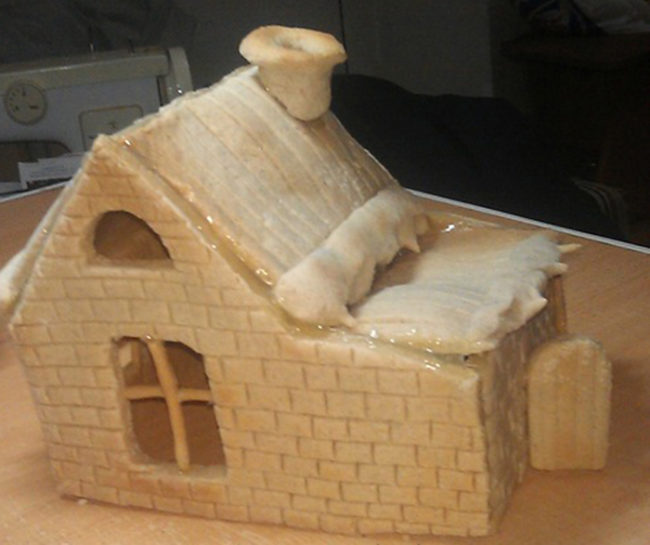
- When the glue is completely dry, proceed to decorating the house. Color it with acrylic paints. The roof can be decorated with transparent pebbles and beads, pour artificial snow and so on.
How to make a picture of salt dough - video
Salt dough is a universal material that can be used to create beautiful and bright crafts both for yourself and for sale.


Comments
a couple of years ago, there was no side of metrogils from the same problem, there were no side effects ...
I’m not a fan of peeling at all, it saves from acne of metrogil, it also smoothes it ...
Great article! ...
I take the second course of the Capsules Climafite 911. The tides went very quickly. It became calmer, irritability went away and I sleep well ...
i also noticed - it is worth nervous, everything immediately affects the face. Therefore, I try to avoid conflicts and unpleasant people. Of the creams, I like Miaflow from wrinkles - smoothes not only small wrinkles ...