

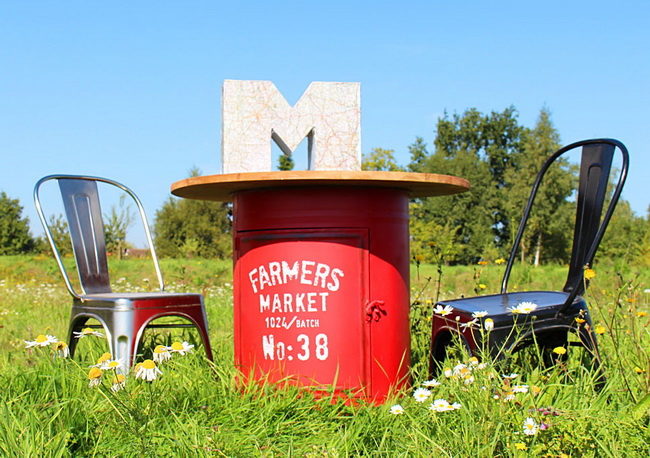
Today, volumetric letters are used not only as an accessory for photo shoots, but also as a bright accent in the interior. They also often decorate holidays and other celebrations. It is very simple to make volumetric letters with your own hands if you use the following instructions.
Content
- How to make volumetric letters from cardboard with your own hands
- How to make a cardboard base for volumetric letters
- How to make a basis for a voluminous letter of cardboard and plastic with your own hands
- How to decorate a voluminous letter from cardboard with corrugated paper
- How to decorate a voluminous letter from cardboard with threads
- How to decorate a voluminous cardboard letter with a fabric
- How to decorate volumetric letters with napkins
- How to make beautiful volumetric letters with backlighting
- How to make volumetric letters from foil
- How to make volumetric letters for a wedding with flowers
- How to make volumetric letters alphabet
- How to make volumetric letters from foam
- How to make volumetric letters from concrete watch the video
How to make volumetric letters from cardboard with your own hands
Large letters are remembered at the festival most. One of the simple basics for volumetric letters is cardboard. Working with him is very simple.
How to make a cardboard base for volumetric letters
Cardboard is a light material, signs of different sizes can be made from it. In addition, you can use technical paper from the packaging of household appliances.
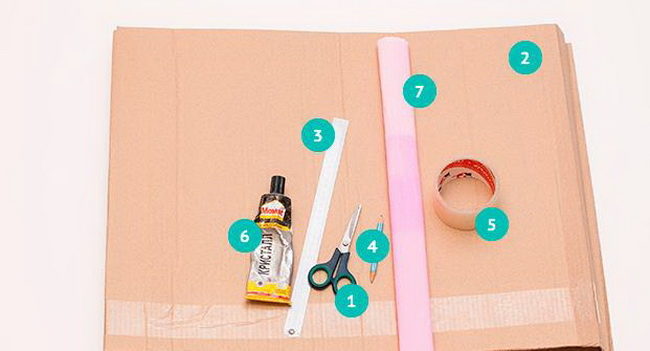
Prepare such materials and tools:
- scissors or stationery knife;
- dense cardboard;
- long ruler;
- simple pencil;
- transparent adhesive tape;
- super-blade.
How to make volumetric letters from cardboard:
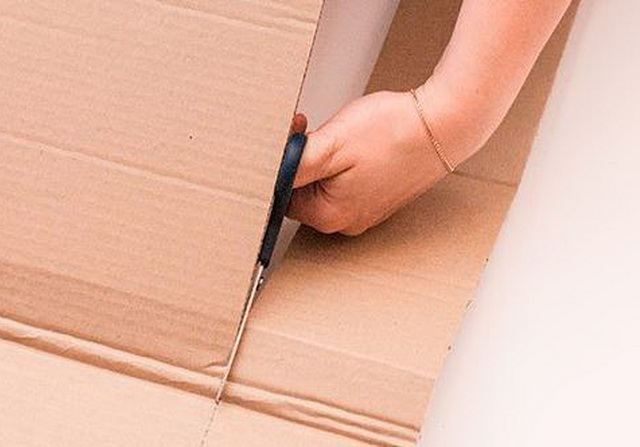
- First, decide on the size of the letter and its shape. Depending on this, draw the facade of the sign of the desired height and thickness on the cardboard. Use a simple pencil to bring the contours of the figure, as it can be erased. The marker will be visible through the decor of the letter, especially if it is made of corrugated paper.
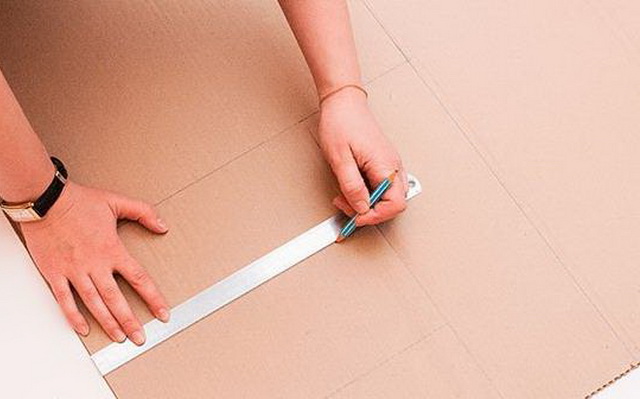
- In the same way, draw the second facade of the letter. Cut them along the contour. So you will have the front and back side for the sign.
- Now determine the thickness of the letters. Roll it with a ruler on the cardboard. Make a few segments at once to make the strip the same size along the entire length.
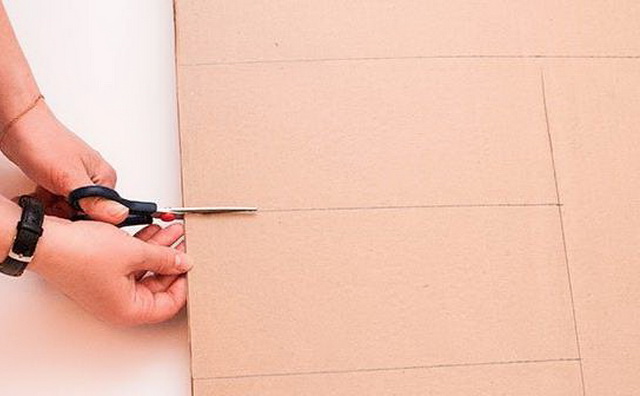
- With scissors, cut the workpiece of cardboard. You can cut off one continuous strip, and then cut off parts from it.
- Put one facade of the letter on a flat surface. Along the cut line, attach the side of the letter that you cut out for the thickness of the figure vertically. On the inside, fix the cardboard parts with tape.
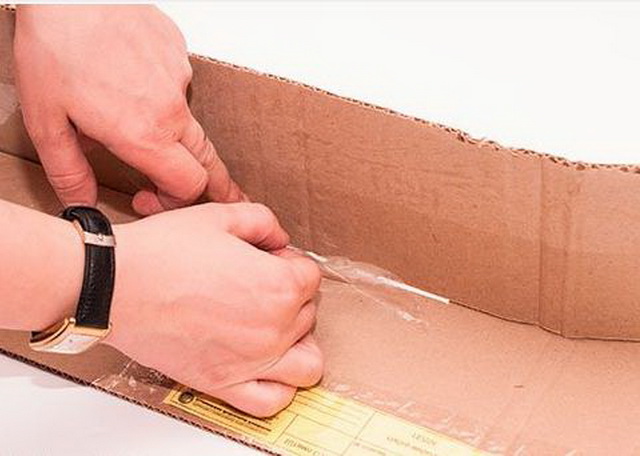
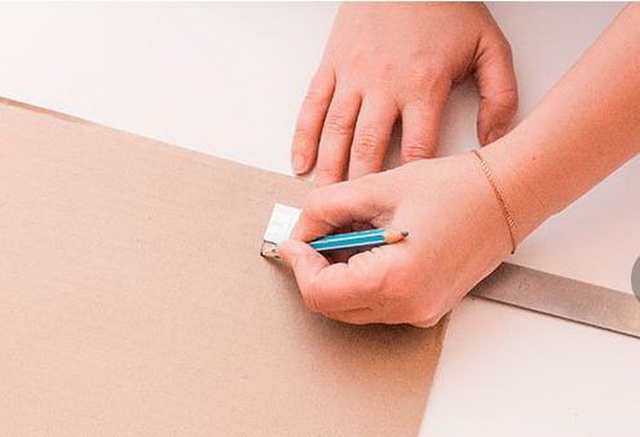
- You can bend the strip as you like. If it does not work out, then cut the cardboard of the required length, then attach perpendicular to each other and glue with tape. Instead, you can use a super-clock.
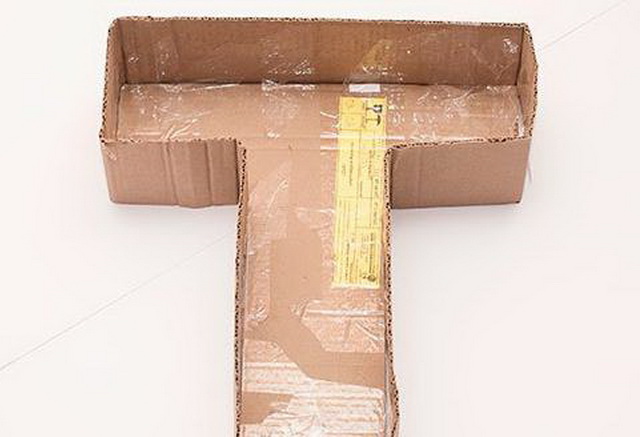
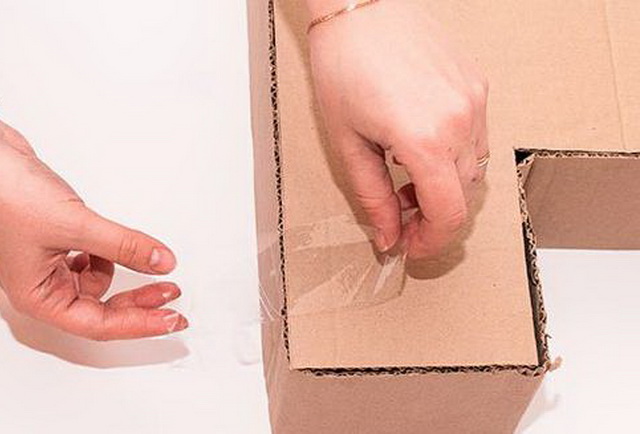
- Apply the second part of the facade of the letter on top of the workpiece, fasten the edges with tape. According to this manufacturing technology, you can make any volume letters.
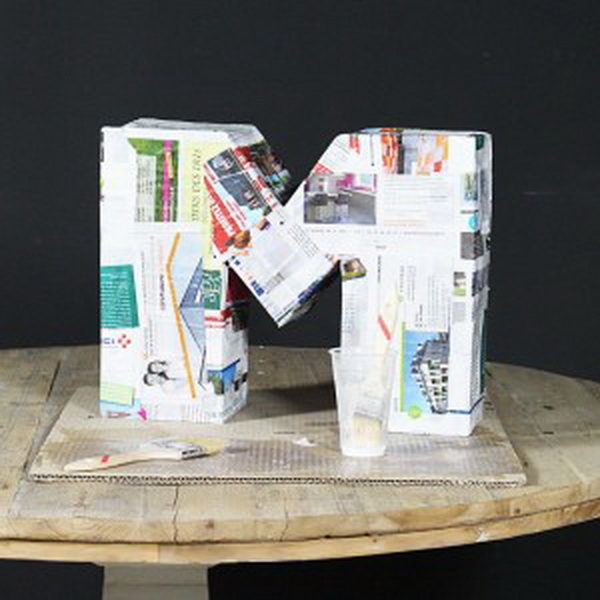
How to make a basis for a voluminous letter of cardboard and plastic with your own hands
There is another technique for manufacturing volumetric letters. With it, the frame of the figure will be more durable and even than with the previous method of manufacture.
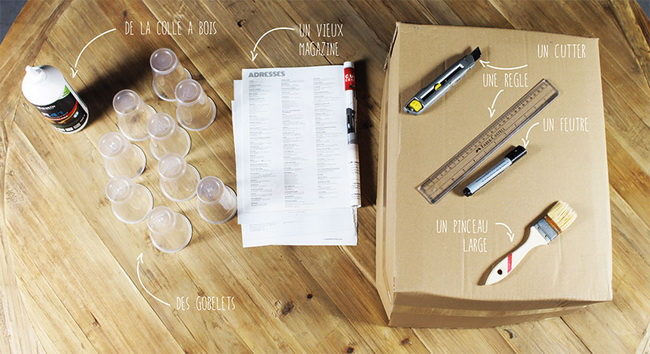
You will need the following materials:
- large cardboard;
- marker, ruler, brush;
- old magazine;
- chancellery knife;
- glue and disposable cups.
Instructions for execution:
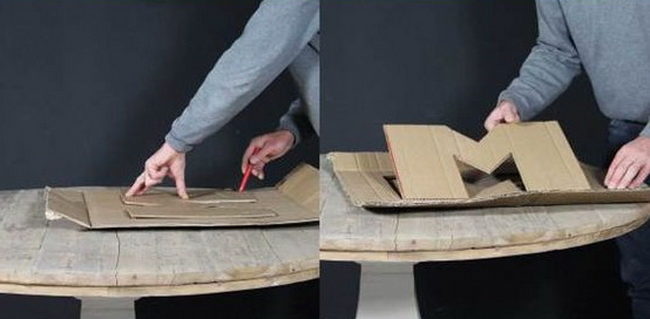
- You will need 2 identical blanks from cardboard. Draw a template for volumetric letters on paper, transfer it to cardboard and cut it off. It is best to use the basis for figure sheet figures. If you glue pieces of cardboard, then bends will appear on the workpiece.
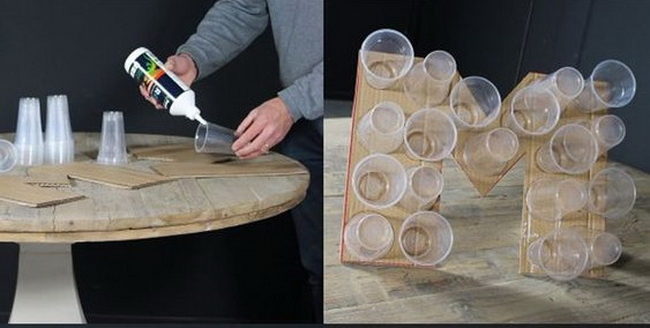
- Disposable cups must be glued to the inside of the letter. Fill them the entire surface of the figure, but for strength, fix the dishes in different positions. So first glue the glasses by the neck, then at the bottom. Try to place plastic as close as possible to each other.
- Then glue the second facade of the letter on top of the glass. Now it is necessary to close the side sides of the figure. Use pages from the old magazine for this. They are more durable than ordinary office paper.
- Cut the sheets into strips. First glue the edges of the cardboard on two blanks. Then place the strips with the lines with the facades of the letter, bend and glue the edges. Try to make a thick layer of paper so that the sides do not sag.
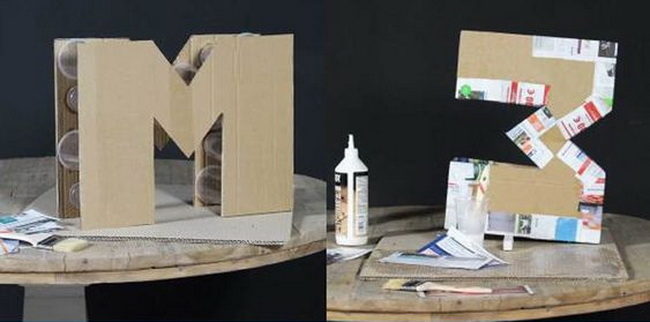
- For further decor, it is necessary to seal the cardboard with magazine sheets. Let the glue dry completely.
- You can decorate such volumetric letters of plastic and cardboard in any way and use for various events and photo shoots.
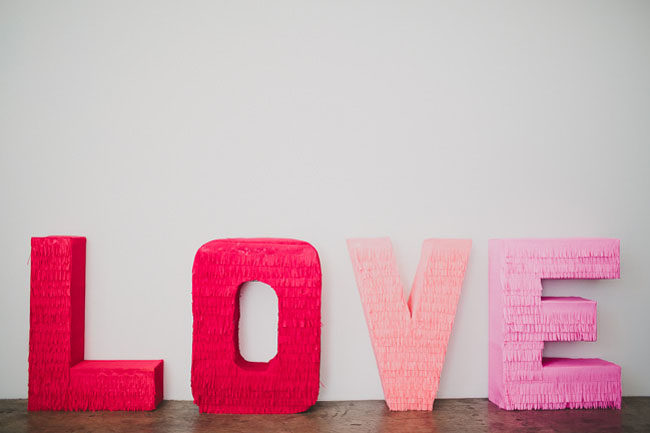
How to decorate a voluminous letter from cardboard with corrugated paper
There are a large number of methods for decorating a cardboard base. The easiest option is the use of a forty paper that can be purchased in needlework stores. Such a decor is easy to use and has a large number of shades.
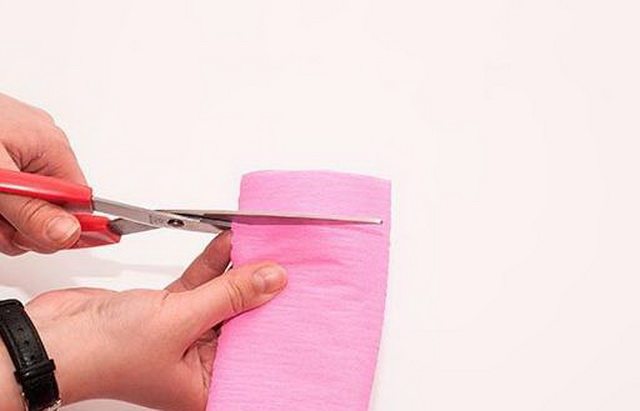
- Complete the roll of corrugated paper. Cut it with strips 7-10 cm wide. Additionally, it is not necessary to cut it into parts.
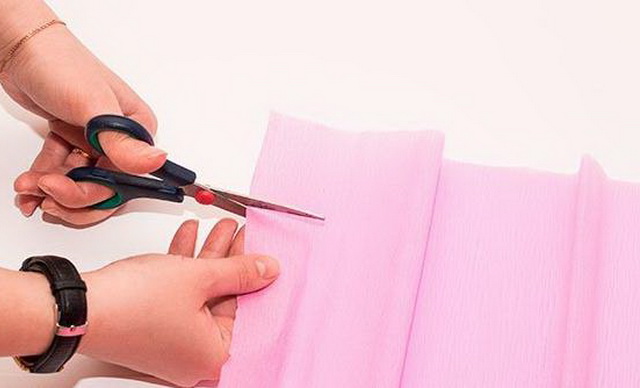
- Fold the strips with an accordion, make cuts on the one hand. They should not reach the reverse side and make the distance between them at least 1.5 cm.
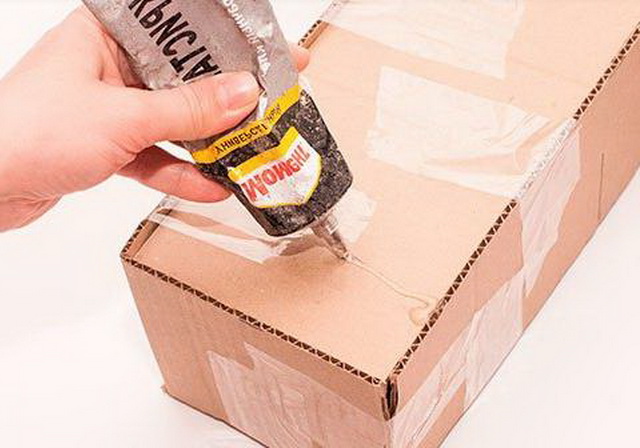
- Go to the letters decor. Start decorating the workpiece from the base. Glue the strip must be on the whole side. So the fringe will stick out and give an additional volume to the figure. Return from the edge of the letter a distance equal to the width of the strip of corrugated paper and glue it on the base.
- Fix the frill in a circle of letters. Try to place the strips at the same level over the entire circle of the figure.
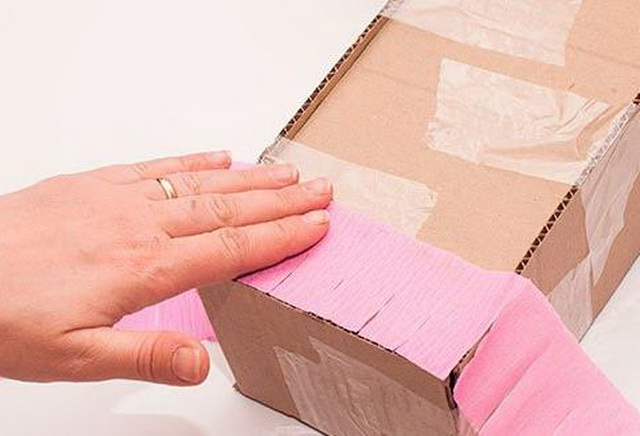
- The second strip should be glued so that only fringe is visible. Therefore, place it over the previous one.
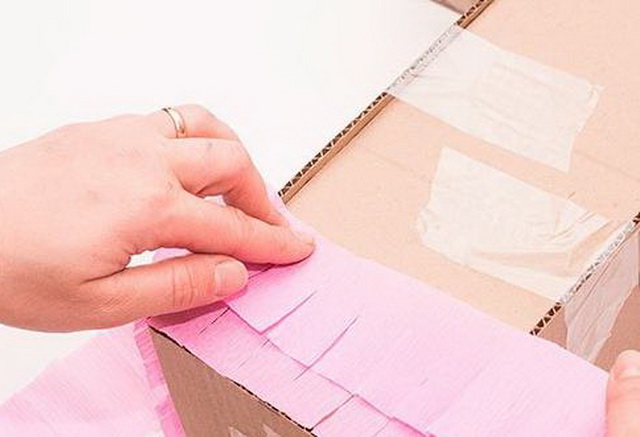
- By this principle, glue the figure completely. Do not forget to decorate the side sides of the letter with corrugated paper. The last strip should be glued on top.
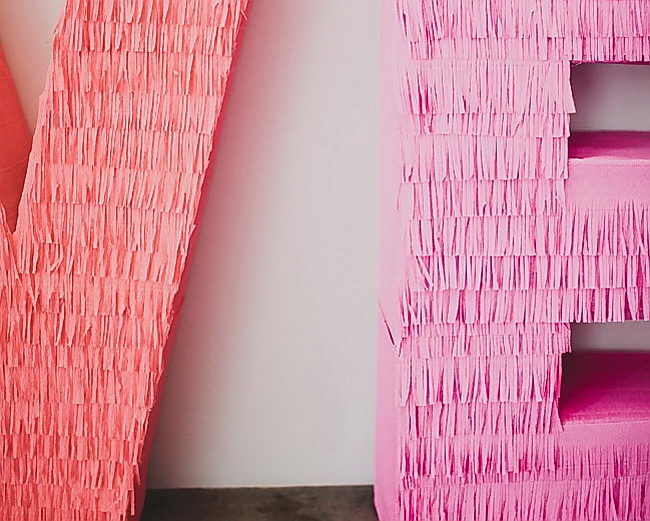
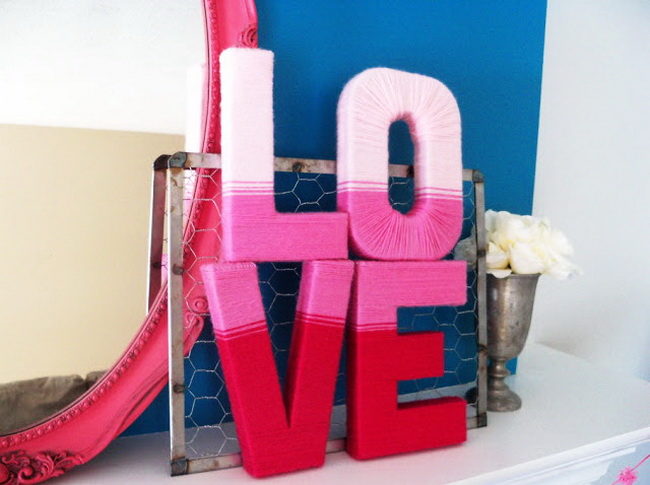
How to decorate a voluminous letter from cardboard with threads
For winter photo shoots, volumetric letters of thread are most often used. You can also make them using a cardboard base. Choose a woolen base for decor.
For work, you will need:
- threads of different shades;
- scissors;
- super-blade.
Step -by -step instruction with photo:
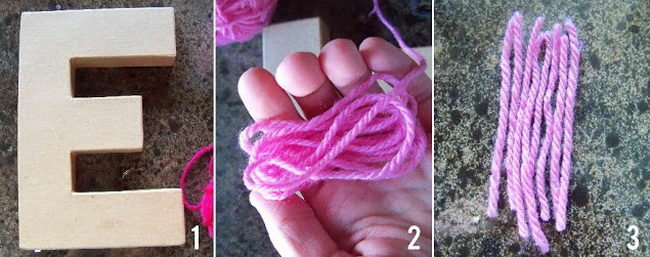
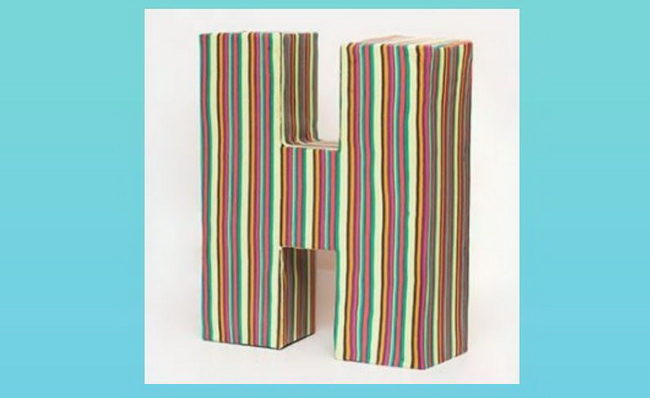
- Make a cardboard letters. Think about the color scheme in which you want to design the figures. It can be plain blanks or in the style of "amber" with the transition of shades. Measure the width of the letters, add 2 cm to it and cut the threads in size. This length is necessary for the decor of the sides of the letters, and the extra centimeters for bending on the form.
Advice. To quickly cut the threads, wrap them around the hands depending on the required length of the strips and cut along the fold line.
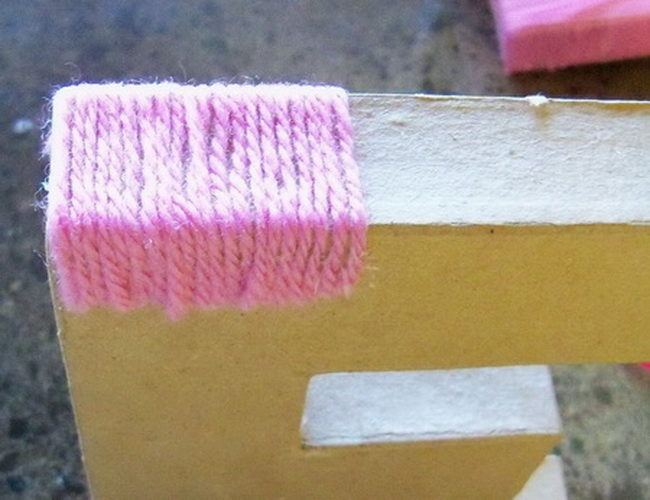
- You will need short threads for the decor of the upper and lower part of the letter. Pour a large amount of glue on the side of the figure. Place the threads vertically next to each other, bent and glue the edges. In the same way, it is necessary to process the lower part of the letter.
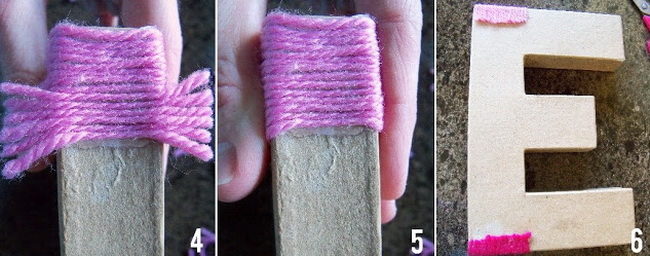
- Now you need a whole thread. Fasten its end on the back of the figure and wrap the letter in the vertical direction. Then turn the thread and move horizontally. This location of the thread is not accidental. So you will hide the possible gaps between them.
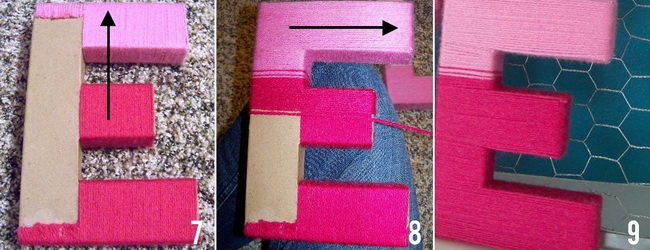
Advice. Fix the threads to the cardboard basis for glue from the back. So you get even strips on the decor.
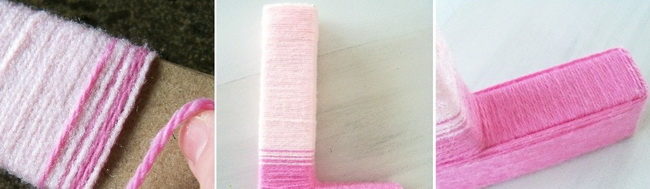
- To create a smooth transition of one color to another, wrap the next shade to the previous one. But at the same time, make the distance between these threads more, and wrap it closely on cardboard. Those places on the letters that cannot be wrapped with a whole thread, glue it with small segments.
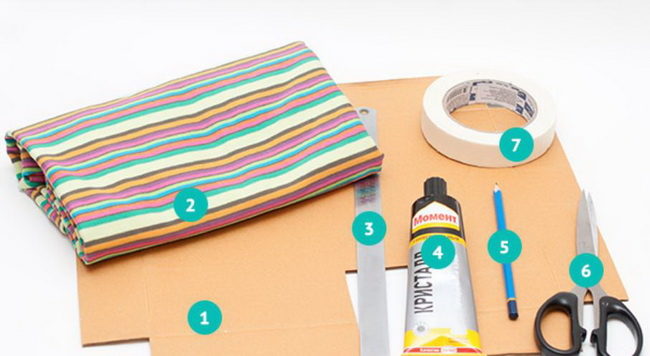
How to decorate a voluminous cardboard letter with a fabric
To cover the cardboard blank with a cloth, you will need patience and time. After all, it is necessary to act carefully. Only in this way you will not have folds and creases on the material. In this master class, it is better to use a super-cell, since it will not create an additional layer between fabric and cardboard, like hot glue.
Necessary materials:
- large cardboard;
- any material;
- scissors and glue.
Squeare of actions:
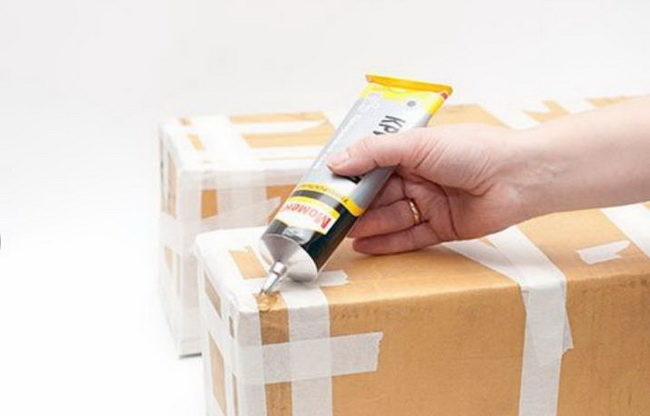
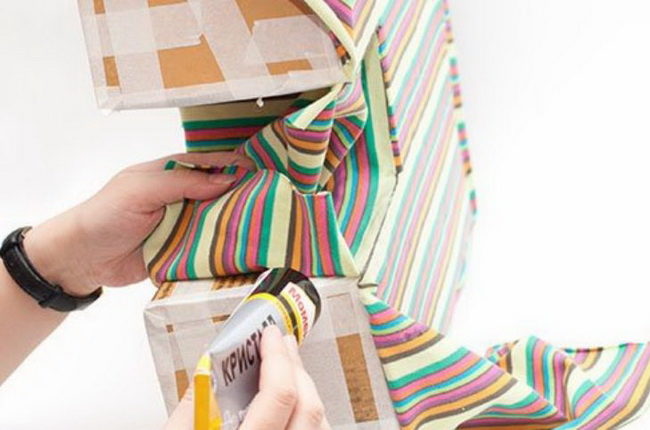
- Make a volume letter from cardboard. For greater strength, secure the parts from above using painting tape. Start working with the facade part of the figure. Apply the glue along its contour.
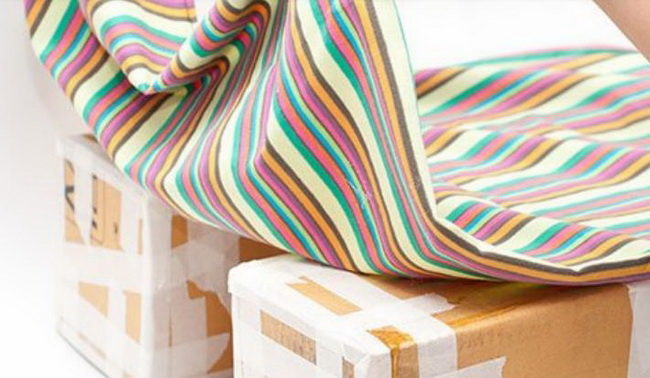
- At the top, attach a large segment of the fabric. With your hands, stretch it in different directions so that folds do not form on the front surface. Press the material to the cardboard. Wait until the glue dries. So the fabric will not move during subsequent actions.
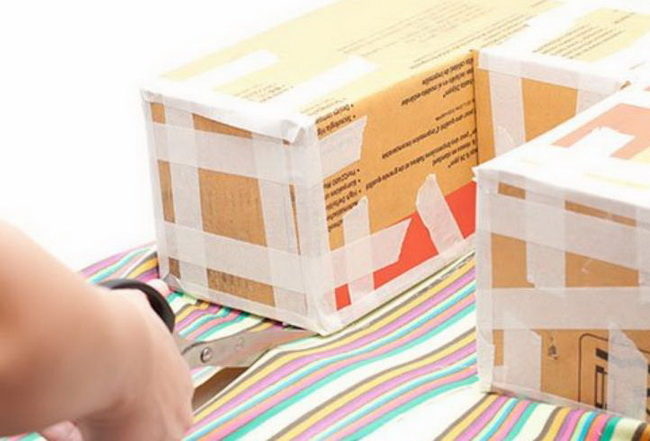
- Turn the figure, material on the bottom. Cut excess fabric along the contour of the letter. Try to make the cut line even. Then glue the second facade part of the workpiece in the same way.
- After the glue is completely dry, proceed to decorating the side of the figure. To do this, measure the thickness of the letter, add 2 cm to it. On allowances. Cut the material in stripes along the intended width.
- The edges of the pattern wrap and glue the fabric to the wrong side to the cardboard. Work slowly and fix the material in small parts so that you can pull it. Cut the extra edge, wrap it and glue it.
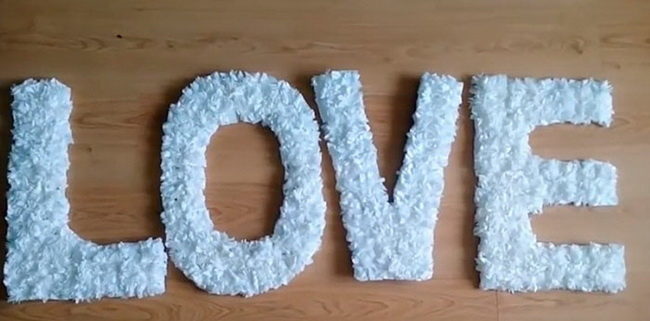
How to decorate volumetric letters with napkins
One of the cheap and simple materials for decorating large letters are napkins. They have a soft base and a variety of color. That's just for a voluminous figure you need a lot of them.
Materials for work:
- dense cardboard;
- a pack of napkins;
- scissors;
- stapler;
- threads;
- glue.
The course of work:
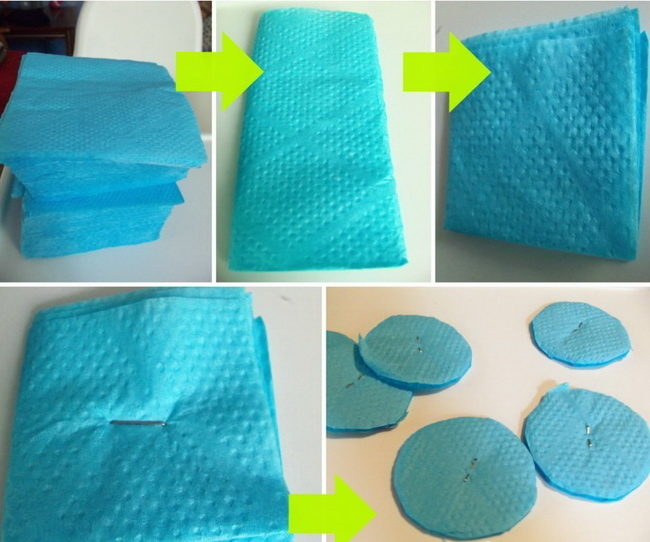
- Prepare the cardboard base, set it aside. Remove the napkins from the package. If the paper allows, then divide it into layers. Fold together a few pieces of napkins, then turn in half and again in the same way. The fold lines on the workpiece can not be cut.
- Enter the center on the square and fasten the napkins with a stapler. Cut the edges of the paper in the form of a circle. To make the blanks the same shape, use a glass or any other round shape. Make several napkin blanks at once.
- Place the circle on the table and start lifting each layer up. At the same time, press the napkin at the base with your fingers. Raise all layers of paper in this way.

- When the workpieces are ready, glue them to the base of the cardboard. You can decorate only the facade part of the letter or throughout the surface. In order not to see the cardboard between the decor, first glue the base of the letter with colored or corrugated paper.
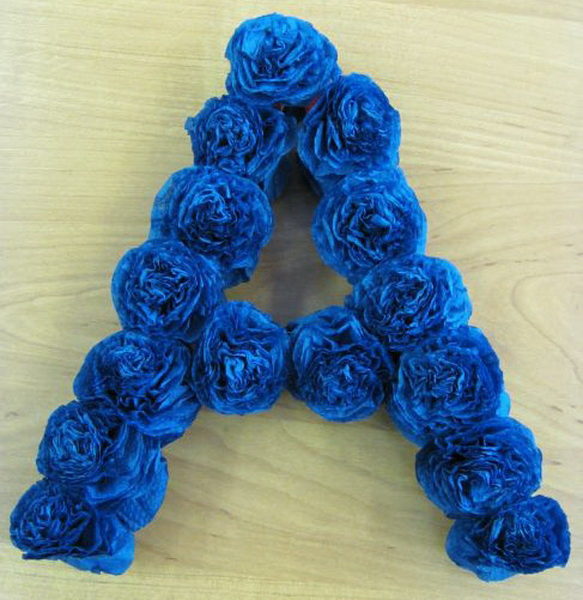
- If the edges of the napkins on a round blank are cut around the circle, then you get a decor with lush forms. At the same time, each layer of paper is not needed additionally.
- Also glue napkins on the cardboard base. According to this option for preparing napkins, you will get a flat surface on the letter with small frills.
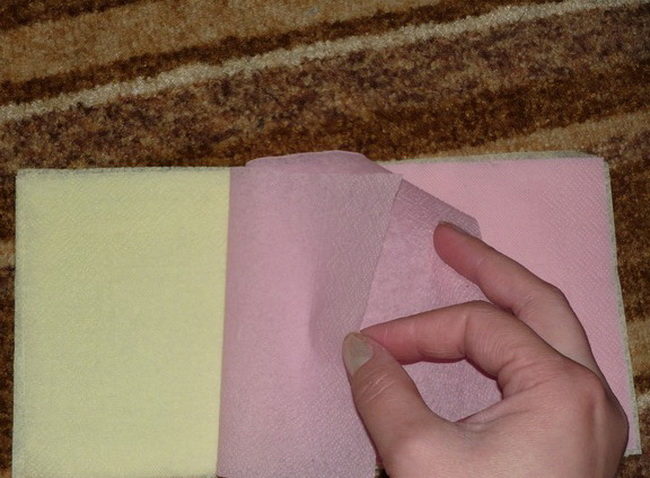
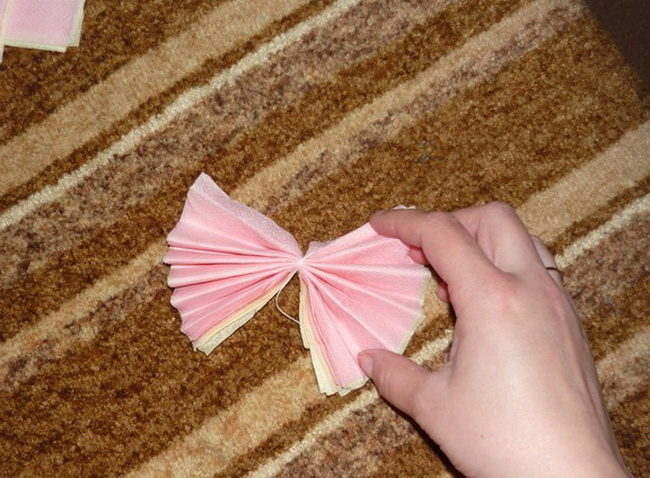
- You can turn the napkins to decorate the volumetric letter in another way. Expand them, divide them into layers. Fold together, alternating colors. Then cut along the central line. You will get rectangles. For one workpiece you will need 6 parts of napkins.
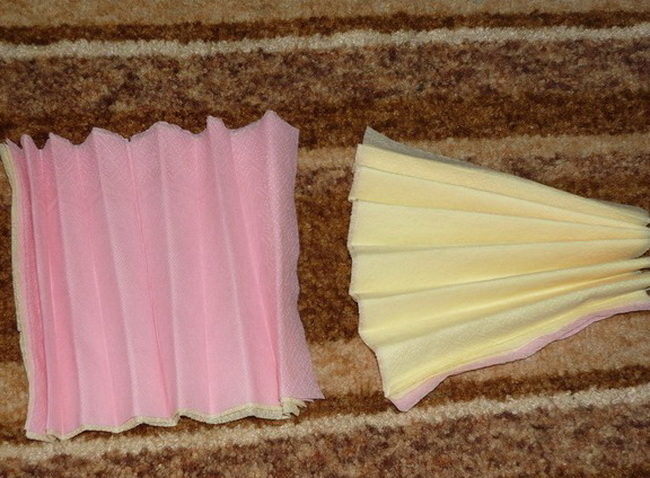
- Fold each stack in the form of an accordion. The fold line is well pressed with your hands or draw a pencil on it.
- Bend the strip in half. Tie a thread in the center or fasten with a stapler. So you fasten the layers of napkins and determine the middle for the bud. Cut the edges of the workpiece at an angle so that you get a trapezoid.
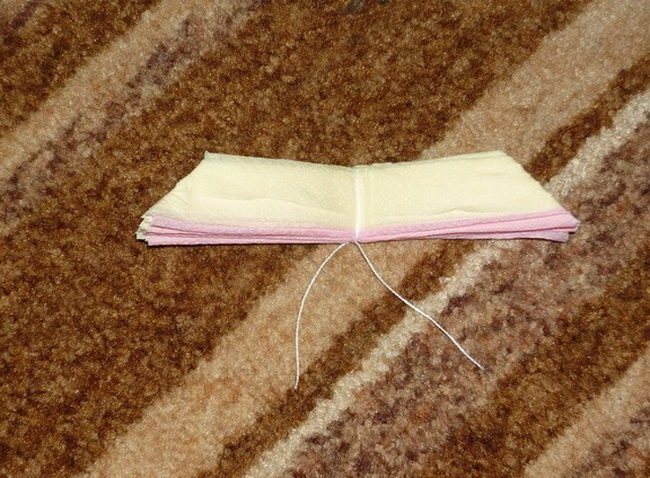
- This is what you should do.
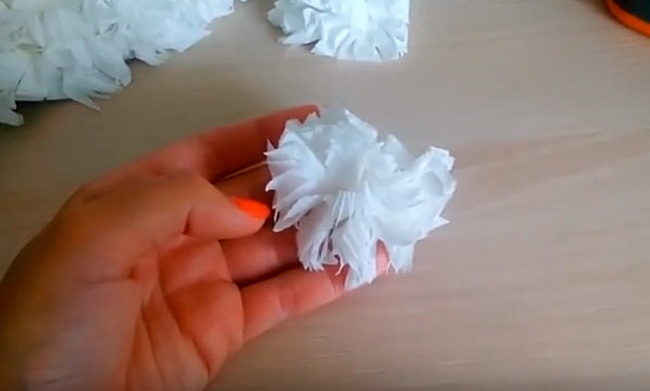
- Raise each row of napkins upstairs. Do it carefully, as you can easily break the paper.
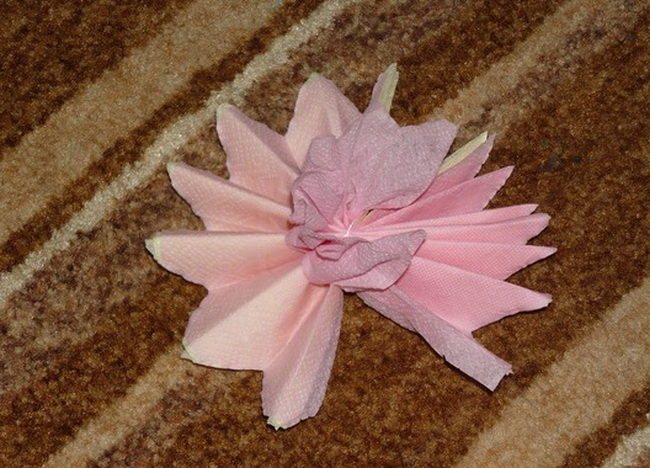
- Do this operation with the rest of the napkin. The flower according to this manufacturing technology is more fluffy.
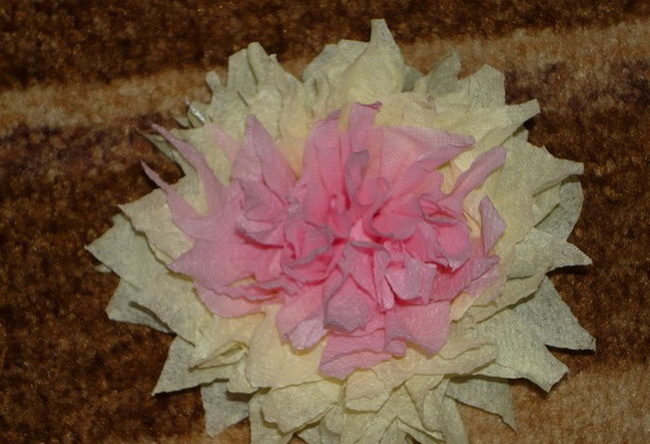
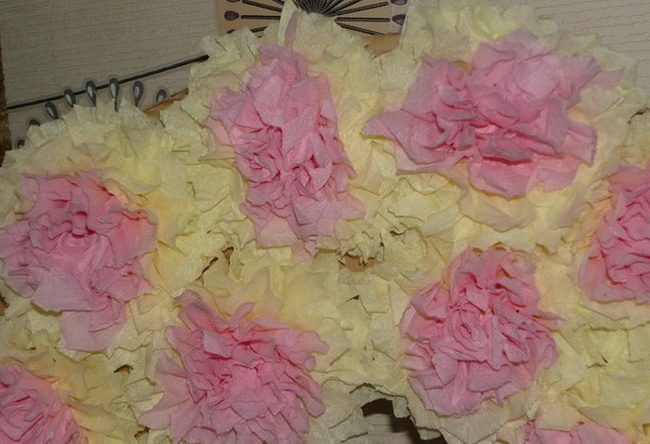
- Glue the finished decor to the letter. Try to place it as close to each other as possible so that cardboard is not visible.
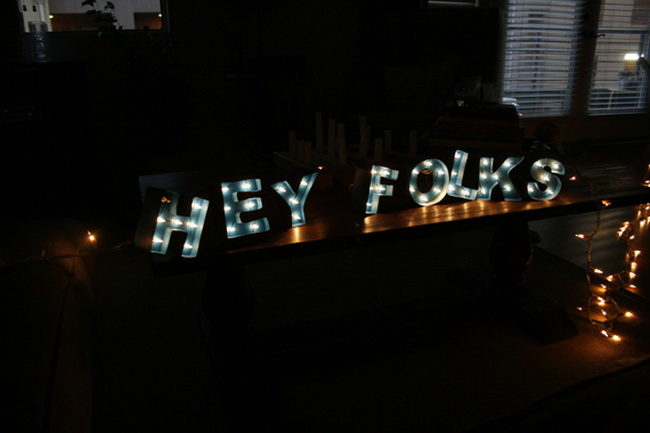
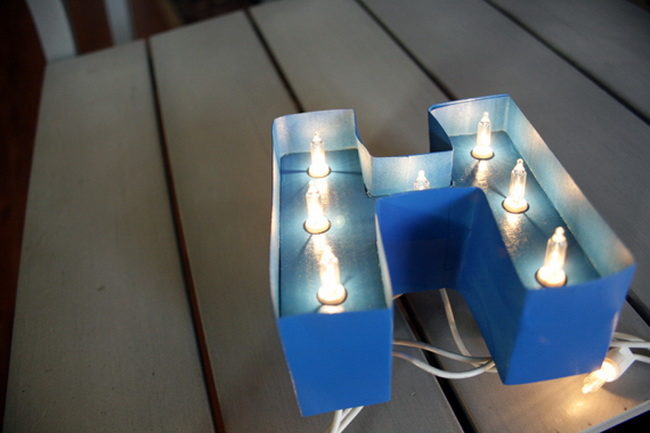
How to make beautiful volumetric letters with backlighting
Dense cardboard can serve as the basis for large letters with any decor. The original party figure can be done with backlight. Use the New Year's garland or make separate light bulbs as light bulbs and connect them through the wire.
List of materials for work:
- carton;
- scissors, stationery knife;
- punch, ruler;
- thick paper;
- paint in the aerosol;
- pencil or marker;
- narrow adhesive tape;
- garland with lights;
- pVA glue, brush;
- big box.
Squeare of actions:
- Select the letter or the phrase you want to do. Then calculate the size for the figures. If you can’t draw the same letters on paper, then print them on the printer.
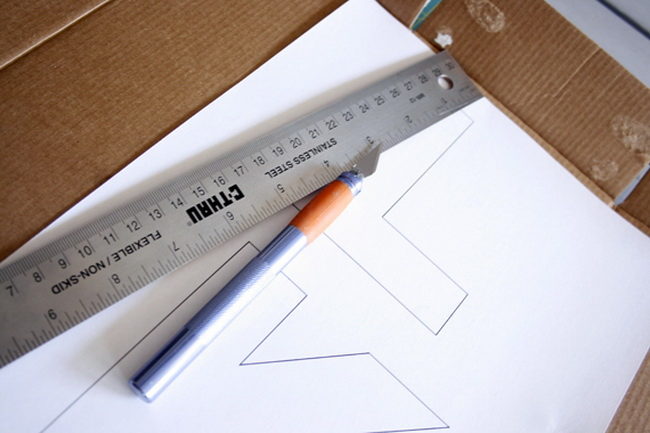
- Transfer the template to the cardboard, cut the blanks. In order for the edges of the figures to turn out without bends and the creases use a chancellery knife or a scalpel instead of scissors. Try to make even sections.
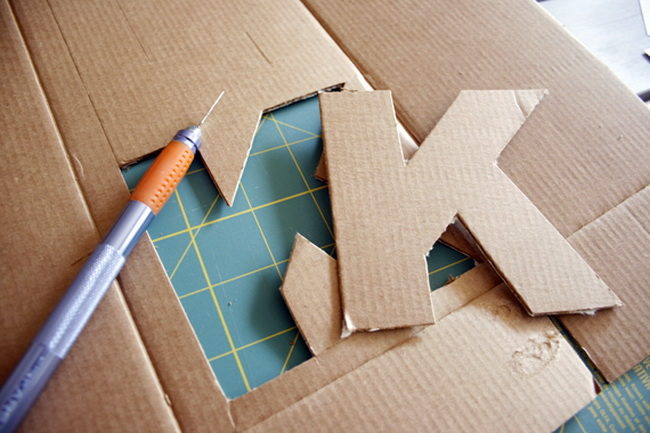
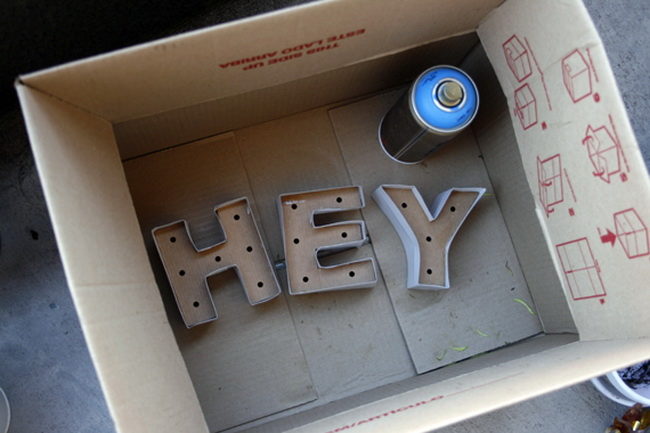
- Prepare all the letters at once and put them in order. So you, by the way, check the presence of figures.
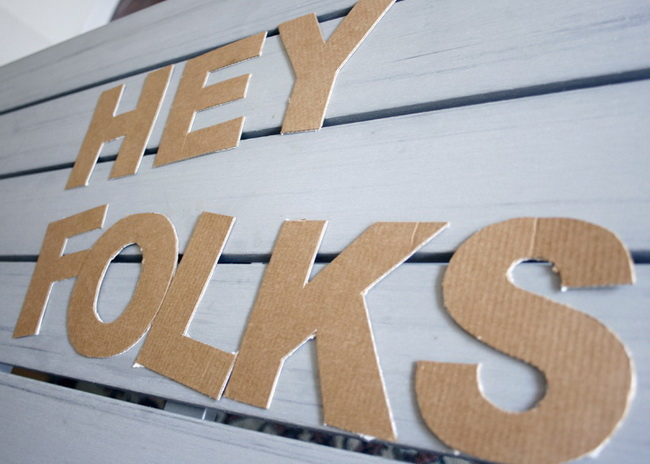
- On each workpiece, make holes for light bulbs. Use an industrial hole hole to make even holes. Their number should be sufficient to understand what the letter shines in the dark.

- To give the volume to letters use paper. It should be dense and not shine out. Cut it with strips 5 cm wide. Wrap each letter with blanks from sheets of paper. But at the same time, place the cardboard along the center of the strip. Apply glue on the edge of the figure and glue the paper. Wait until it dries completely.
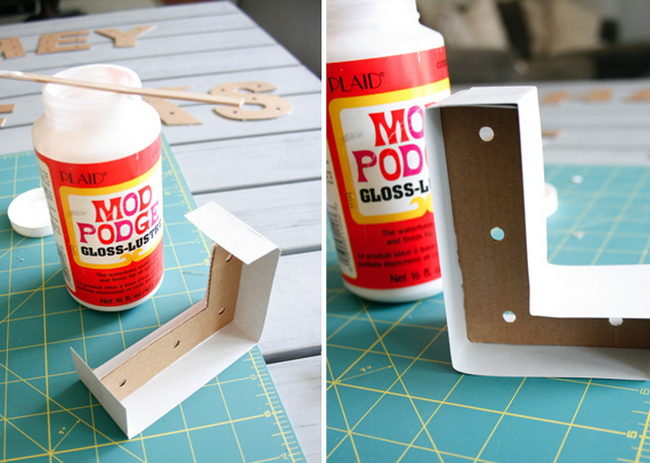
Advice. Try to glue the parts as close as possible on the bends, so that later the light does not penetrate through the holes.
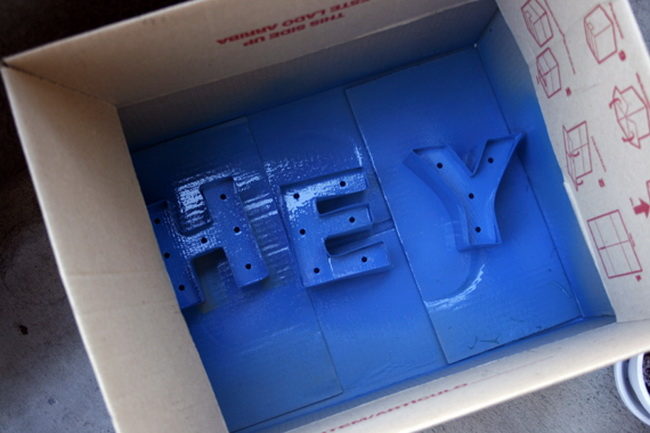
- Now it is necessary to paint the letters. To save time use paint in the aerosol. She will quickly fill all the bends and will fall on the surface exactly. In order not to stain everything around, put the figures in the box.
Important! Work with aerosol paint in the fresh air or in a well -ventilated room. Such paint, in addition to an unpleasant odor, also scatters into dust.
- Color the blanks on both sides. You can also use paint in different shades or paint letters in one color. Before further use, the product must completely dry and not have the smell of paint.
- Lay out on the flat surface of the letter according to the inscription. Since you will use the finished garland, it is important to start collecting the phrase from the first letter. Make sure that all the bulbs are burning. Insert them on the back of the figure. Fasten the wire with tape.
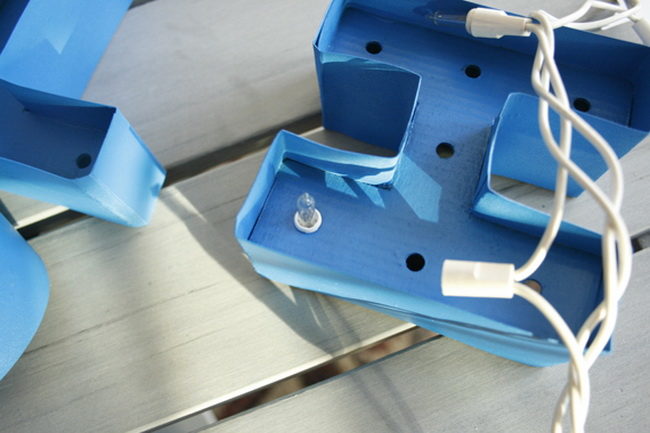
- Place the next letter nearby and place the lights in the same way. If you need to make the distance between the words, then unscrew a few bulbs and stretch the wire.
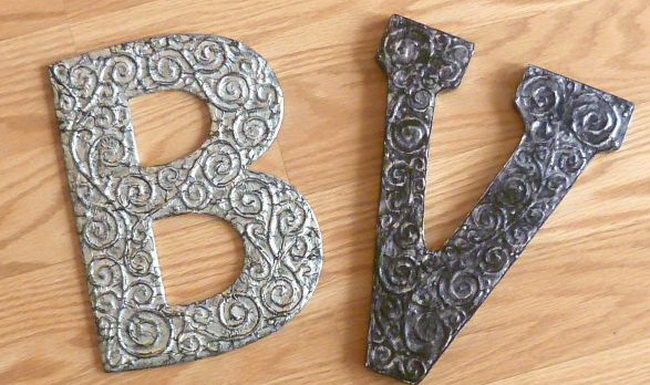
How to make volumetric letters from foil
Not all interiors are suitable for large letters with napkins and fabric. You can make a decor for a holiday or photo shoot in an unusual technique - from foil.
Prepare for work:
- thick cardboard;
- pencil and grater;
- glue gun;
- toothpicks, scissors;
- aluminum foil;
- pVA glue;
- black shoe cream;
- foam sponge and soft fabric;
- the varnish for decoupage is matte or glossy.
Step -by -step instruction with photo:
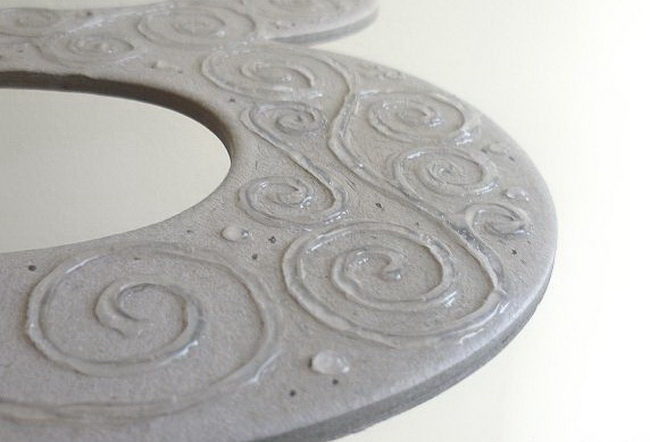
- For this decor, you will need thick cardboard to give the volume to the figure. Cut the letter out of it. Additionally, it is not necessary to wrap it with paper. Draw any drawing with curls with a pencil. But at the same time leave a place between the stripes so that you can put foil.
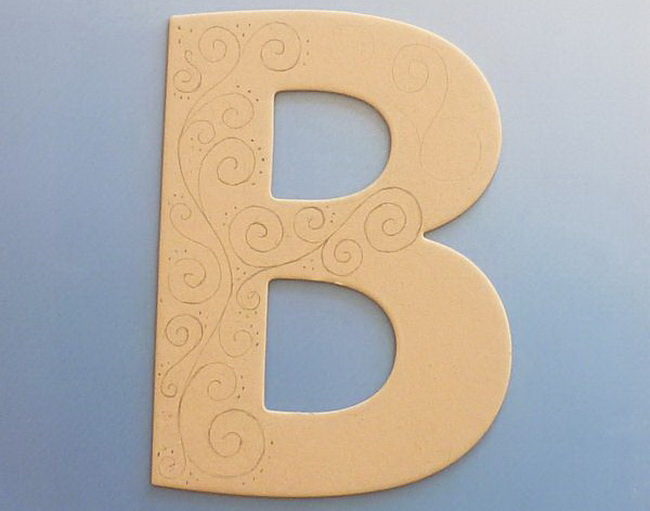
- If you can’t draw even lines, then wipe them with an eraser and try to apply the drawing again. The finished template should look like this.
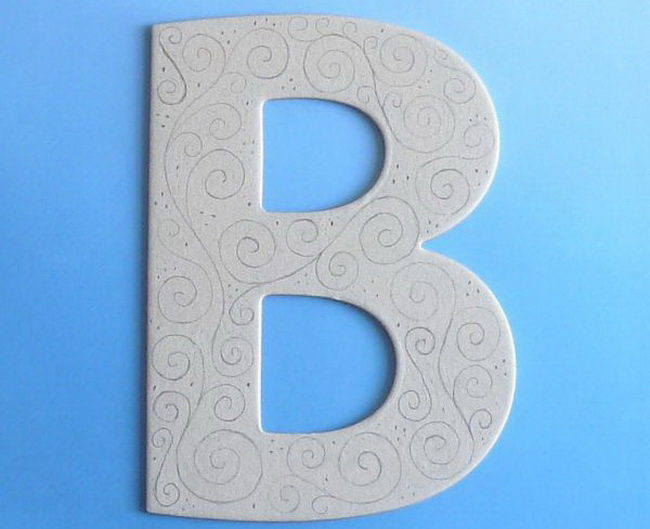
- To create a volumetric pattern, use hot glue. When solidifying, he forms a thick layer. Gently apply it to the template according to the lines. Let it dry. If you want a more voluminous pattern, then make a second layer of glue.
- Do not forget to put the points between the lines. But they should not be too close to each other, as a place for foil is needed.
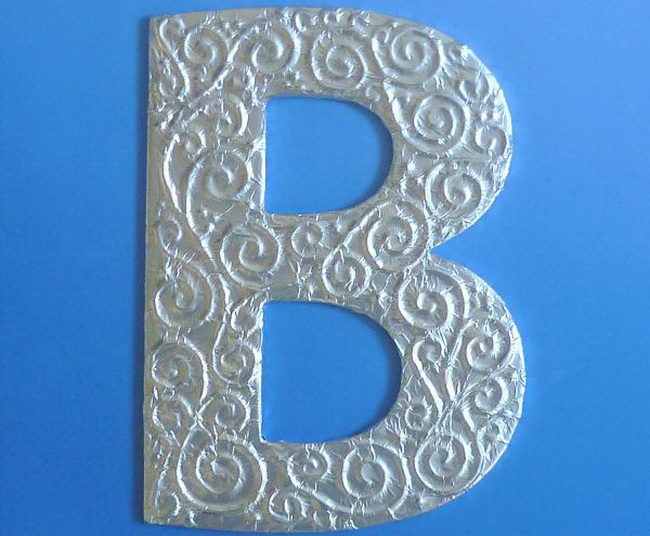
- Cut a large piece of aluminum foil. She must completely close the figure. If the width of the roll is not enough for the size of the letter, then visually divide the workpiece in half. For each half, cut the foil.
Advice. Do not wrap the letter with pieces of foil. The edges will peel off over time. You can use foil itself upstairs - matte or glossy.
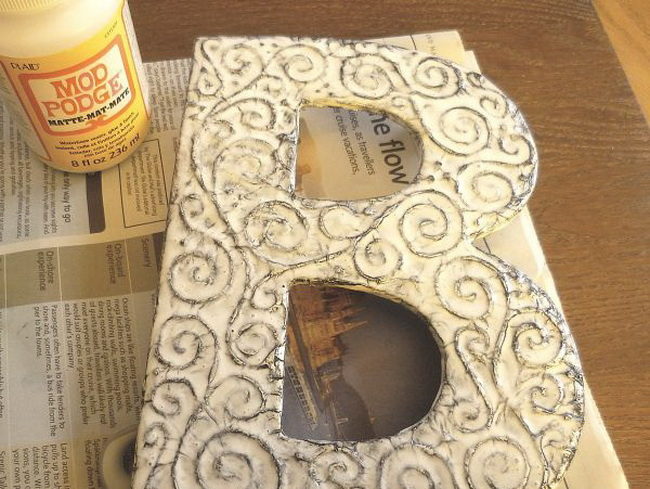
- Light the letter with PVA glue. Pay special attention to recesses near the picture so that the foil can stick in these places. Attach foil to the letter and press your hands to the curls. Gently wrap the edges on the back of the cardboard.
- In the back of the letter, glue the foil in the same side as on the front. But at the same time, do not wrap the excess part along the cutting lines of the cardboard, but cut it.
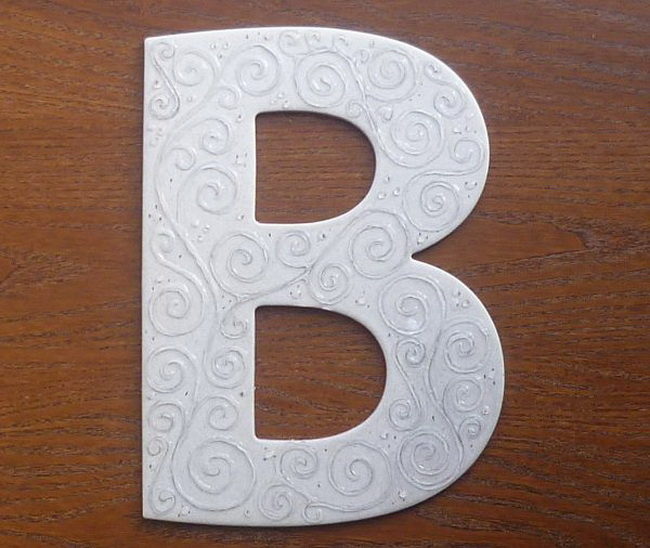
- To give the texture of the volumetric letter use a regular shoe cream. Using soft fabric, apply it to the pattern. At the same time, slightly push the foil with a cloth. If you have applied a lot of funds, then you can remove it, as the cream dries slowly.
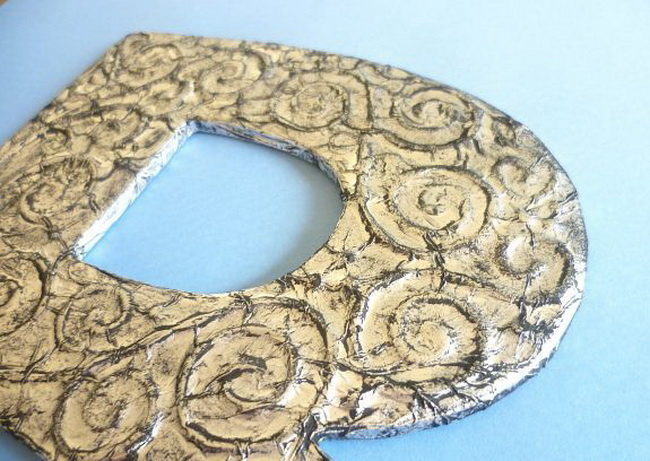
- On top of it, smear the thick layer of the finish varnish, which is used for decoupage. It will fix the cream on the figure and give the letter a flat surface.
Advice. Work first with the facade of the letter, and after completely drying out the product with the back. So you do not lubricate the pattern from the foil.
- Before using the volumetric letter, give the varnish completely to dry. It will take you about 3-4 hours, depending on the layer of the product.
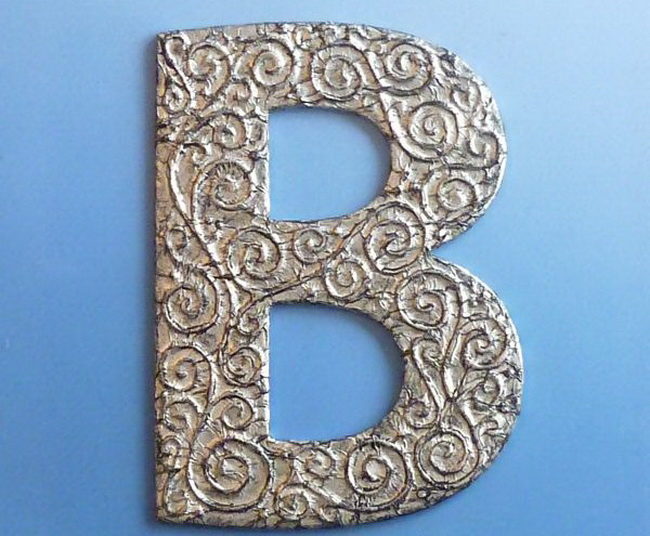
- There are 2 methods of applying the cream: only on the convex part of the letter (drawing) or on an even surface. As a result, you will get two letters with different textures.
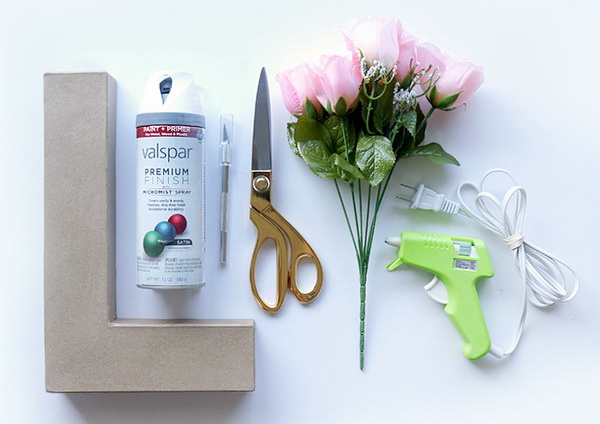
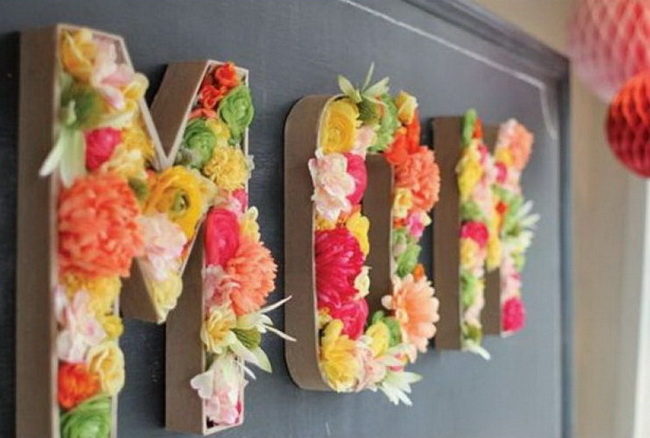
How to make volumetric letters for a wedding with flowers
You can diversify the interior or background for photographs using volumetric letters. For weddings, both living and artificial flowers are used. Therefore, you can combine these 2 types of decor. How to do it? Read further.
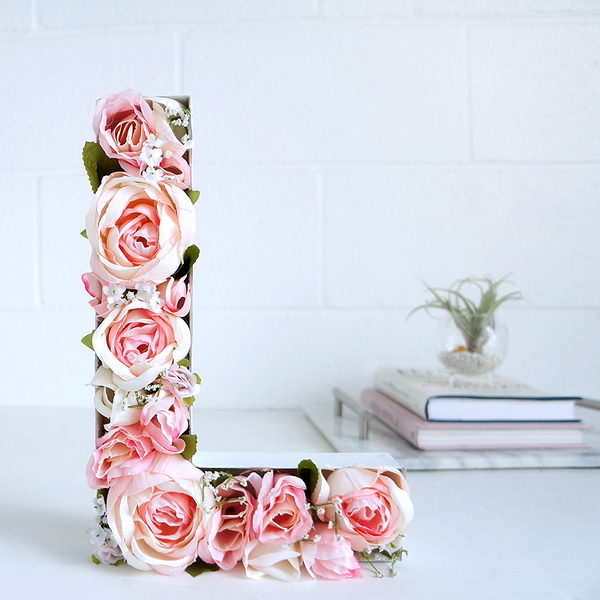
Option No. 1: Volumetric letters "Artificial flowers"
Large letters with artificial decor are stored for a long time. You can also use it when decorating a room for a holiday.
Materials for work:
- any artificial flowers;
- glue gun;
- scissors;
- cardboard letter;
- paint in the aerosol.
Production of volumetric letters:
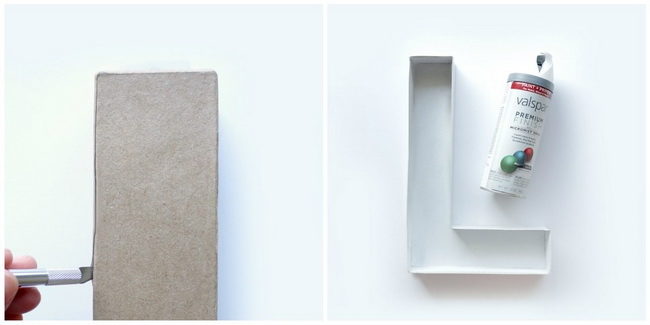
- If you have a finished letter from cardboard, then carefully cut the upper part of the figure. Or do volumetric letters according to the templates with your own hands, but do not glue the second facade of the letter on top.
- Apply paint to the workpiece from all sides. Pay special attention to bends. Let the product dry thoroughly. Or glue the figure with corrugated paper.
- Divide a bouquet of artificial flowers into inflorescences. Cut the buds from the stems. Turn the flower over and apply a large amount of glue to it.
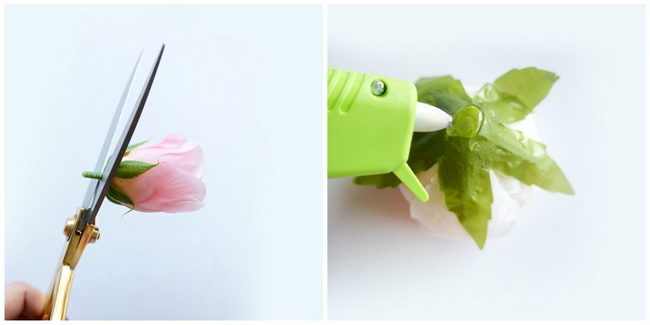
- Glue the bud at the bottom of the workpiece. Press it with your hands so that the glue froze. If your flower height is less than the width of the side of the letter, then cut it.
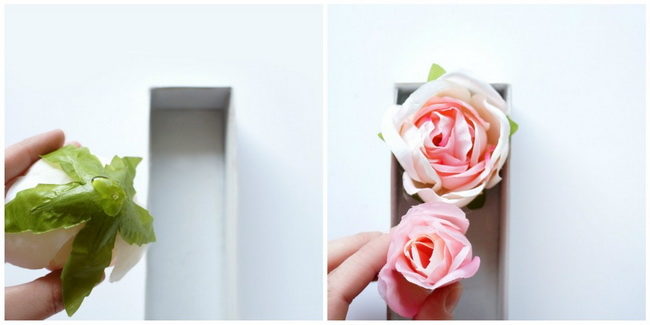
- Start glue the decor from large buds, then place the smaller diameter flowers between them. Fill the free distance between them with leaves and decorative branches.
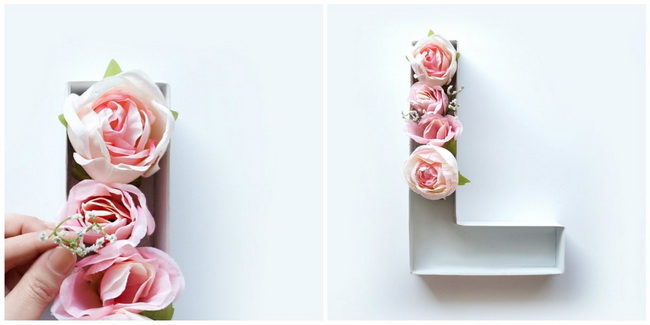
- Make all other letters in this way. This decor will not only decorate your wedding, but also revive the interior of the room.
Option No. 2: Volumetric letters "Free flowers"
The composition with fresh flowers looks very tender on wedding photo shoots. You can do it with your own hands, but you need to act quickly, since the plants dry out.
Take such materials and tools:
- fresh flowers with different diameters of buds;
- cardboard, knife;
- scissors, second -hand;
- paint and brush;
- oasis;
- plastic bag;
- paper towels;
- water container.
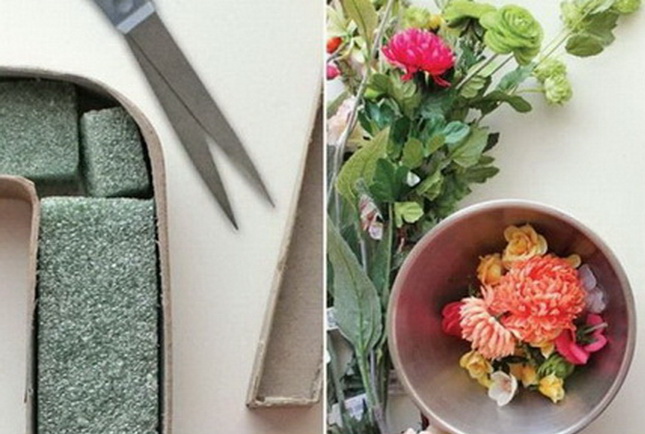
The production scheme of volumetric letters:
- You will also need a workpiece without the upper part of the cardboard. Paint it with acrylic paint and let it dry. Cut the inside of the figure with a bag, cut excess material, glue the edges. Instead, you can use a cling film.
- In order for the flowers to remain fresh for a long time, the florists use an oasis. This sponge that absorbs moisture and then saturates the plants with it. Cut the oasis into parts according to the letters. Complete it in cold water for an hour and a half.
- Then take it out of the water and transfer it to a paper towel. It is not necessary to squeeze a floristic sponge. Excess water itself is draining and absorbed into the paper. Gently transfer the oasis into the form.
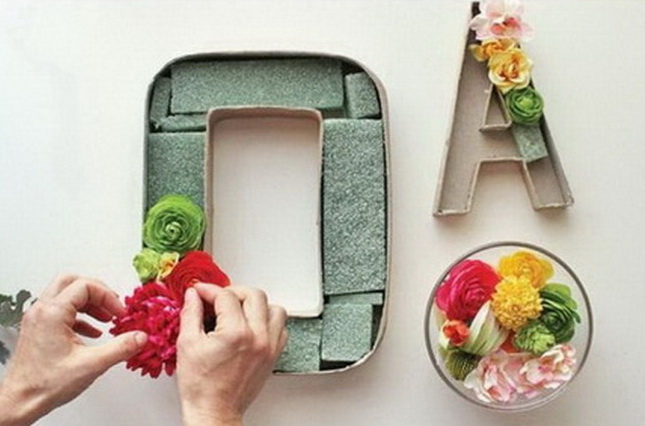
- In the colors, cut the stems, but leave 2-3 cm to saturate with moisture. Stuck each bud in the sponge over the entire area of \u200b\u200bthe letter. You can also use twigs and other additional ones.
- Put the finished composition in the refrigerator on the lower shelf and take it out in front of the ceremony. So the flowers will remain fresh longer.
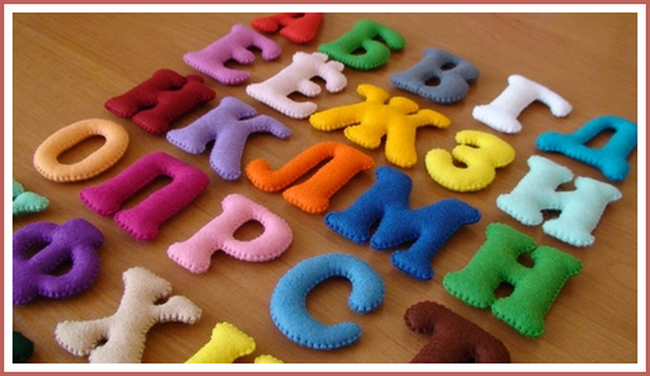
How to make volumetric letters alphabet
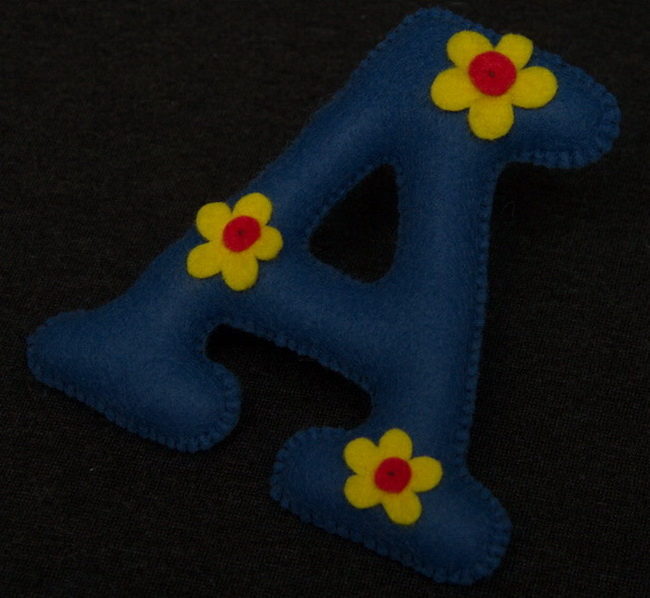
Large letters can be used not only for photo shoots, but also for playing with children or decorating a room for a room. As the basis of such figures, use soft felt. For kids it will be a toy, but at the same time you can learn the alphabet.
For work, prepare the following materials:
- thin felt of different colors;
- synthetic winterizer or other filler;
- thick threads;
- chalk or soap;
- office paper;
- pencil, scissors.
Master class on making letters with photos:
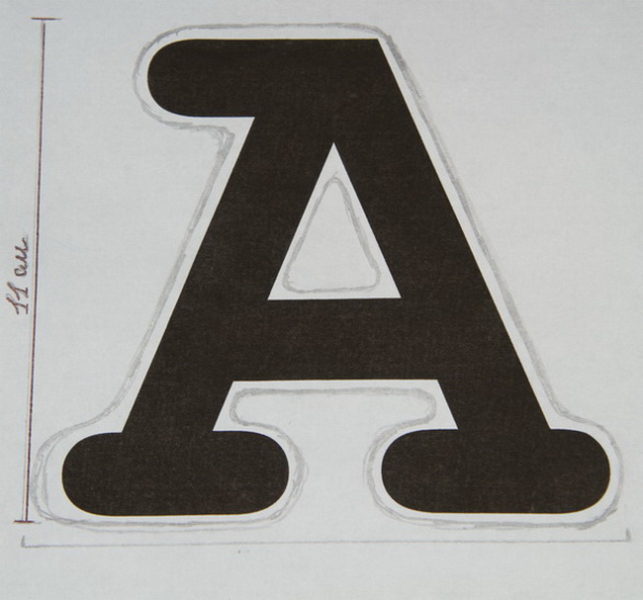
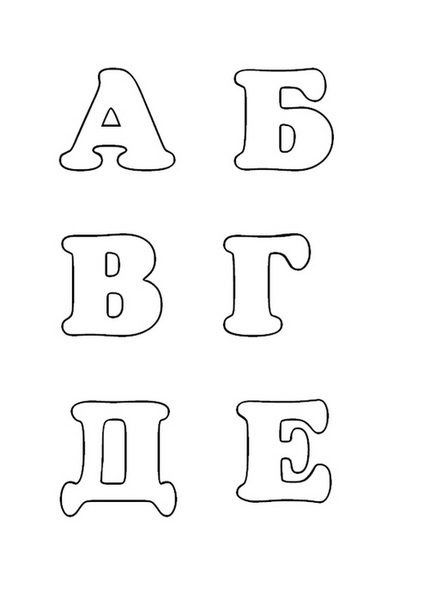
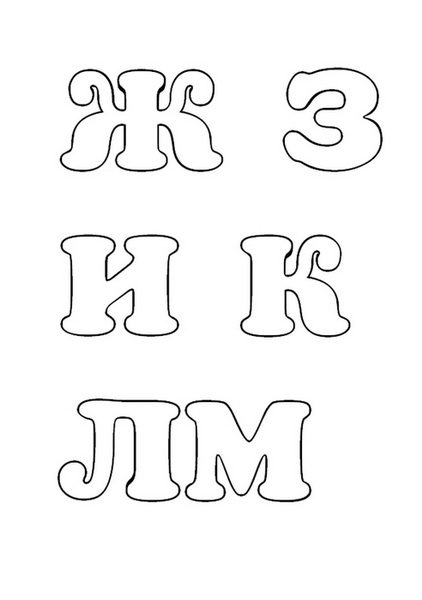
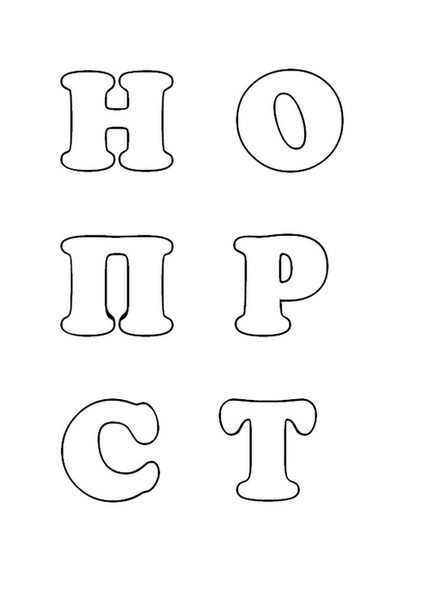
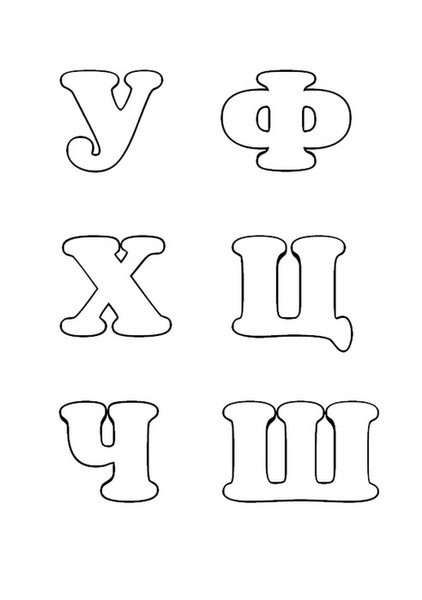
- Many mothers are interested in the question: how to draw volumetric letters for the alphabet? The technology for manufacturing templates is very simple. Choose the letter size convenient for the child. Depending on it, dial signs on the computer and print. The edges of the figures are rounded. Additionally, add 0.5 cm on the sheet for the seam and cut the workpiece.
- Attach the template on the felt. With the help of chalk or soap, outline the contour of the figure. Do not use a marker for this. It will not be washed off and will be visible on the material.
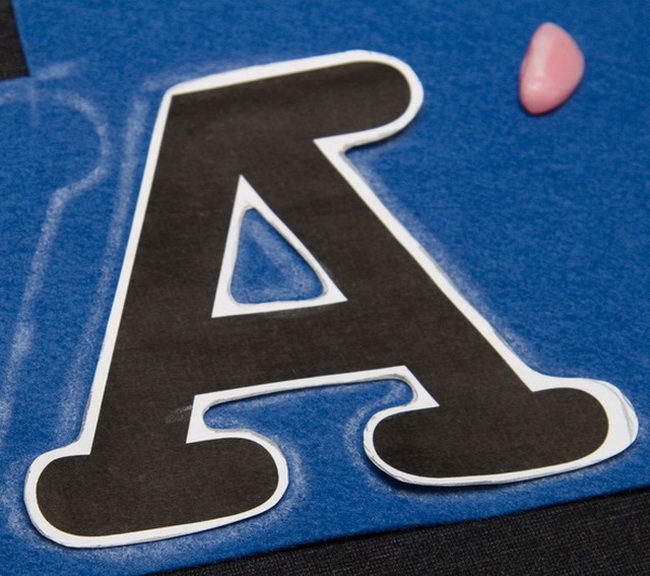
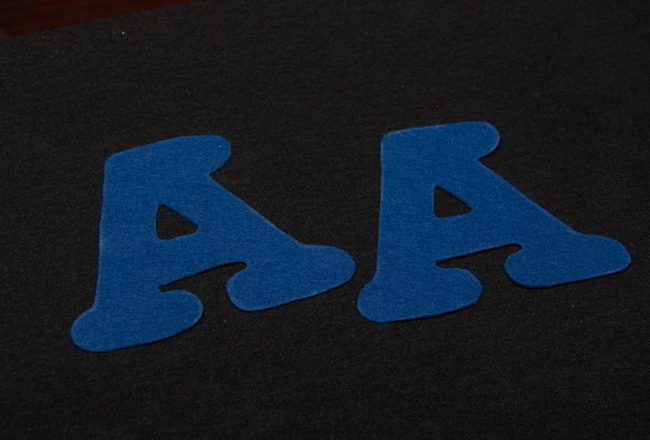
- For one letter you will need two identical felt blanks. Cut them from the same color.
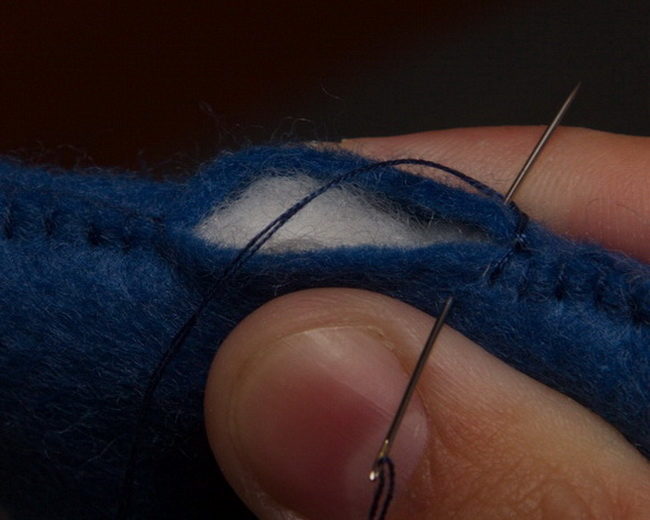
- If you want the letters to decorate a large line, then use a thick thread. Pass it into a needle and start to sew the letter. Do this from the middle, and hide the knot on the inside of the workpieces.
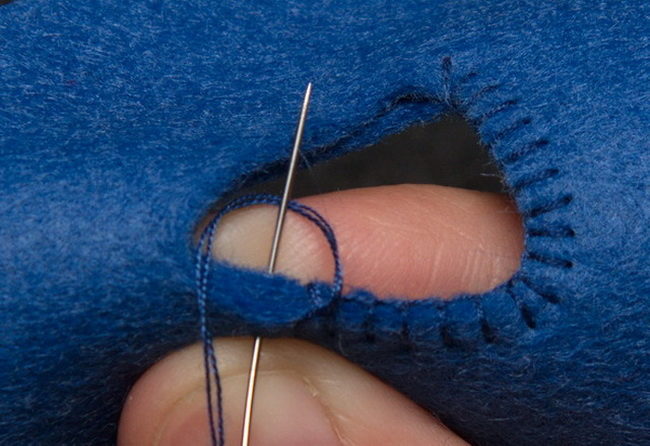
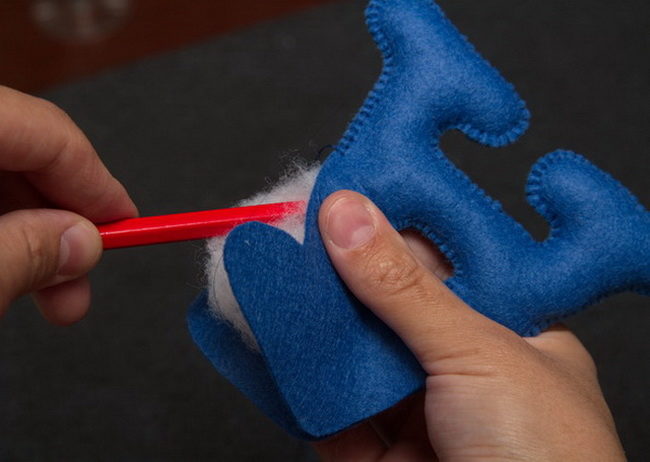
- Go through the top throughout the edge of the letter. Leave a small hole at the end. Through it, fill the figure with a synthetic winterizer. For convenience, use a simple pencil.
- Free sides on the felt. So that the knot is not visible, pierce the needle from the seam in the middle of the figure and cut the thread.
- Additionally, you can cut out figures and flowers for decorating letters. If you plan to use the letters to decorate the room, then sew a loop.
- For convenience, use the following volume schemes:
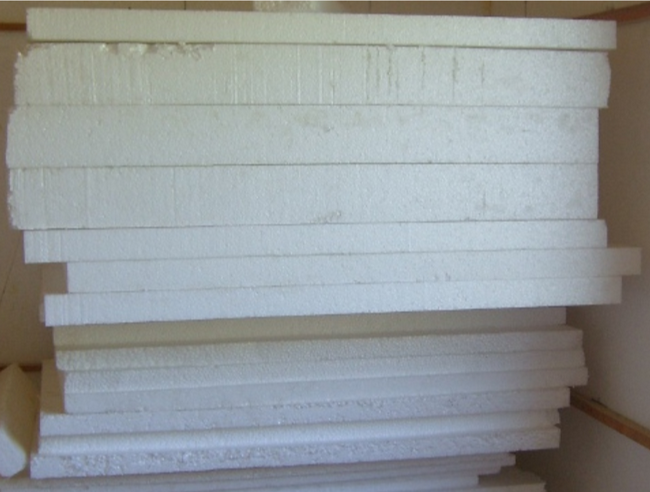
How to make volumetric letters from foam
The advantages of letters of foam are several: simplicity in work, cheap material and figures keep their shape for a long time. Making volumetric letters from it is much easier than gluing a cardboard frame.
List of materials:
- foam sheets;
- pen or marker;
- ruler, sharp knife;
- thick paper;
- small sandpaper;
- pVA -based glue;
- newspaper or thin parchment;
- acrylic paint, brush.
Work instructions:
- Buy foam in the sheets. You can find it in construction stores. Choose forms that suit you in thickness. If there are no such, then you will have to glue a few sheets.
- Draw a template first on a sheet of paper. So you can correct it, which will be difficult to do with polystyrene. Transfer the letter scheme to the material. For convenience, divide the sheet into several parts by the size of the workpieces.
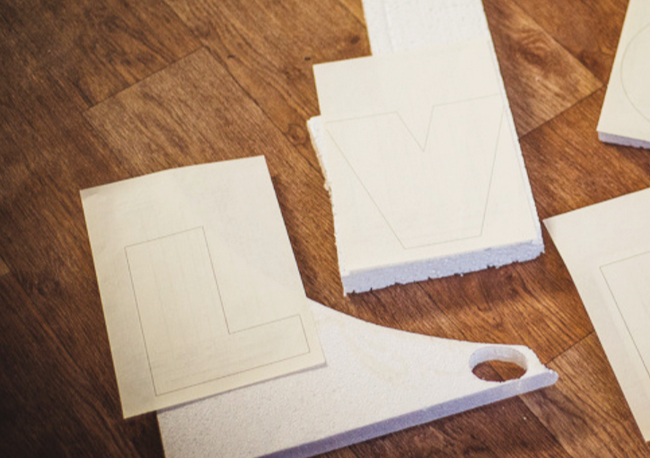
- Cut the figures from the foam with a clerical knife. Use a metal ruler to help yourself - move the blade along it. So the knife does not jump in the wrong direction.
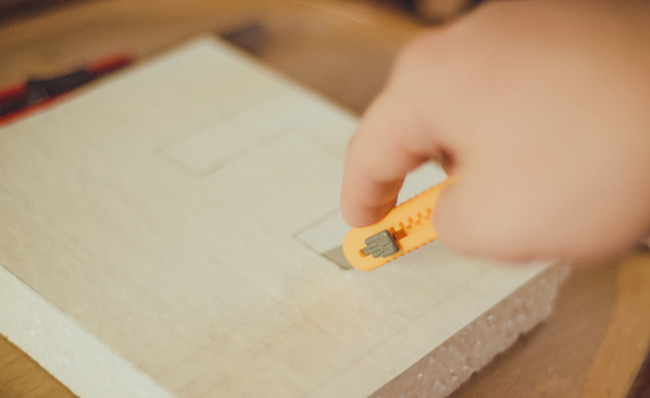
- On the line of the cut, it is necessary to treat with sandpaper. Choose it with small grains to make the surface uniform. Brush the excess fluid scraps with a brush.
- To decorate the letters, use newspaper paper or thin parchment. Pick them into small pieces, apply glue on them and fix them on the foam. For this material, super-clicks and adhesive pistol are not suitable.
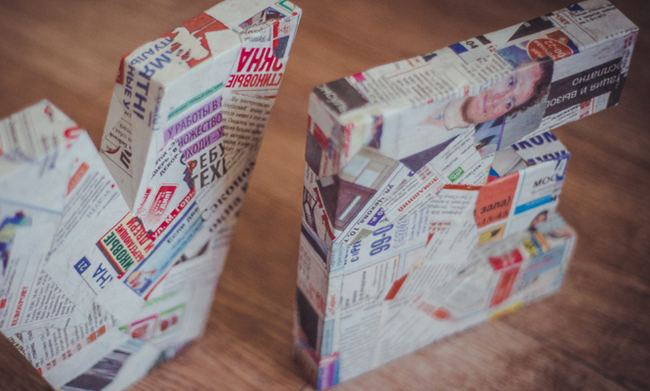
- After you have glued the entire surface of the figure, leave the glue to dry. Additionally, the surface is not necessary to primer, since the glue acts in its role.
- Now you can apply acrylic paint. If the layer is transparent, then paint the letters again. But just do this after the first layer is completely dry.
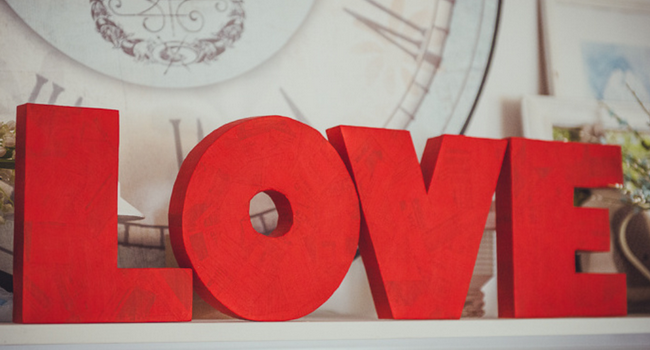
- You can leave the figures in this state or decorate them with ribbons, beads, as well as artificial colors.
As you can see, there are a lot of ways to make volumetric letters. If you make such a decor with your own hands, you can not only decorate the interior or revive the photo shoot, but also save on the original design.
How to make volumetric letters from concrete watch the video
Another master class on PVC volume letters See here:


Comments
a couple of years ago, there was no side of metrogils from the same problem, there were no side effects ...
I’m not a fan of peeling at all, it saves from acne of metrogil, it also smoothes it ...
Great article! ...
I take the second course of the Capsules Climafite 911. The tides went very quickly. It became calmer, irritability went away and I sleep well ...
i also noticed - it is worth nervous, everything immediately affects the face. Therefore, I try to avoid conflicts and unpleasant people. Of the creams, I like Miaflow from wrinkles - smoothes not only small wrinkles ...