

Knitted manicure or the effect of a sweater on the nails is a popular option for nail design that looks unusual and original. We are used to the fact that the difficult design on the nails should perform professional masters in the cabin, but it is quite possible to make knitted manicure independently at home. Simple lines imitating the sweater pattern will not require outstanding artistic abilities, although the ability to handle gel polish will come in handy. But even if you first decided to realize a conceived design with your own hands, a knitted manicure is a good simple option with which you can start. From this article you will learn how to make knitted manicure at home and which design is better to choose for the coming spring.
Content
Is it difficult to make knitted manicure yourself
It is not difficult to do knitted manicure with your own hands, especially if you already have experience using gel polish at home. If you have never tried to make a manicure with a design yourself, it's okay - with proper zeal, the result will turn out to be no worse than experienced craftsmen.
If you are not too confident in your abilities, for the first time you can try to make a design resembling a sweater using a conventional varnish, not a gel. You will not get the effect of a volumetric pattern, but you will train to remove even lines on your nails. Due to the small area of \u200b\u200bthe nail, this is not easy. In addition, it is always difficult to draw with his left hand on the right when it comes to creating a manicure on his own.
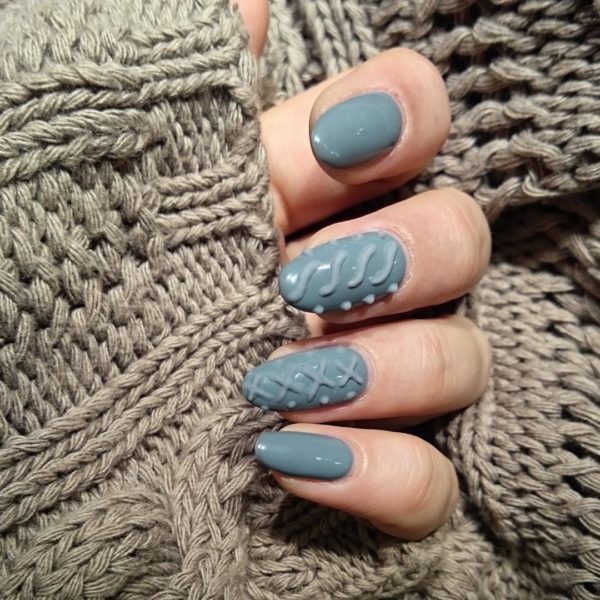
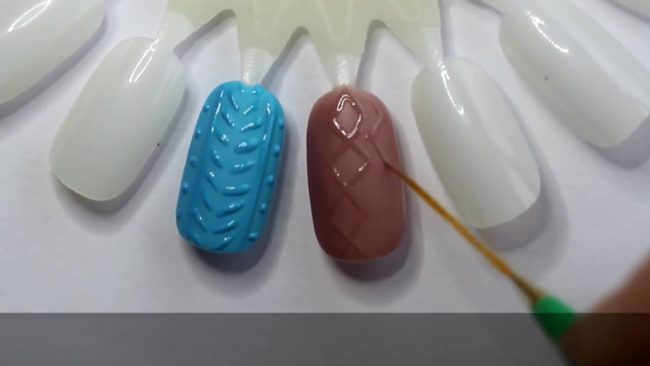
The whole charm of a knitted manicure is that it looks good, even if it is not done too carefully. The ornament in the photograph, consisting of rounded lines and crosses, is made imperfectly, but small flaws only give it identity.
If you decide to perform a manicure with the sweater effect yourself, these are a few rules that will help you achieve the highest quality result:
- The shade of the main varnish and varnish with which you perform the pattern must match. This will give the same ZD effect and allow the nails to look really like a winter sweater. In some cases, if you want to diversify the ornament, you can add other colors that are combined with each other, but then the impression of the manicure will be slightly different - it may look like a color ornament than as a texture of a knitted pattern.
- Do not cover with gel unprepared nails. First you should make a classic manicure: remove the excess cuticle and treat the nail plate with a file so that it is smooth. It is also worth degreasing the surface of the nail-this will allow the basic layer for gel polish to clarify tightly from the nail plate, and your manicure will last longer.
- A manicure with a sweater effect can be performed in different techniques-draw patterns with gel polish, add velvet sand or acrylic powder. In the choice of technology suitable you should proceed from your experience in an independent nail design. If you are a newcomer in this matter, the easiest way will be a manicure using only gel polish. If you already know how to make a coating on your own nails, you can try velvet powder or acrylic powder. They will allow you to play with the texture and make more complex professional patterns.
What materials you need to create a knitted manicure:
- Gel polish. His most popular brand is shellac, which is mainly found in stores. It combines the quality and reasonable price, and is also perfect for an independent manicure at home. Also, under the gel varnish, a basic coating and top will be required.
- Laming lamp. It can also be purchased at a specialized store or order on the Internet.
- Velvet sand is useful for those who want to give the manicure a rough soft texture similar to real fabric. When you apply it to the gel polish, it will clarify it tightly with it, which will make such an original manicure no less durable than the usual coating.
- Acrylic powder is a universal remedy for creating volumetric patterns on your nails. Of course, you can apply a pattern and gel polish by making several layers, and get an equally beautiful knitted pattern. However, with acrylic powder, this will be easier and faster, and the lines will be even more convex, providing a full -fledged ZD effect. In addition, acrylic powder is ideal for creating thin lines and drawing small details-you cannot achieve this, applying patterns only gel polish. Acrylic powder is colored and transparent. If you want to purchase color, make sure that its shade coincides with a shade of varnish. If you cannot choose perfectly suitable tones, it is better to take transparent.
- Thin brush. Any artistic brush is suitable, its diameter should be chosen depending on the desired pattern.
- Pusher. With it, you can remove the unnecessary remnants of acrylic powder or velvet sand from the nails after the completion of your manicure.
Choosing a knitted manicure design
In vain, some believe that knitted manicure is relevant only in winter. Often, additional ornaments are added to it, suitable for the New Year holidays, or perform a manicure in a blue-red color scheme. However, if you avoid such cliches, a manicure with a design resembling a sweater will fit perfectly into the spring image.
If you are going to make a manicure using acrylic powder or velvet sand, the choice of varnish color will be very limited. Try to choose powder or sand in the same store as varnish, so that you have the opportunity to compare shades. In rare cases, different colors are used for the background and patterns, but then the sweater effect will not be so obvious - rather, such a design will be like just colored volumetric ornaments.
What lines are usually used for knitted manicure
- A straight vertical line is often used in knitted manicure. Usually they make two straight lines on the sides so that they framed a pigtail or any other main pattern. Despite the apparent simplicity, the vertical line requires great accuracy and accuracy. It is worth training in advance on a sheet of paper, but even if you have achieved the desired result, it will be much more difficult to draw a line on a slightly rounded nail plate.
Take your time and do not interrupt the line - it may look sloppy. Try that the lines drawn by the right and left hand turn out the same in width. Keep the Pusher close to, in case of error, quickly adjust the line without waiting for the drying of the pattern.
- Kosiki is one of the most popular patterns for a sweater effect. To depict them is quite simple, although, like any ornament, they will require accuracy and clarity: after all, all the elements of the pigtail should be the same in length, width and tilt.
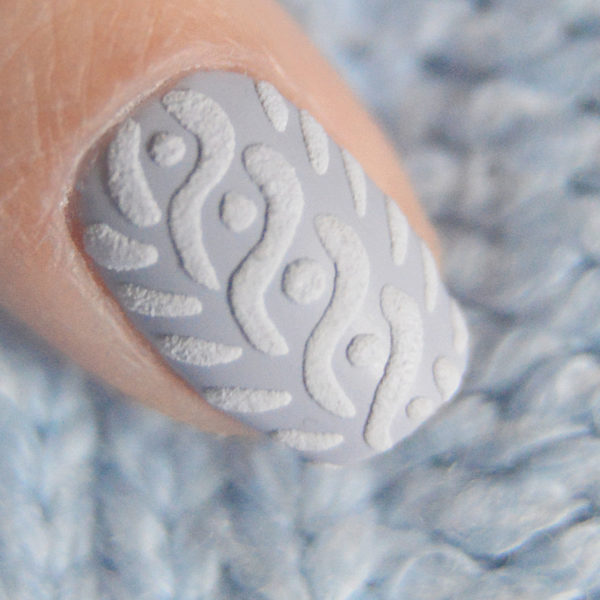
The easiest way to depict a pigtail is to draw repeated inclined curls. If you are not sure of your accuracy, you should make curls wide enough - so small defects will not be noticeable.
Also, a pigtail can be portrayed from two interwoven lines-it is worth trying to do this to those who already have experience in an independent nail design. This option is a little more complicated, because it is usually performed with the thinnest brush, achieving the most small elements of the pattern. You can’t do without acrylic powder. In addition, braids from interwoven lines forming ellipses are suitable for long and medium nails. If your nails are too short, the pattern there simply will not fit there and it will not look good.
- Dishene. This option is especially relevant in winter, but if you perform it in juicy cheerful colors, you will get an original design suitable for spring. It is relatively easy to make it. Due to the fact that the lines are short and straight, they are easy to repeat in the ornament, and, if you were mistaken, the length can be adjusted. The main thing is to follow the angle at which you draw lines. Usually, a pattern of a liner is made in the direction from the base of the nail to the tip, although you can do the other way around.
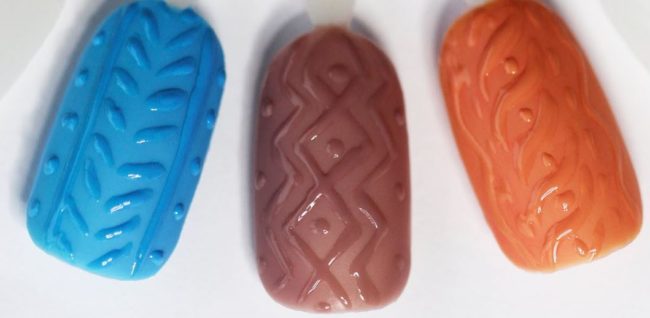
- Rombs are another popular print for the design of the nails that simulates a knitted sweater. This option can be considered by girls with long nails or nails of medium length. Try to imagine the size of your rhombuses in advance and correlate them with the length of the nail. You should fit at least three rhombuses so that the pattern is beautiful and understandable. You can complete such a pattern either in the middle of the rhombus, or at the end-depending on this, the pattern will look a little differently.
- Points are usually placed on the sides of the nail plate, creating a peculiar frame for the pattern. It is not difficult to make them, but it is better to use acrylic powder: points affixed with gel polish can turn out to be slightly blurry and lubricated. Also pay attention to the overall impression of the pattern so that your combination of ornaments looks harmonious. The points are small elements, and if you place them on the sides, in the middle your lines of your patterns should also not be too wide.
- Zigzags. Making them is quite simple, but not always they definitely send us to a knitted pattern. It is worth taking them as an additional element for pigtails or rhombuses. As one of the variations, you can also make a vertical wavy line. Zigzags and waves are an excellent replacement for straight lines for beginners, because drawing them is much easier.
- Crosses are less common, but they look excellent and great for beginners in nail design. Making them is quite simple, both with the help of acrylic powder, and with a simple gel polish.
It is worth making sure that each cross is even and that they are all about the same width. If you are mistaken, it will not be difficult to adjust the picture. Pay attention when working with gel polish that the volume of the pattern depends on the number of layers-if you are imposed on the cross-steam lines, you can get a strongly protruding middle. Therefore, when you draw a second line in a cross, it should be interrupted in the place of the first.
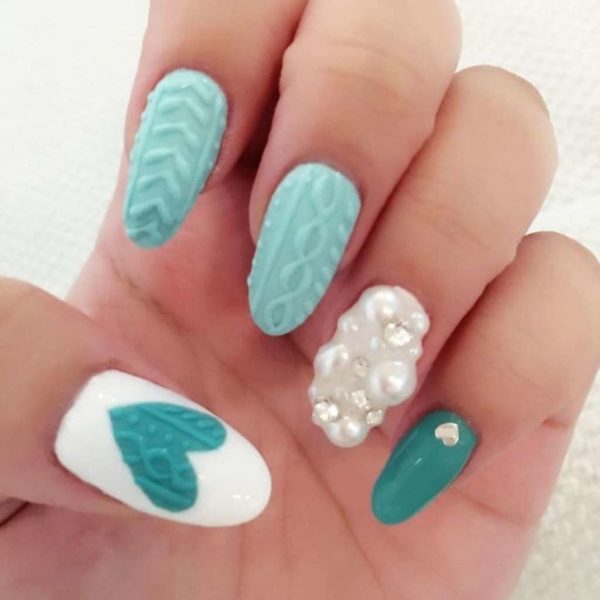
- The hearts do not quite fit into the knitted manicure and certainly not its integral part. Nevertheless, with a manicure depicting a sweater, they are perfectly combined. It is unlikely that you should combine hearts and knitted patterns on one nail, otherwise the design will be too saturated and urgent. But it is quite possible to make a heart or several on one of the nails. Hearts are large spots compared to lines, so it is the easiest to draw them, even beginners in independent manicure will easily cope the first time. When performing them, you can use acrylic powder, velvet sand and just gel polish. Also, for hearts, you can choose the same color as the main varnish and any other that forms a beautiful combination.
- Bows are also not directly related to knitted nail design, but it is perfectly complemented. They can be arranged both in the center of knitted patterns, and separately on one of the nails. Bows can be drawn with enough thick lines, this can be done with the help of exclusively gel polish, and this option is well suited for beginners. If you want to make thin lines, you should use acrylic powder and draw a bow especially carefully. In the new season, gold or silver bows will look very relevant. They will also create an interesting contrast with knitted ornaments.
Knitted manicure in the photo on long nails
It is no secret that on long nails any manicure looks good. And although modern fashion puts practicality in priorities and allows you to maintain medium and short lengths, long nails always remain relevant, as the embodiment of femininity and grace.
In knitted manicure, most ornaments go vertically, and this once again visually lengthens the nail. Owners of long nails can afford almost any patterns from the list. Also on long nails you can depict a knitted texture with a fragment, as you can see in the photo on the thumb.
Creating a similar design is not as difficult as it seems-first you need to draw a heart with gel polish, and then apply patterns on it. It is better to use acrylic powder, because the details of such an ornament will inevitably be pretty small. This original design version is best used in combination with ordinary knitted manicure, otherwise your idea may be incomprehensible.
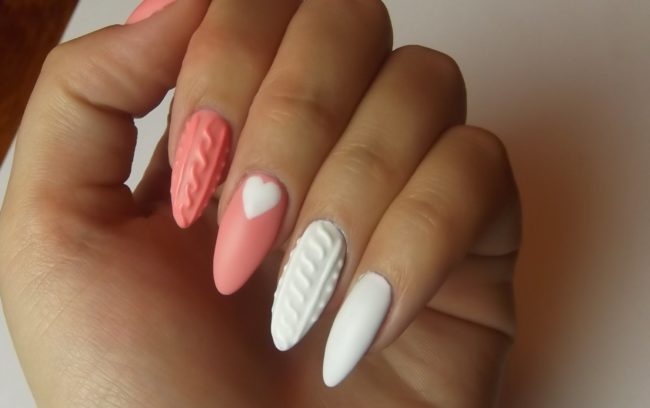
To make a manicure look more unusual, combine it with monotonous nails without an ornament or with other drawings. In this photo you see the original option in white and pink - this combination is perfect for spring. Such pigtails look great on long pointed nails, emphasizing the shape of the nail plate.
Knitted manicure in the photo on nails of medium length
Almost any patterns should fit on the nails of medium length. If you want to visually lengthen your nails, you should choose a combination of several vertical lines, and if the length suits you, you can stretch the pigtails along the width.
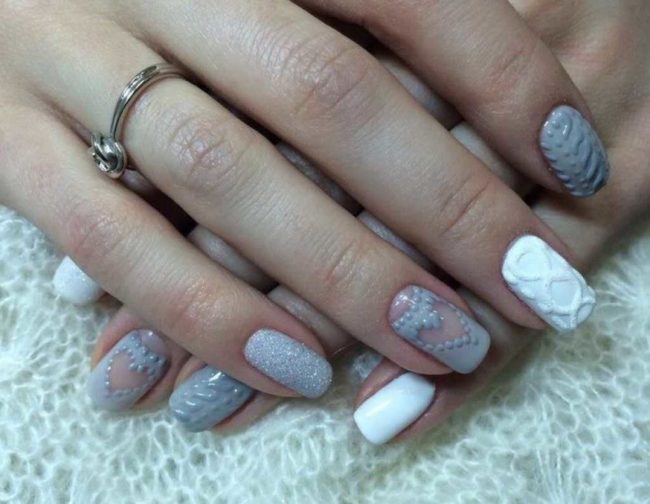
On the nails of medium length, even a combination of several ornaments can be fitted - for example, a hole, heart and voluminous lines from points. A combination of smooth -coating ornaments, and simple colors with a shiny texture, also looks great. Such a variety will help make the design of a knitted manicure in 2017 even more relevant for spring.
Knitted manicure in the photo on short nails
Knitted manicure is suitable for short nails - it looks even more cute and comfortable at them. It is better to use thicker lines and choose simple ornaments so that the pattern is not too full of small details and can be well traced.
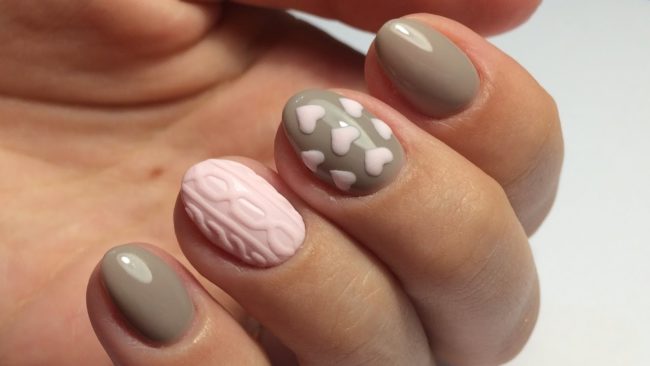
The design that imitates a sweater is a great way to diversify even ordinary manicure - just cover only one nail with knitted ornaments, and your hands will look stylish and original.
How to make knitted manicure step by step
Knitted manicure gel polish
When choosing a knitted manicure, it is worth giving preference to gel polish. With ordinary varnish, you can apply only a flat pattern, and gel polish will achieve a 3D effect-the very voluminous braids that so resemble knitted patterns. You can get the desired volumetric result both with the help of exclusively gel polish, and combining it with other means.
So, for starters, let's look at the way of creating a knitted manicure using gel polish, without any additional means.
- Apply a basic coating for gel polish on your nails. Dry under the lamp for one minute.
- Apply one gel polish layer and keep under the lamp for two minutes. Then apply the second layer and also dry for two minutes.
- Take a thin brush and apply patterns on your nails - rhombuses, stripes, pigtails or ovals. To get the sweater effect, the patterns must be the same shade as the main color of the nail. Apply these patterns 3-4 times sequentially, drying each time-so you can achieve the right volume.
- Cover the nails with a top and dry again. Your manicure is ready.
Knitted manicure using velvet sand
For this manicure, you will need velvet sand and a fur - a special scapula for manicure. You can purchase them in any professional store.
- Choose a suitable shade of gel polish, it must completely coincide with the color of velvet sand.
- Apply and dry the base coating under the lamp.
- Apply two layers of gel polish, dried each in series.
- Cover the nails with a top and remove the sticky layer.
- Using gel polish and thin brush, apply a pattern you need to your nails. Just as in the first case, it is worth performing several layers.
- Sprinkle the pattern with a thin layer of velvet sand using the Pusher to distribute it along the pattern.
- Dry your nails under the lamp for three minutes.
- Remove the excess velvet sand, which was beyond the borders of the pattern. Due to the fact that you covered your nails with a top in advance, you can easily do it with a brush or cotton pad. Repeated coating with a top is not required - this will make the pattern less distinct and smooth out the velvet texture.
Knitted manicure using acrylic powder
Unlike velvet sand, the acrylic powder is smaller and will allow you to draw thinner lines in your ornaments.
- Apply the base layer and dry it.
- Apply two layers of the gel polish you need, drying them sequentially.
- Apply the top to the nails and remove the sticky layer.
- Perform the drawing with gel polish several times, drying each layer.
- Pick up acrylic powder. Most often, they use transparent, but you can choose color, which is suitable for tone of nails. Sprinkle your nails with powder.
- Dry your nails and remove the rest of the powder. As with the use of velvet sand, the repeated coating of the top is not required here.


Comments
a couple of years ago, there was no side of metrogils from the same problem, there were no side effects ...
I’m not a fan of peeling at all, it saves from acne of metrogil, it also smoothes it ...
Great article! ...
I take the second course of the Capsules Climafite 911. The tides went very quickly. It became calmer, irritability went away and I sleep well ...
i also noticed - it is worth nervous, everything immediately affects the face. Therefore, I try to avoid conflicts and unpleasant people. Of the creams, I like Miaflow from wrinkles - smoothes not only small wrinkles ...